|
Menu Bar |
|
MENU_BAR ctl_id,menu_def$
MENU_BAR { REMOVE | DISABLE | ENABLE | ON | OFF } element [$]
MENU_BAR GOTO
MENU_BAR READ var$
MENU_BAR CLEAR
MENU_BAR RESET
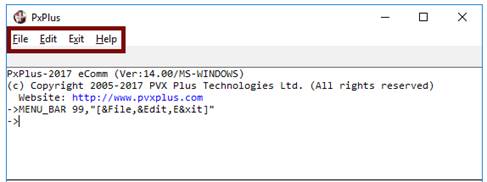
Use the MENU_BAR directive to define and control the menu bar options across the top of a window/panel. Top-level menu items, sub-menus, subordinate entries, hot keys, and menu images/icons can all be defined using this directive.
For syntax details, see MENU_BAR directive. For related functionality, see Popup Menu.
For information on defining a menu bar for a panel using the NOMADS Panel Designer, see Menu Bar.
The top level of the menu consists of a list of comma-separated entries enclosed in square brackets with each entry containing a unique selection character prefixed with an & ampersand used to identify it as a hot key.
Example:
"[&File,&Edit,E&xit]"
The MENU_BAR directive adds the Help menu bar option by default.
You can remove the Help menu bar option by specifying a dash immediately after the opening quote.
Example:
MENU_BAR 99,"-[&File,&Edit,E&xit]"
Sub-menus are identified by the hot key(s) used to open them, followed by a : colon and a list of subordinate entries enclosed in square brackets.
Example:
MENU_BAR 99,"-[&File,&Edit,E&xit],F:[&Open,&Close,&Print,E&xit]"
The text for subordinate entries may also contain tab characters ($09$) to separate additional item information such as alternate hot keys. You can include lines to separate items by inserting an additional comma between items.
Example:
MENU_BAR 99,"-[&File,&Edit,,E&xit],F:[&Open,&Close,&Print,E&xit],E:[&Cut"+$09$+"Shft-DEL,&Paste"+$09$+"Ins,&Format]"
Further sub-menus are identified by combining the higher level hot keys.
Example:
MENU_BAR 99,"-[&File,&Edit,E&xit],F:[&Open,&Close,&Print,,E&xit],E:[&Cut"+$09$+"Shft-DEL,&Paste"+$09$+"Ins,,&Format],EF:[&Word Wrap]"
Normally, when a user selects any of the items from a menu bar, PxPlus generates the ctl_id you assigned to the menu bar. You can return the selected menu item code in a string variable using MENU_BAR READ. For example, if the user selected Word Wrap from the above menu, MENU_BAR READ would return EFW.
It is also possible to assign specific CTL values to individual menu entries. To do this, append an = equals sign and the CTL value to any item in the menu selection list:
E&xit=4
Menu items can be disabled, displayed in bold, or show a checkmark by placing a "D", "B" or "C" after the = equals sign and before the assigned CTL value.
Example:
"[&One=1,&Two=BC2,&Three=D3]"
Items can also be enabled/disabled or checked/unchecked after the menu is created using the MENU_BAR DISABLE | ENABLE and MENU_BAR ON | OFF directives. See MENU_BAR directive.
Example:
MENU_BAR DISABLE "EP"
MENU_BAR ON "EFW"
To include images with each item in the menu, enclose the image name in { } curly braces and place it in the menu definition just prior to the specific item text. Use a leading ! exclamation point to identify the image as internal, or specify the relative path and file name to access an image file that is external. The first bitmap determines the dimensions used to display menu items (up to 64x64).
Example:
E:[{!Cut}&Cut"+$09$+"Shft-DEL,{!Paste}&Paste"+$09$+"Ins,,&Format]
Transparency options are also available. "T" indicates use of the upper leftmost pixel colour, and "G" means use colour RGB:192,192,192.
Colours may be applied to the left edge of the menu where images are displayed, as well as to the text background area. (Colours do not apply to the top level of the menu.) The LEFT(colour) and Fill(colour) parameters are used to do this. The colour for the left edge applies to the entire menu and is specified prior to the menu items. The text area colour may apply to the entire menu if specified prior to the menu items or to a specific item.
Example:
MENU_BAR 99,"-LEFT(YELLOW),FILL(RGB:255,255,192),[&File,&Edit,E&xit],F:[&Open,&Close,&Print,,E&xit],E:[{!Cut}&Cut"+$09$+"Shft-DEL,{!Paste}&Paste"+$09$+"Ins,,&Format],EF:[&Word Wrap=FILL(RGB:192,255,255)]"
To process a menu bar, you would trap its CTL value or the CTL value of an individual item. In the first case, you would then have to execute a MENU_BAR READ directive to determine which item was selected, then process as desired.
Example:
PRINT 'CS',
MENU_BAR 99,"[&File,&Edit,E&xit=4],F:[&Open,&Close],E:[&Cut,&Paste]"
WHILE 1
OBTAIN *
IF CTL=4 \
THEN BREAK
IF CTL=99 \
THEN MENU_BAR READ X$;
PRINT X$
WEND
END