|
PxPlus SQL Server Configuration (Windows) |
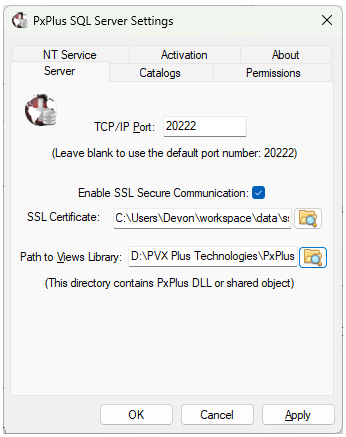
The PxPlus SQL Server is configured in Windows by using the PxPlus SQL Server Settings program, which can be accessed directly from the Windows Start menu or from the Control Panel under the Programs category. The PxPlus SQL Server Settings program requires Administrator privileges to run; therefore, click OK on the prompt asking you for permission. The default TCP/IP port number is 20222.
To enable SSL encrypted TCP/IP communication, click the Enable SSL Secure Communication check box and manually input or use the Browse button to select an SSL certificate file. The certificate should be in PEM format.
To use the Views System, the Path to Views Library must point to a directory with pvxwin32.dll in it.
(The Path to View Library setting was added in PxPlus 2018.)
(SSL support was added in version 8.00.0000/PxPlus 2024.)
To activate the PxPlus SQL Server, you must use the Serial Number, User Count, and ODBC Activation Key of your PxPlus Professional or Web license.
To run the PxPlus SQL Server in demonstration mode, leave the fields blank. The PxPlus SQL Server in demo mode will allow one user to access the server with demo messages appearing periodically on the client's screen.
As with most PxPlus products, valid activation information (Serial Number, User Count and Activation Key) must be recorded to activate the PxPlus SQL Server. If the activation is accepted, the configuration program returns a confirmation message when you select the Apply button.
It is possible to change the activation at any time. For example, an increase in the number of users on the system could require a new license and new activation values. The PxPlus SQL Server controls the number of concurrent client connections and denies access if the number of users is exceeded.
Because activations are only verified during the initialization process, the server must be restarted when a new activation is recorded.
The PxPlus SQL Server installation program checks the operating system, and it automatically sets it up as a service. On installation, the server's Startup Type defaults to Automatic, which means that the PxPlus SQL service will start automatically every time the system reboots and will run independently of any logged-on user. This setting is evident by the message displayed in the Service folder: "PxPlus SQL Service is running".
As with other services, the SQL service can be controlled (Stopped, Paused, etc.) using the Windows Services dialog, which is accessed via the Control Panel (in the Administrative Tools sub-folder). The PxPlus SQL service can also be uninstalled (and reinstalled) via the Service panel.
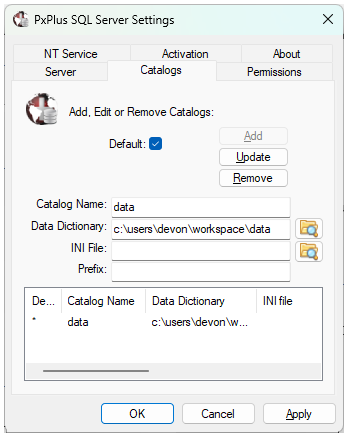
Define sets of data that the SQL server can access. The client will use the Catalog Name to tell the server what data it wants to access. A maximum number of 256 catalogs may be defined.
On installation, the default catalog is defined. Catalog definitions can be viewed/changed in the Catalogs panel of the PxPlus SQL Server Settings dialog:
This panel consists of the following:
|
Default |
Select the default catalog. If you set a default, it will unset the previous default. |
|
Add |
Adds catalog. |
|
Update |
Updates any changes to the catalog. |
|
Remove |
Deletes the catalog. |
|
Catalog Name |
Name of the catalog. The client will use the catalog name to specify what data to access. |
|
Data Dictionary |
Path to the providex.ddf file to which the client's DSN will have access. This entry is case sensitive. Click the Browse button beside the input field to select a directory using the Windows Select Folder dialog. Note: |
|
INI File |
Path and file name of INI file to which the client's DSN will have access. This entry is case sensitive. Click the Browse button beside the input field to select an INI file using the Windows Open File dialog. Note: |
|
Prefix |
Search paths to be inserted in front of all relative file references used in Data Dictionary or INI definitions. As of PxPlus 2018, Equals Sign and Asterisks substitution is supported. Use a comma as the separator between multiple prefixes. Maximum length is 1023 characters. |
(Catalog support was added in PxPlus 2018.)
(Support for up to 256 catalogs was added in PxPlus 2019.)
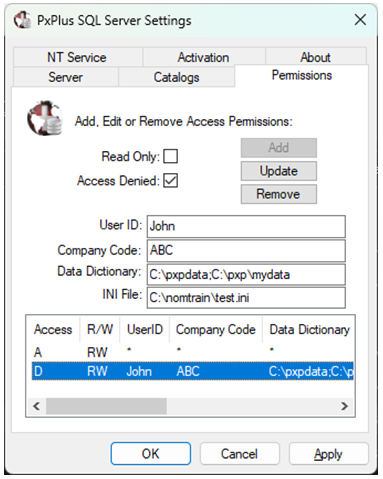
On installation, the server is set to default access permissions. These permissions can be viewed/changed on the Permissions panel of the PxPlus SQL Server Settings dialog:
In this sample screen shot, the server administrator has temporarily denied John access; however, John would still have Read Only access to directories, as all users of all companies may access any directory.
This panel consists of the following:
|
Read Only |
Select the mode of access permissions. |
|
Add |
Adds access permissions. |
|
Update |
Updates any changes to the access permissions. |
|
Remove |
Deletes the access permissions. |
|
User ID |
Specific User ID supplied by the client driver. An * (asterisk) signifies all User IDs. Spaces are significant. "John /"and "John/" are considered two different entries. |
|
Company Code |
Specific Company Code supplied by the client driver. An * (asterisk) signifies all Company Codes. Spaces are significant. "/ ABC" and "/ABC" are considered two different entries. |
|
Data Dictionary |
A comma or semi-colon separated list of paths to the providex.ddf files to which the client's DSN will have access. An * (asterisk) signifies that any data dictionary path is valid. This entry is case sensitive. Note: |
|
INI File |
Comma or semi-colon separated list of paths and file names of INI files to which the client's DSN will have access. An * (asterisk) signifies any INI file path and file name. This entry is case sensitive. Note: |
The default settings below grant users almost unrestricted Read access to the server's data sources. An * (asterisk) indicates any; therefore, for security reasons, you should reset the parameters based on your own business rules immediately following installation.
|
Setting |
Default |
Definition |
|
Access |
A |
Access allowed |
|
R/W |
R |
Read only |
|
User ID |
* |
Any users |
|
Company Code |
* |
Any company |
|
Data Dictionary Path |
* |
Any data dictionaries |
|
INI File Path |
* |
Any INI files |
The PxPlus SQL Server checks access permissions by searching the permission rules from the maximum restriction to the lowest one. It is a method to grant access to specific directories on the server based on a client's User ID and Company Code.
If the check for a specific User ID and Company Code fails, then the User ID is substituted with * (any) and the combination for User ID = any with Company Code = specific is checked against the corresponding rule if it is present on the system. The next check is performed for User ID = specific, Company Code = any, and the last check is for User ID = any, Company Code = any.
Refer to the following table:
|
Sequence |
User ID |
Company Code | |
|
1. |
Specific |
Specific |
Highest Restriction |
|
2. |
Any |
Specific | |
|
3. |
Specific |
Any | |
|
4. |
Any |
Any |
Lowest Restriction |
The About panel displays Version information about the SQL Server and OpenSSL version.
(SSL support was added in version 8.00.0000/PxPlus 2024.)