1.
Double-click on the installation program that was downloaded to your computer to begin the installation process. This launches an Install Wizard similar to the PxPlus installation.
2.
Click Next > to continue. Read the license agreement, then click the I accept the agreement button, then click the Next > button to continue.
3.
Optionally enter your user name and company name, then click Next > to continue.
4.
For the PxPlus SQL ODBC Local/Client Driver, you then must select either a server side licensing or client side licensing installation type.
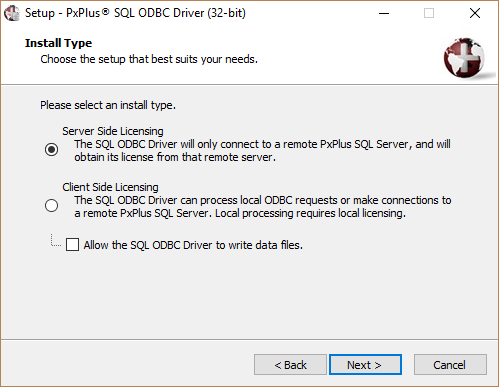
You must set the Allow the SQL ODBC driver to write data files check box if you selected client side licensing and need to have write access. This is not necessary for server side licensing because the write permissions are set by the server for that installation type.
5.
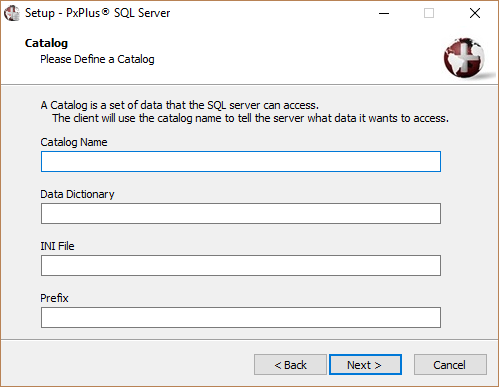
For the PxPlus SQL Server install, if this is the first install, then the next screen will be the Catalog page. This page is used to specify the location of the PxPlus data that your server will access. Additional catalogs can be defined, and the catalog entered can be modified later using the PxPlus SQL Server Configuration Utility. ODBC clients will use the catalog name to specify what data they want to access on the server.
(Catalog support was added in PxPlus 2018.)
6.
Unless this is a server side licensing PxPlus SQL ODBC Driver install, the next screen will be the Activation page. A valid serial number, number of users, and activation key are required to set up and run a permanent version of the File IO product. The necessary activation information is issued with every purchase of a product package from PVX Plus Technologies Ltd. or authorized dealer/distributor.
When installing PxPlus File IO products as part of a Web or Professional license, use your temporary key for permanent activation. Permanent keys that are generated for bundled activations do not apply to File IO components.
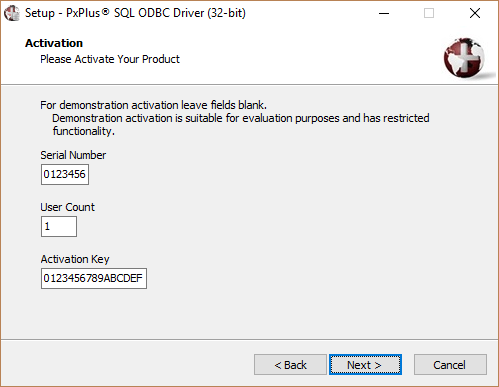
For demonstration activation, you can leave the fields blank. In this case, the Activation dialog pops up for every File IO connection, and a "nag" message is repeated continuously during execution. The activation information is not verified during the install; it is only checked for a valid format. If the activation is invalid, the File IO product will use a demonstration activation.
If this is an installation over an existing installation, the three fields will be auto-populated with the previous activation information, if any.
7.
Select the destination location for the install files.
8.
Select a Start menu folder or select not to create a Start menu folder.
Note:
The PxPlus SQL ODBC Driver install does not include this step, as no GUI programs are installed. Therefore, a Start menu folder is not needed, with the exception of installing the 32-bit PxPlus SQL ODBC Driver on a 64-bit Windows 7 (or earlier) system.
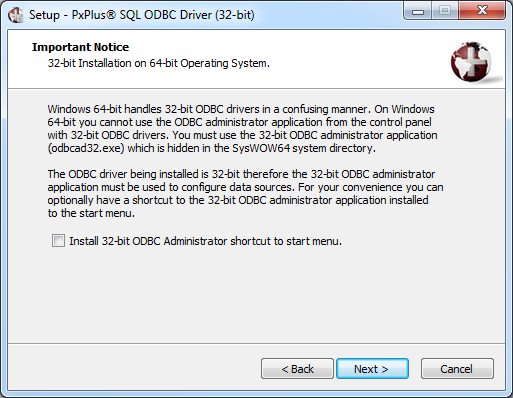
In that case, an option is given to the user to install a Start menu folder with a shortcut to the 32-bit ODBC Administrator utility, and a warning message is presented to the user stating the limitations of a 32-bit PxPlus SQL ODBC Driver on a 64-bit OS and how to properly configure the driver.
9.
The Ready to Install page is used to confirm all the install settings before actually performing the install. If all the information is correct, then click Next > to finish the installation. If something is not correct, you can click Back < until you are at the right screen to correct the problem.
For the PxPlus SQL Server install, if the SQL Server is running as a service, a dialog popup comes up and gives you an option to automatically stop the service and install over it, or you can manually stop the service and continue the installation, or lastly, you can cancel the installation.