|
1. |
Select the External Control from the Controls Toolbar and outline the location of the map on the panel. |
|
2. |
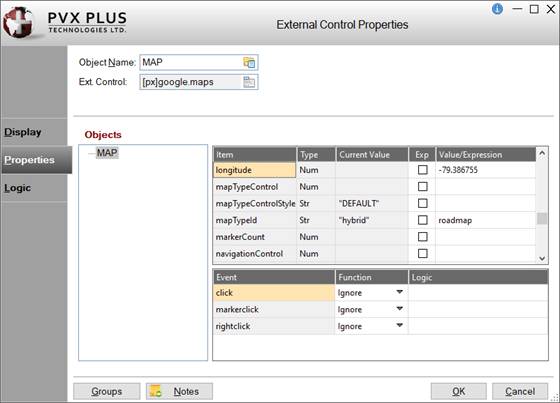
In the External Control Properties window, enter an Object Name for the control (e.g. MAP). |
|
3. |
Click the Ext. Control query button and select PVX Plus Controls from the popup menu. |
|
4. |
From the list that displays, select Google Maps Control. |
|
5. |
In the External Control Properties window, click the Properties tab to set the properties. |
|
|
 |
|
|
Four properties are required when defining a map:
|
|
latitude |
Latitude in degrees of the center point of the map. Range is -90 to 90 degrees. |
|
|
longitude |
Longitude in degrees of the center point of the map. Range wraps from -180 to 180 degrees. |
|
|
mapTypeId |
Type of map to be displayed. Options are hybrid, roadmap, satellite and terrain. |
|
|
zoom |
Numeric zoom factor for the map (zero-based). |
|
Other properties are optional; however, if an API Key has been obtained, it can be set either in the
APIkey property or by setting the %GoogleAPIkey$ variable. See
Adding a Google Maps API Key. | |
|
6. |
Save the definition. This information is sufficient to display the map on your panel, complete with map type and zoom controls, as well as full standard Google Map UI capability, including full mouse and keyboard control. |
|
Now add some controls and logic to see some of the functionality available in Google Maps, such as adding/removing markers and info windows, along with geocoding that translates human-readable addresses into latitude/longitude locations and vice versa. |
|
7. |
Add three multi-lines: Address, Latitude and Longitude, as well as fonted text prompts to accompany them. Set the Numeric attribute for the Latitude and Longitude multi-lines. |
|
8. |
You will need more than standard precision to handle Latitude and Longitude values. Set Precision to 6 on the Display tab of the Header Panel Definition window. |
|
9. |
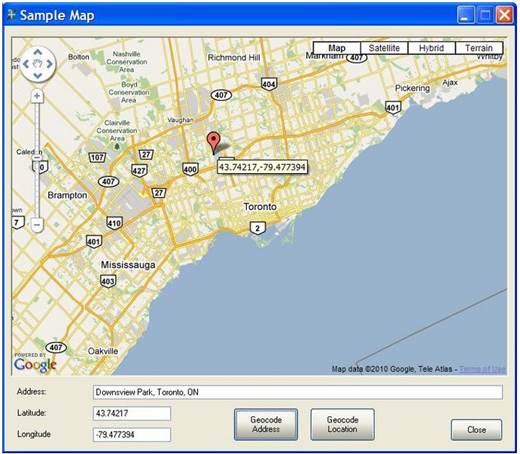
Add a Geocode_Address button, a Geocode_Location button and a Close button to exit the panel.
Set the OnChange logic on the Logic tab for the Close button to End.
Set the OnChange logic on the Logic tab for the Geocode_Address button to Execute:
location$=map.ctl'geocode$(address$);
latitude=map.ctl'geocodeLatitude;
longitude=map.ctl'geocodeLongitude;
map.ctl'addMarker(latitude,longitude,location$) |
|
|
When the button is pushed, the address is passed to the geocode method, which returns the latitude and longitude as a string with a comma separator. The geocoder also loads the
geocodeLatitude and
geocodeLongitude properties, which are used in this case to populate the Latitude and Longitude multi-lines. A marker is then created using the given latitude and longitude, and the location is used as the marker title, which is displayed as the marker tip.
 |
|
|
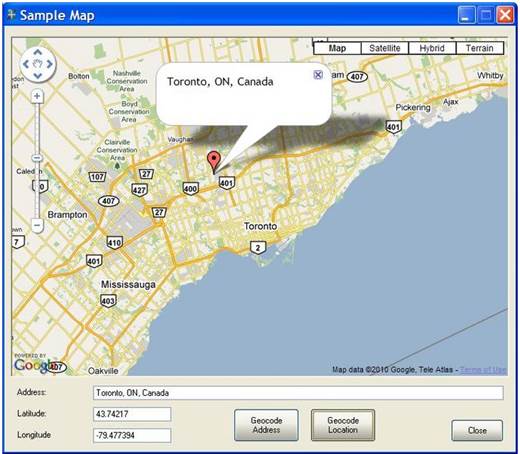
Set the OnChange logic on the Logic tab for the Geocode_Location button to Execute: |
|
|
address$=map.ctl'geocode$(latitude,longitude,0);
map.ctl'showInfoWindow(latitude,longitude,address$) |
|
|
When the button is pushed, the latitude, longitude and level are passed to the geocode method. The level indicates how specific or general the returned address is to be, with 0 being the most specific address. The address is then displayed in an info window placed at the given latitude and longitude.
 |
|
10. |
Finally, click the Properties tab in the External Control Properties window. Set the markerclick Event logic to Execute:
markerid=map.ctl'clickmarker;
map.ctl'removeMarker(markerid) |
|
|
When a marker is clicked, it is removed from the map.
 |
This example shows just a few of the properties, methods and events available to the Google Maps Extended Control.
|
1. |
Using the methodology described in the first example, create a new application panel in the NOMADS Panel Designer and add a Google Map extended control with the name DIRECTIONS. |
|
2. |
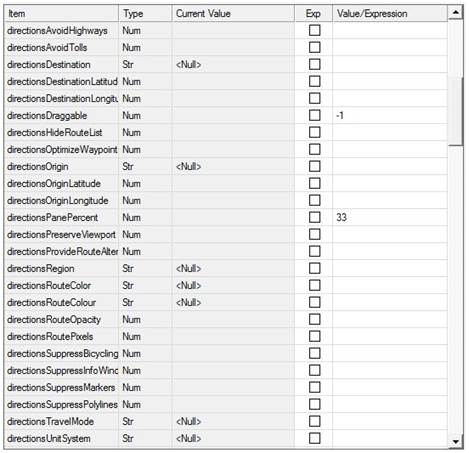
In addition to the four properties (latitude, longitude, mapTypeID and zoom) required to display a map, two other properties must be set to request directions, showDirectionsPane and directionsPanePercent:
|
showDirectionsPane |
Used to enable the directions service and indicate the placement of the directions. Values are:
|
0 |
Directions service not enabled. (Default) |
|
1 |
Directions service enabled. Directions are displayed to the left of the map. |
|
2 |
Directions service enabled. Directions are displayed to the right of the map. | |
|
directionsPanePercent |
Percent (0 - 100) of the designated horizontal map area to be used to display directions. If set to 0, then a default value of 30 will be used. | |
|
|
These properties must be set in the map definition and cannot be changed dynamically.
In this example, the following settings are used: latitude = 44, longitude = -79, zoom = 8, and the default setting for mapTypeid(hybrid). The showDirectionsPane property has been set to 1 to display directions to the left of the map, and directionsPanePercent has been set to 33, setting the directions display to occupy 33% of the width allotted for the map. |
|
|
There are many directions-related properties.
 |
|
|
The following properties are used as parameters for directions requests:
directionsAvoidHighways
directionsAvoidTolls
directionsOptimizeWaypoints
directionsProvideRouteAlternatives
directionsRegion$
directionsTravelMode$
directionsUnitSystem$ |
|
|
These properties are display options:
directionsDraggable
directionsHideRouteList
directionsPreserveViewport
directionsRouteColor$
directionsRouteColour$
directionsRoutePixels
directionsRouteOpacity
directionsSuppressBicyclingLayer
directionsSuppressInfoWindows
directionsSuppressMarkers
directionsSuppressPolylines |
|
When set, the above properties will affect any subsequent directions requests; they have no effect on currently displayed directions. These properties may be set in the map definition or any time prior to making a directions request.
See
Directions-Related Properties. |
|
Now add some controls and logic to generate directions. |
|
3. |
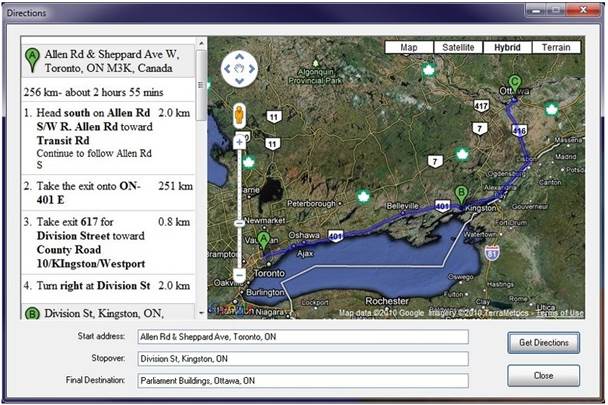
Add three multi-lines: Origin, Stopover and Destination, as well as fonted text prompts to accompany them.
Two locations, an origin and destination, are required to request directions. These may be in the form of an address or as latitude/longitude pairs. Addresses are used in this example. Stopover locations, or waypoints, are optional. This example has one stopover; however, up to 8 are allowed (23 waypoints for Google Maps API Premier customers). |
|
4. |
Add a Get_Directions button and a Close button to exit the panel.
Set the OnChange logic for the Close button to End.
Set the OnChange logic for the Get_Directions button to Execute:
directions.ctl'clearDirections();
directions.ctl'clearWaypoints();
if stopover$<>"" \
then directions.ctl'addWaypoint(1,stopover$) \
end_if ;
status$=directions.ctl'getDirections$(origin$,destination$)
When the button is pushed, any directions currently on the map are cleared, as are any waypoints that have been defined. This is necessary due to the design of the sample panel, which allows multiple directions requests for different origins, destinations and waypoints. |
|
5. |
Then, the optional waypoint is added. Waypoints are additional locations through which the calculated route must pass. In this case, a single waypoint is added with 1 representing the sequence number. Multiple waypoints are possible, where, by default, the route follows the order of the waypoint sequence numbers. In addition, by default, waypoints are stopover points, which divide the route into legs.
You can specify that waypoints are not stopovers (addWaypoint(sequence, address, stopoverFlag) where stopoverFlag=0), in which case they are marked on the route with a dot and do not divide the route into legs. If all waypoints are stopovers, then the
directionsOptimizeWaypoints property can be turned On, in which case the sequence of the waypoints is ignored and an optimal route determined. |
|
6. |
Finally, the
getDirections$() method is passed the Origin and Destination. Based upon these values and previously set values, such as waypoints and the various directions-related properties, a route is drawn on the map and directions displayed in the directions pane. As well, the method returns a status to indicate whether the method was successful ("OK") or not. |
|
|
 |