|
External Controls - *Browser, ActiveX (COM), PVX Plus, .NET |
The PxPlus External Control Properties dialogue allows you to integrate external components produced by third-party vendors into your MS Windows-based PxPlus application (e.g. progress bar, spreadsheet, browser or calendar). This dialogue is used to obtain information about, as well as access to, the internal properties and methods of the external control being used.
This table lists the types of external controls that can be created:
|
Chromium Browser |
The Chromium Browser Object allows you to embed a Chromium Browser into PxPlus windows. This object can be used to display a Web page, execute JavaScript, and subscribe to browser events. The Chromium Browser was developed as an alternative to the Microsoft Web Browser (Shell Explorer). Important Note:
|
|
ActiveX Controls |
ActiveX controls are specific components that provide applet-like functionality for Web pages. These controls can be accessed and executed via Web browsers and other applications over the Internet. However, ActiveX offers little cross-platform support, compared to Java, and is limited to software based on Microsoft's Component Object Model (COM). |
|
PVX Plus Controls |
The types of PVX Plus external controls that can be created are Ace Editor Control, Google Maps Control, Signature Capture Control and TinyMCE® Editor Control. |
|
.NET Controls |
The .NET Interface allows .NET objects to be added to applications and used like any PxPlus object. Important Note:
|
To add an external control to a NOMADS panel, see Adding an External Control.
To define an external control once it has been added to a panel, see Defining an External Control.
For information on handling events for an external control, see Handling Events.
To add an external control to your panel, select the External Control button from the Controls Toolbar in the Panel Designer. Hold down the left mouse button and drag the mouse to create a rectangle to the desired size. Release the mouse button to create the new object. Select the type of external control you want to create and define its properties.
For making other adjustments, see Modifying Objects.
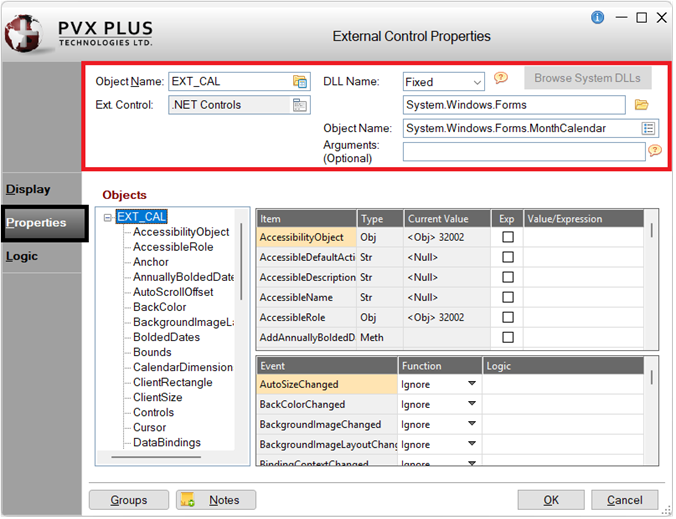
When creating or editing an external control, the External Control Properties dialogue is displayed:
This dialogue is divided into the following tabbed panels for viewing and/or changing external control properties: Display, Properties and Logic. The control properties that display depend on the type of external control being created.
|
Object Name |
Enter a unique name for the external control. NOMADS provides a default; e.g. EXT_1. Naming conventions for variables apply. When a new control name is entered, it will be checked against the Reserved Words list to determine if it is restricted for use as a NOMADS control name. If it is found, a warning message will display. (User Reserved Words Maintenance was added in PxPlus 2020.) | ||||||||
|
Click the Query button to select the type of external control to create:
See Defining an External Control. (The Chromium Browser Object was added in PxPlus 2017.) | |||||||||
|
Alternate control names to load at runtime if primary not found |
(Applicable only for ActiveX Controls) Assign alternate control names (separated by semi-colons) to be used at runtime if the generic name cannot be found. This field is shown only when creating ActiveX controls; otherwise, it is hidden. | ||||||||
|
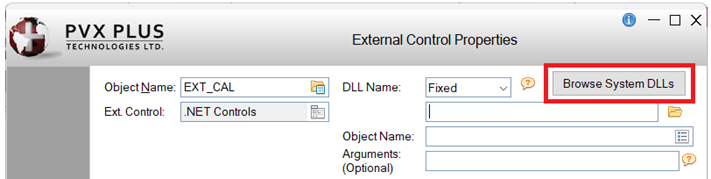
(Applicable only for .NET Controls) This button simplifies the input of a Windows system DLL and its associated object. This button is enabled only when:
Clicking this button displays a list of available Windows system DLLs. After a DLL is selected, a second list displays the objects in that DLL. Selecting an object automatically populates both the DLL Name and Object Name fields. (The Browse System DLLs button was added in PxPlus 2026.) | |||||||||
|
(Applicable only for .NET Controls) Enter the .NET DLL name. Can be a Fixed value or an Expression. This field is shown only when creating .NET controls; otherwise, it is hidden. Click the Browse button (folder icon) to select a fixed value for the .NET DLL file location. If the DLL name or file location has been defined as a global variable or defined in such a way that its value can be evaluated now (when the .NET control is being created, as well as at run time), change the drop box from Fixed to Expression and then enter the expression. (The DLL Name field was added in PxPlus 2025.) | |||||||||
|
(Applicable only for .NET Controls) Enter the .NET object name. This field is shown only when creating .NET controls; otherwise, it is hidden. Clicking the Query button in the Object Name field displays a list of all objects in the DLL (if a DLL Name has been entered). Important Note:
| |||||||||
|
Arguments |
(Applicable only for .NET Controls) Enter any optional arguments to be used by the .NET control. This field is shown only when creating .NET controls; otherwise, it is hidden. These arguments can be either a PxPlus numeric or string variable or a numeric or string literal. String literals must be quoted. Multiple numeric or string arguments can be specified and must be separated by commas. Example: mystr$,42,"A String",mynum This example shows four comma-separated arguments: the mystr$ string variable, the number 42, the string "A String", and the contents of the mynum numeric variable. (The Arguments field was added in PxPlus 2025.) | ||||||||
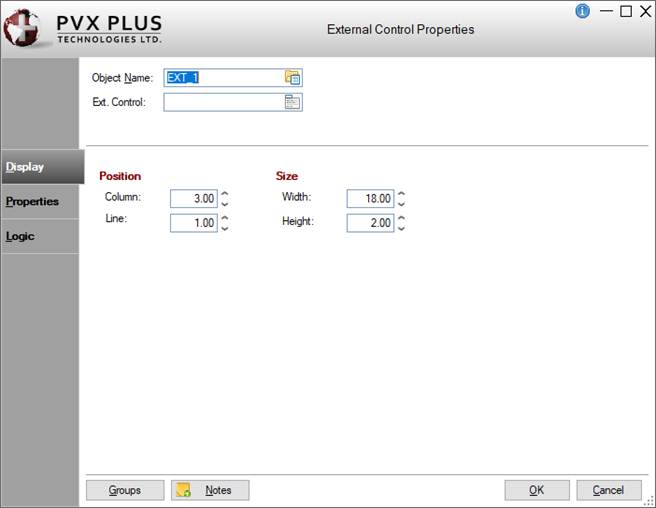
|
Position |
(Support for increased Column and Line maximums was added in PxPlus 2021.) | ||||||||
|
Size |
(Support for increased Width and Height maximums was added in PxPlus 2021.) | ||||||||
|
Objects |
Assign property/method values (Fixed or Expression) and set up logic that will execute when an external control event is triggered. See Defining an External Control. | ||||||||
|
Default Program |
Displays the name of the Default Program used in the Panel Header definition. (The Default Program was added for display in PxPlus 2019.) | ||||||||
|
Post Create |
Logic to be processed after the external control is drawn. Click the drop-down arrow for a list of selections. See Events Logic. Click the Program Logic button beside the Perform or Call action to launch the default program editor, which is typically the *IT - Integrated Toolkit. To make Ed+ the default program editor, change the setting for the %NOMADS'Program_Editor property to Ed+. (The ability to set Ed+ as the default program editor was added in PxPlus 2023.) | ||||||||
|
| |||||||||
|
Groups |
Button used to assign the external control to a group. See Group Assignment. | ||||||||
|
Notes |
Add notes/comments for the external control. Maximum 1024 characters. These notes also display in the Wiki Help documentation for the panel. See NOMADS Wiki Help. (The Notes button was added in PxPlus 2023.) | ||||||||
After an external control is created on the panel (see Adding an External Control), the control's properties need to be defined.
This table lists the steps to define a new external control. (These steps are based on the Folder Style version of the NOMADS Panel Designer.)
|
Step |
Description | ||||||||||||||||
|
1. Select an external control |
In the External Control Properties dialogue, click the Query button for the Ext. Control property. Available selections are Chromium Browser, ActiveX Controls, PVX Plus Controls and .NET Controls. | ||||||||||||||||
|
2. Define Properties |
Once the Ext. Control is selected, assign property/method values using the Properties tab. The Item grid lists all the sub-objects, properties and methods for the external control selected. This grid consists of the following:
| ||||||||||||||||
|
3. Define Events |
The Events grid contains all the events available for the external control. This grid consists of the following:
| ||||||||||||||||
|
4. Assign Post Create Logic |
Add/edit Post Create logic using the Logic tab. Enter the program/entry point to be performed, called or executed after the external control is created. See Events Logic. |
It is strongly recommended that event functions be kept relatively short and simple. One reason for this is that normal code execution will be suspended when an event is handled and will not resume until the event function is finished. It is also possible to introduce code (or use commands, such as MSGBOX) to create a re-entrance issue in the event function.
How NOMADS Handles the Events
External controls generate a unique CTL value for each event defined in NOMADS. NOMADS reserves CTL values between 22001 and 22999. These are loaded into a table at run time after the external control is created using:
ON EVENT "event_name" FROM EXT_id PREINPUT CTL_value
Working with Events that Supply Parameters
Most of the time, it is sufficient to trap events through the external control interface. However, NOMADS does not normally receive the parameters that may be passed back (if the events are capable).
To receive event parameters from an external control, a PxPlus class must first be designed. A class function must be written for each event to be handled.
Example:
If you were writing an event class for the external object Shell.Explorer.2, you could receive parameters from the exposed event BEFORENAVIGATE2 (URL, [Flags], [TargetFrameName], [PostData], [Headers]) by defining a class as follows:
def class "menuevent"
property TXID$
function BEFORENAVIGATE2(*)BEFORE for event "BeforeNavigate2"
end def
BEFORE:
enter *,U$,*,*,*,*,C
if mid(lcs(U$),1,3)="tx:" \
then C=1;
TXID$=U$(4) \
else TXID$=""
return 1
The function and label name are not required to match the name of the event. It is the string after the FOR EVENT portion of the statement that determines the event name that will be handled. The event name is not case sensitive, and argument names are not required to match the external control's event declaration. When the OOP method name matches the external control event name, then SAME can be used to describe the name of the event.
Once the class is complete, an instance of the class must be instantiated to bind the external object to the event handler. In NOMADS, this code should be invoked by the external object Post Create logic:
create_object:
EVNTOBJ=new("menuevent",EXPLORER.CTL,100)
return
Once bound, the PxPlus event class function will be called when the corresponding event occurs.
.NET Interface
DEF OBJECT Define Windows Object
How to Create a .NET Button (NOMADS)
How to Create a .NET Calendar Control (NOMADS)
How to Display a Date in a PxPlus Multi-Line from a NOMADS .NET Calendar
TinyMCE® is a registered trademark of Tiny Technologies Inc.