|
Modifying Objects |
|
Accessing the properties of panel objects provides one method for controlling the appearance and functionality of panel components. The Panel Designer work area includes several handy tools for copying, moving and resizing objects in a panel, which automatically updates associated design properties in the process.
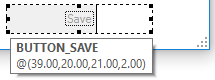
To move an object using the mouse, click and drag the object to a new location. During this action, the mouse pointer changes to crossed arrows and a tooltip shows the object's changing coordinates.
Release the mouse when the object is positioned in its new location. The status bar at the bottom of the Panel Designer shows the coordinates of the new location (Col, Ln).
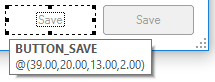
To resize an object using the mouse, select the object and then position the mouse pointer on the dotted outline until the pointer changes to a double-headed arrow. Click and drag the mouse to resize the dotted outline. A tooltip shows the object's changing coordinates.
Release the mouse when the object has reached the desired size. The status bar at the bottom of the Panel Designer shows the new dimensions (Wd, Hi).
Besides using the mouse, other methods are available for changing the size and placement of a panel object. Once an object is selected in the Panel Designer, you can change the coordinate values directly in the object's properties window, or use the keyboard and menu options.
The arrow keys can be used to move or resize a selected object:
|
Shift + Up Arrow |
Switches a selected object to moving mode. The four arrow keys can then be used to move the dotted outline for the object to a new location on the panel. This is confirmed by the coordinate values displayed in the tooltip, as well as on the status bar. |
|
Ctrl + Up Arrow |
Switches a selected object to resizing mode. The four arrow keys can then be used to change the dimensions of the dotted outline for the object. This is confirmed by the coordinate values displayed in the tooltip, as well as on the status bar. |
Different menu bar and hot key options are also available for modifying an object. To access moving mode, select the Edit > Move menu option or use the hot-key combination Alt + E to invoke the Edit menu and then press M for Move. To access resizing mode, select the Edit > Size menu option or use the hot-key combination Alt + E to invoke the Edit menu and then press S for Size.
For a list of the standard edit keys and hot keys, see Edit Keys.
To copy an object, several methods are available:
|
Method |
Description | ||||||||||
|
Panel Designer Menu Bar |
From the Edit menu, select the Copy and Paste options. | ||||||||||
|
Right Click Popup Menu |
Right click on a selected object in a panel to access the Copy and Paste Object(s) options from the popup menu. | ||||||||||
|
Ctrl + C |
Press Ctrl + C to copy an object. | ||||||||||
|
Ctrl + D |
To create a duplicate of a selected panel object with the same dimensions and properties as the original, follow these steps:
The same results can be achieved by using Ctrl + C to copy followed by Ctrl + V to paste the object in the new location. | ||||||||||
|
Ctrl + N |
To create a new object with only the same dimensions, but not the same properties, of a selected panel object, follow these steps:
Example: In the panel, the selected object is a button. In the Controls Toolbar, the highlighted tool is a multi-line. After following the above steps using Ctrl+N, the new object that is created is a multi-line. |
For a list of the standard edit keys and hot keys, see Edit Keys.
Two methods are available for selecting a group of objects for modification:
Moving a Group of Objects
Select the group of objects using one of the methods above. Then, position the mouse pointer over one of the selected objects in the group. Click and drag the dotted selection box to the new location. Releasing the mouse button moves all of the objects in the group to the new location.
Resizing a Group of Objects
Select the group of objects using one of the methods above. Then, position the mouse pointer over the dotted outline of a selected object in the group until the pointer changes to a double-headed arrow. Click and drag the dotted selection box to increase/decrease the dimensions. Releasing the mouse button resizes all of the objects in the group.
The Panel Bulk Edit Utility can also be used to modify the height/width of several objects simultaneously.
To justify or space a group of objects uniformly, follow these steps:
|
1. |
In the Panel Designer, first select all the objects by using Shift-Click or the Group Items tool in the Controls Toolbar. | ||||||
|
2. |
Select Edit > Align or Distribute on the menu bar and choose from a list of available options. Alternatively, these options can be accessed by right clicking on the selected panel objects and choosing Align/Distribute from the popup menu:
|
Example:
To give you an example of how the alignment/distribution rules work, if you select three controls to Align Right, then the right alignment (justification) for all three selected controls will be based on the right most control (not the first control selected).