|
UNIX/Linux Installation |
|
The instructions below apply to all installations and upgrades of PxPlus for UNIX/Linux systems.
To begin, you will require the following:
a) Product Download (.taz or .tar.Z file from the PVX Plus Download section or CD)
b) Product Activation Key
To install PVX Plus Technologies Development Suite on a UNIX/Linux system, you will first need to download the 'tar' file from the PVX Plus download site. Two types of tar files exist on this site: a '.taz' file and a '.tar.Z' file. Once downloaded, these files will need to be expanded and restored into the target directory on your system. Then, you may proceed to the activation process.
When you order PxPlus, you will receive either one or two 25-character activation keys with your order.
If you ordered the complete PxPlus Development Suite, you should have received two keys: one for the core ProvideX product and one for the PxPlus enhancements.
If you ordered a PxPlus upgrade, you will receive only one activation key for the PxPlus enhancements. Please use your original ProvideX activation key to activate the ProvideX portion.
If the system you are activating is connected to the Internet, you only need to activate the core ProvideX portion. The system can obtain all other activation key information through the Internet.
If not connected to the Internet, you will need to enter both the core ProvideX key and the PxPlus enhancement key. Then, follow the PxPlus Registration instructions below to complete the registration process.
The steps for installing your product are listed below.
|
1. |
Download/copy the "tar" file to your UNIX/Linux system. | |
|
2. |
Create your target directory. PVX Plus suggests that you use /pxplus for the directory name. | |
|
|
mkdir /pxplus | |
|
3. |
Change to the target directory. | |
|
|
cd /pxplus | |
|
4. |
Expand and restore the "tar" files. (Replace download.tar in the example below with the name of the file you downloaded (with the trailing .Z , if present.) | |
|
For .taz file: |
tar -xvzf download.taz | |
|
For .tar.Z file: |
uncompress download.tar | |
|
5. |
To activate the product with the 25-character key(s) provided, invoke the program pxpreg found in the target directory. | |
|
To be Prompted: |
./ pxpreg | |
|
With Key: |
./ pxpreg -k xxxxx-xxxxx-xxxxx-xxxxx-xxxxx | |
|
Change Serials: |
./ pxpreg -i | |
|
Demonstration Key: |
./ pxpreg -d | |
You will need to register your installation within 30 days of activation. If your system is connected to the Internet, you may automatically register online.
Whenever you run pxplus without specifying a starting/lead program on the command line, the system will check to see if you have registered your software. If the software is not registered, the system will prompt you to register it online. Selecting YES will initiate the online registration process.
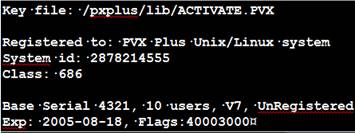
If your system does not have direct access to the Internet (or if the online registration is unavailable), you may register your software manually. Before you manually register the software, you will need to obtain some information about your system. Enter the command pxpreg -v and the following screen will be displayed:
You will need to provide the System ID, Class, Serial Number and User Count in order to obtain the registration key from your reseller. With this information, they can generate and provide you with your system registration key.
Once you obtain the registration key, you can record it on the system by using the command pxpreg -k keyvalue (where keyvalue is the key you have been given).
To simplify the upgrading of an existing ProvideX system to PxPlus, PVX Plus suggests the following:
To run the online activation program, simply start PxPlus and enter:
RUN "*plus/reg/net"
It will contact the PVX Plus servers and apply any key updates to your system. Once applied, you will need to exit and restart PxPlus.
Once upgraded, the activation keys will be shared between PxPlus and ProvideX. You may continue to run either; however, the total number of users active at any time will apply to both.