|
Remote Process Capability |
|
The Remote Process Capability is intended to allow for true distributed processing of PxPlus applications across a network of TCP/IP connected machines. It allows applications and their files to be distributed in such a way that the processing logic can be executed on the same machine as the data files, thus minimizing the time required to run the application - increasing throughput and overall system performance.
Current network implementations limit their ability to perform in high volume situations because of the requirement to transfer the data from the database to the individual client machine. Normal implementations consist of a data or file server in which the application will pass requests to the server for each record they require to process a function. This means that a simple function, such as inventory, could involve multiple transfers - one for the product master to read product status, one to update inventory, one to update a transaction log file of some sort, and possibly one to update General Ledger and other related information. Ideally, the inventory allocation transaction would consist of a single network request - allocate inventory.
It is this scenario that the Remote Process Capability attempts to address through the use of remote procedure calls while, at the same time, providing a "classic" data or file server facility.
Fundamentally, a remote procedure call is a CALL to a program that will run on a different processor on the network. Syntactically, it is the same as a standard CALL statement except that the name of the program and the parameters that are specified on the CALL will be placed into a TCP/IP data packet, shipped to a remote program server, which, in turn, will load and run the specified program, passing it the parameters. When the program EXITs, a response packet will be created, containing the parameters as altered by the remote program and sent back to the calling program. The net result is the seamless integration of remote processing into PxPlus applications.
Using the original example of inventory allocation, using an RPC will result in a single network exchange in lieu of three or more. An inventory allocation PxPlus subprogram could be written that would be called remotely to perform all the logic pertaining to the transaction.
Server Names
To simplify the process of configuration, PxPlus allows for the definition of logical server names. These logical server names can be from one to 12 characters and are used to identify which server will handle which CALL request.
Issuing a Remote Procedure Call
To initiate a remote procedure call, the calling program simply issues a CALL statement with the name of the program being prefixed by "[RPC: logical_server_name]" (case insensitive). The presence of an [RPC] clause will be all that is required to initiate the remote CALL.
Since PxPlus already provides for a prefix file, existing CALLs can be dynamically altered to RPCs. For example, a PREFIX FILE entry for the file "INVALOC" could be created with its contents being "[RPC:Inventory]INVALLOC", thus a simple CALL "INVALLOC" would result in an RPC request.
Each remote program server will need to be identified to the calling application. This will be done through the PROCESS SERVER directive:
PROCESS SERVER "name" ON "tcp_address;server"
Where:
|
|
"name" |
Logical name associated with the program server |
|
|
"tcp_address;server" |
TCP address and services identifier for the server |
Example:
PROCESS SERVER "Inventory" ON "[tcp]192.1.1.100;15000"
If desired, the "tcp_address;server" can be set to "LOCALHOST", which will result in any RPC call to this server simply becoming a local CALL directive. Alternatively, the tcp_address can specify a pipe on UNIX or a DLL on Windows.
If the connection to the server requires SSL/TLS, you need to add ";secure" to the end of the TCP pathname (e.g. "[tcp]192.1.1.100;15000;secure").
To terminate the remote server connection:
PROCESS SERVER "name" CLOSE
Running Subprograms on a Remote Program Server
Subprograms designed to run on a remote server should make no assumptions about the current environment. While the server can be initiated in a specific disk directory, and as such could have its own START_UP procedure, the subprogram should attempt to make sure that the files it requires can be directly addressed.
In addition, no attempt should be made to display anything on the user terminal. An RPC subprogram is running as a background task on the server, and any terminal output will be displayed on the server, not the calling terminal.
Remote File Access
In addition to the ability to CALL programs on a remote server, the OPEN command has been extended to allow files to be opened remotely as well. To open a remote, simply prefix the file name with the [rpc:xxxxx] designation to indicate the server that is to handle the file requests.
Background Processing
You can also START background programs using the remote server facilities by simply adding the [rpc:xxxxx] designation to the start of the Command line/Program name to be started.
There are two basic means to launch the RPC server on a specific port. The first is by a direct CALL to "*rpsrvr" providing the port number you want to monitor; the second is to launch the server directly from the operating system Command mode.
Method 1 - Launching by Direct Call:
To start an RPC server, issue a CALL to the program "*rpsrvr" with the port/service number to be used.
Example:
CALL "*rpsrvr", 15000 (This will establish a remote process server on port/service 15000 on your system.)
To enable SSL/TLS encryption, you can provide a second parameter of a PEM certificate file to the CALL.
Example:
CALL "*rpsrvr", 15000,"sslcert.pem"
Method 2 - Launching from the Operating System Command Mode:
You can launch an RPC server in the background directly from the operating system Command mode by providing the desired setting in the -ARG parameter list.
On Unix/Linux/Aix/MacOS:
/pxplus "*rpsrvr" -arg portno >/dev/null </dev/null
On Windows:
\pxplus.exe -bkg "*rpsrvr" -arg portno
If you want to enable SSL/TLS, add the parameter secure=xxxxx to the -ARG list after the port number where xxxxx is the pathname of the certificate PEM file.
To simplify the usage of port numbers, the RPC interface provides a means to create a "NameMaster" that allows your application to refer to logical RPC server names as opposed to port numbers.
To use an RPC NameMaster, you must do the following:
|
1. |
Start the NameMaster on your server on a specific port. |
|
2. |
Define the global variable %RPC_NameMaster$ in your system. This can be done in code, in your START_UP program or in the [Globals] section of your system INI file. Optionally, this can also be done externally by setting the system environment variable, RPC_NameMaster. This variable should have the Name server IP address, port and secure option (e.g. "[tcp]127.0.0.1;15000;secure"). |
|
3. |
Start your RPC servers using either a CALL to "*rpsrvr;Define", "name" or from the operating system Command line. See Starting a Named Server. |
|
4. |
Use a CALL to "*rpsrvr;Connect" to connect to the server, which, in turn, will issue the PROCESS SERVER command. Example: CALL "*rpsrvr;Connect", "MyServer" |
Method 1 - Using a CALL directive:
CALL "*rpsrvr;Define", name$, portno, pemfile$
Where:
|
|
name$ |
Name of the server. Must be "NameMaster" to the actual NameMaster server. |
|
|
portno |
Port number to use. Can be 0/omitted to dynamically have a port number assigned for all but the NameMaster whose port number must be defined. |
|
|
pemfile$ |
Optional name of the certificate PEM file to use if using SSL/TLS. |
Method 2 - Using the operating system Command line:
Unix/Linux/Aix/MacOS:
/pxplus "*rpsrvr" -arg "NameMaster" port=portno secure=pemfile >/dev/null </dev/null
Windows:
\pxplus.exe -bkg "*rpsrvr" -arg "NameMaster" port=portno secure=pemfile
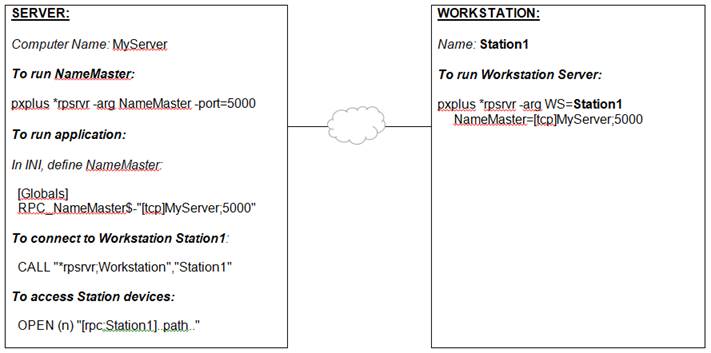
One of the newer features of the *rpsrvr program is to provide a remote server for workstations. Often, in business applications, you may find a need to access files or devices on remote systems from your business application. For example, you may want users to be able to connect to your application using iNomads but have your iNomads application directly access files or devices on that device.
The *rpsrvr program can be used to accomplish this by using its WorkStation interface. This interface allows a computer to connect to the central NameMaster system and identify itself as a WorkStation server. The application can then connect through the NameMaster to the workstation and, using the RPC interface, access files and devices on that workstation.
For an illustration of a typical workstation setup, see Workstation Setup Example.
(Support for workstations to run *rpsrvr was added in PxPlus 2023.)
For this to work, the NameMaster itself will need to be accessible via the network by both the workstation and the application. However, the network address for each may be different, as one may be connecting on a Local network and the other on an open Internet address.
First, you need to install and activate PxPlus on the workstation. Then, add the RPC_NameMaster address to either the PxPlus INI file or the system environment variable. Make sure that the NameMaster network address used is correct based on the network that the workstation is on.
Once this is configured, the following operating system command can be used to launch a Workstation server:
Unix/Linux:
/pxplus "*rpsrvr" -arg WS=Name >/dev/null </dev/null &
Windows:
\pxplus.exe -bkg "*rpsrvr" -arg WS=Name
To connect from the application to the workstation, the application can CALL *rpsrvr as the entry point workstation:
CALL "*rpsrvr;Workstation", wsName$
Where:
wsName$ is the name assigned to the workstation. The system will report an Error 68 (Cannot connect to RPC server) should the connection not be able to be made.
Workstation Security
To make sure not just any system can connect to the NameServer, the system allows you to specify passcodes for each workstation. These passcodes can be provided in the file rpsrvr_codes.conf, which is a simple text file consisting of the name of each workstation allowed to connect followed by an = (equals sign) and the passcode required.
Example:
If the rpsrvr_codes.conf file contained
Sales=abs67$zedg
Warehouse=jkld0d90jk&
only the workstations "Sales" and "Warehouse" would be allowed to connect, and on the operating system Command line, along with the Workstation name, they would need to include Passcode=xxxxx where xxxxx is their associated passcode.
For additional security, the passcodes in the rpsrvr_code.conf file, instead of being clear text, can contain the SHA2 hash value for the actual passcode.
Therefore, instead of the line
Sales=abs67$zedg
the line could read:
Sales=sha2:A25C32AE6A076AE53A5173F27615484DFFBFDDC5EFF23AECAB92253FE91E2133
Where:
A25C32AE6A076AE53A5173F27615484DFFBFDDC5EFF23AECAB92253FE91E2133 is the value return from HSH("abs67$zedg",-2). The Sales workstation would still need to provide the passcode as abs67$zedg; however, anyone getting access to the rpsrvr_codes.conf file would not know the actual passcode.
The hash values are case insensitive.
This diagram illustrates a typical workstation setup:
See additional Examples.
All data packets for file access contain the following header:
|
|
Major_code |
Single character major function (Always "F" for File I/O) |
|
|
Minor_code |
Single character minor function |
|
|
Size |
Two-byte binary packet size |
|
|
Crc |
Two-byte CRC-16 |
|
|
Data |
Variable length packet data |
The format of the data elements in the packets are:
|
|
CHR |
A one-byte character |
|
|
INT |
A two-byte binary value |
|
|
LONG |
A four-byte binary value |
|
|
STR |
A string of data prefixed by a two-byte binary length. If string is omitted, then the size = -1. |
If a return value is specified, it should contain an ACK$06$ in the first character position, followed by a two-byte return length, then the data. If an error occurs, the first character should be NAK$15$, followed by a two-byte binary error code.
The following commands are supported:
|
OPEN |
|
|
Minor code "O" |
|
|
Option |
CHAR |
Open option (*=Load, I=Input, P=Purge, L=Lock, Blank=None) |
|
|
Isz |
INT |
ISZ value, if specified |
|
|
Path |
STR |
Path name from the OPEN directive |
|
|
Opt= |
STR |
Value specified in OPT= parameter |
|
|
(Return) |
INT |
Logical file number to be used in all subsequent requests |
|
| |||
|
CLOSE |
|
|
Minor code "C" |
|
|
Fileno |
INT |
Logical File number to close |
|
| |||
|
WRITE |
|
|
Minor code "W" |
|
|
Fileno |
INT |
Logical file number |
|
|
Sub1 |
CHAR |
Record access option (K=Key, I=Ind, R=Rno) |
|
|
Sub2 |
CHAR |
Error option (D=DOM specified) |
|
|
Key |
STR |
Key, if specified |
|
|
Ind |
LONG |
Record Ind, if specified, or Rno value |
|
|
Data |
STR |
Data to write |
|
| |||
|
READ |
|
|
Minor code "R" |
|
|
Fileno |
INT |
Logical file number |
|
|
Sub1 |
CHAR |
Record access option (K=Key, I=Ind, R=Rno) |
|
|
Sub2 |
CHAR |
Blank (Not Used) |
|
|
Key |
STR |
Key, if specified |
|
|
Ind |
LONG |
Record Ind, if specified, or Rno value |
|
|
Kno |
INT |
Key number |
|
|
(Return) |
STR |
Record contents |
|
| |||
|
REMOVE |
|
|
Minor code "-" |
|
|
Fileno |
INT |
Logical file number |
|
|
Sub1 |
CHAR |
Record access option (K=Key, I=Ind, R=Rno) |
|
|
Sub2 |
CHAR |
Blank (Not Used) |
|
|
Key |
STR |
Key, if specified |
|
|
Ind |
LONG |
Record Ind, if specified, or Rno value |
|
| |||
|
KEY( ) |
|
|
Minor code "K" |
|
|
Fileno |
INT |
Logical file number |
|
|
Sub1 |
CHAR |
Record access option (K=Key, I=Ind, R=Rno) |
|
|
Sub2 |
CHAR |
' '=KEY, 'P'=KEP, 'C'=KEC, 'N'=KEN, 'F'=KEF, 'L'=KEL, 'R'=RNO, 'I'=IND |
|
|
Key |
STR |
Key, if specified |
|
|
Ind |
LONG |
Record Ind, if specified, or Rno value |
|
|
Kno |
INT |
Key number |
|
|
(Return) |
STR |
Returns KEY value as STR or IND/RNO as a LONG |
When running *rpsrvr from the operating system Command line, the first argument following the -arg must be either the numeric port number you want the server to run on or the name of the server being launched. If the name is of the form WS=xxxxxx (i.e. the first three letters are WS=), then *rpsrvr will launch as a workstation server with the name xxxxxx.
This table shows all the options that can be included following the port number/name in the operating system Command line:
|
Option |
Description |
|
NAMEMASTER=xxxx |
Can be specified to provide the address of the NameMaster to use. |
|
PASSCODE=xxxxx |
Defines the passcode needed to connect to the server. |
|
PORT=nnnn |
Defines the port number to use when launching a Named server. If omitted, the system will assign a port number automatically. |
|
RESTRICTED |
Indicates that all file OPENs and CALLs will be restricted to just the current directory and below (also can be specified as SECUREDIR). |
|
SECURE=xxxx |
Indicates that the server being started is to use SSL/TLS to securely communicate between the applications and the server. The value of xxxx defines the .PEM file containing the server certificate to use. |
|
WORKSTATION |
If included in the -ARG list, indicates this is a workstation server (same as using the WS= prefix on the first argument). |
This table provides additional examples:
|
Example 1: |
Defining the NameMaster in your system INI file: For a NameMaster using SSL running on Port 50000 on the server host.example.com: [Globals] For a NameMaster running on Port 40000 on your local host: [Globals] |
|
Example 2: |
Launching a NameMaster on your system using Port 50000 with SSL enabled using sslcert.pem file from operating system Command line: Unix/Linux: /pxplus "*rpsrvr" -arg NameMaster port=50000 secure=sslcert.pem >/dev/null </dev/null & Windows: \pxplus.exe -bkg "*rpsrvr" -arg NameMaster port=50000 secure=sslcert.pem |
|
Example 3: |
Launching a Named Service "MyServer" without SSL/TLS (assumes %RPC_NameMaster$ is set): Unix/Linux: /pxplus "*rpsrvr" -arg MyServer >/dev/null </dev/null & Windows: \pxplus.exe -bkg "*rpsrvr" -arg MyServer |
|
Example 4: |
Launching a Workstation Service (workstation name Desktop1 without defining NameMaster in INIENV): Unix/Linux: /pxplus "*rpsrvr" -arg WS=Desktop1 "NameMaster=[tcp]server;port" >/dev/null </dev/null & Windows: \pxplus.exe -bkg "*rpsrvr" -arg WS=Desktop1 "NameMaster=[tcp]server;port" |
|
Example 5: |
Establishing an RPC connection to a Named Service of "MyServer": CALL "*rpsrvr;Connect","MyServer" |
|
Example 6: |
Establishing an RPC connection to a Named Workstation of "Desktop1": CALL "*rpsrvr;Workstation", "Desktop1" |