|
How to Work with Styles in Webster+ (CSS) |
Webster+ supports the use of CSS to enhance the appearance of Web pages generated from your applications. Below are some key points on how CSS can be used within Webster+.
Webster+ offers several methods for applying styling. Use these links to access additional information:
|
|
|
|
|
|
|
|
|
|
|
|
|
|
|
|
|
|
|
|
Method 7: Standard HTML, CSS, and JavaScript |
All custom CSS currently comes from the style.css file located on the PxPlus server.
The examples below show the various ways you can use custom styles within Webster+ Setup > Customizations.
Much like the standard external style sheet rules, you can enter a link to the location of the external style.css file.
You must enter the full path, including http:// (or https:// if secure). If the path is not a valid URL, the library prefix docroot /lib will be the default directory listed for the style sheet.
Enter the URL in the CSS File URL option. To access this option, go to Webster+ Setup, choose Config from the top menu, and then select Customizations.
During run time, the bind logic will add the style sheet to the page using the path you provided and include it on every page.
Example:
Much like the standard embedded/internal style, you can enter CSS code directly in the Custom CSS option.
The CSS code you enter will be appended to the current rules in the <style> </style> section located in the <head>...</head> section.
Any rules that exist for selectors already found in the <style> </style> section will be overridden.
During run time, the bind logic will add the style sheet to the page using the path you provided and include it on every page.
In the example below, the background of every page will now be lightblue:
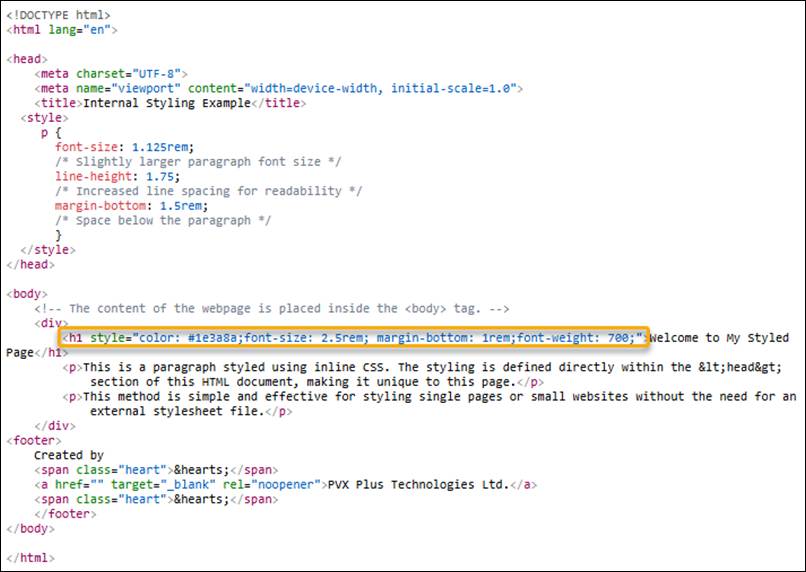
Whether you are coding HTML in Webster+ or outside of PxPlus, inline CSS works the same way.
Inline CSS is a method of applying unique styles to a single HTML element directly within the HTML tag itself. It uses the <style> attribute inside the HTML tag to declare CSS properties and their values.
A preferred method for defining styles is to use a separate style sheet file, reference a class or ID label, or code within the <head><style> </style> </head> section of an HTML document.
Syntax Example:
<element style="property: value; property2: value2;">Text</element>
Many Webster+ short codes support the short code option, class=xxx. See Short Code Options.
This value can consist of a single class name or multiple class names, separated by spaces or commas. If spaces are used, they must be enclosed in double quotes.
Example:
This example applies both the text-center and bold-text styles:
<p class="text-center bold-text">This is centered and bold.</p>
Webster+ provides several dynamic classes that automatically generate corresponding CSS rules. These classes do not need to be defined in your CSS files. They will be automatically created by the binding logic and included in the page.
For descriptions of these classes including examples, see Webster+ Defined Classes.
Short codes are processed by a binding utility, which replaces the short codes in the HTML documents with the necessary HTML elements for rendering in a Web browser.
|
Short Code |
Description |
|
[css] [/css] |
Inserts the contents of the short code into the <head> </head> or <body> </body> tags after any custom CSS. See Method 2: "Custom CSS" Option. Example: <head>[css]body{background-color:red}[/css]</head> <body>[css]body{background-color:red}[/css]</body> |
|
[cssfile file=xxx] |
Inserts a CSS file link into the <head> </head> tags. Example: [cssfile file=./yourstyles/buttons.css] |
|
[include filename] |
Inserts the <body> </body> contents of a specified file. The filename can be either a literal (e.g. "myfile.htm") or a string variable (e.g. myfile$). If filename is null (""), then nothing is included, and the short code is ignored. Example: [include myfile.html] |