|
Element Description |
|
The Element Description window is used to add, edit, copy and delete a data element for a selected table. To make bulk changes to multiple data elements in the PxPlus data dictionary and apply the changes to selected tables, use the Bulk Edit Data Elements utility.
After a table is entered or selected on the Data Dictionary Maintenance Main Panel, click the Elements tab. Invoke the Element Description window by clicking the button in the Dtl column of the Data Elements grid.
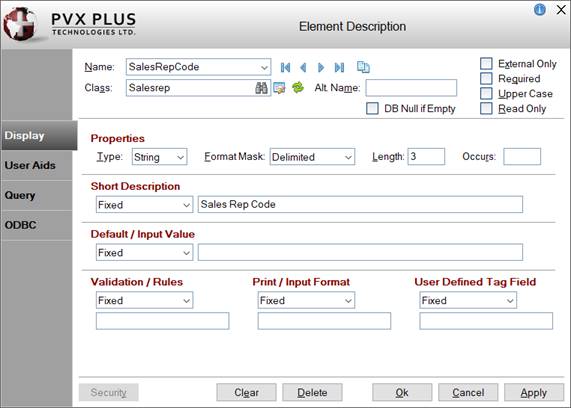
This window is divided into four tabbed folders - Display, User Aids, Query and ODBC - for defining the attributes of an element.
|
Unique name of the element - this is the variable name used in the primary IOList. Naming conventions for variables apply. Select from a drop-down list of data elements defined in the Data Dictionary for the selected table or type a new element name. A new element name must start with an alpha character (A-Z or a-z) or an_ (underscore), followed by any combination of A-Z, a-z, 0-9 or _ (underscore). If an element name contains a . (dot), a message will display, warning that column names containing a dot may not be ODBC-compliant. Note:
| |||||||||||||||||||||||||
|
(Copy Element) |
(Available when an existing Element Name is selected) Button used to create a new element by copying the settings from an existing element. Once it is created, the new element must be saved, as the Copy process does not do this. (The Copy Element button was added in PxPlus 2014.) | ||||||||||||||||||||||||
|
(Available when an existing Global Dictionary Element Name is selected) Button used to invoke the Update Global Dictionary Elements window only if both of these conditions are met:
This button is disabled while a global element is being edited. When the element is recalled, this button is enabled. (The Update Global Dictionary Elements in other Files button was added in PxPlus 2019.) | |||||||||||||||||||||||||
|
Enter a data class to load the information from the data class definition into the element's fields. See Data Classes. The class is also used to associate a control type (i.e. Multi-Lines, Drop Boxes, List Boxes, Radio Buttons and Check Boxes) with the element for use within NOMADS and its sub-systems, as well as in iNomads. To enter a data class, use any of the following methods:
If the data class is changed, a message will display prior to overwriting any information. If the data class assigned to the element has been deleted in Data Class Definitions maintenance, the text ** Class not on File ** will display. (The dark red text indicating a deleted Data Class was added in PxPlus 2021.) | |||||||||||||||||||||||||
|
(Data Class Maintenance) |
Button used to launch Data Class Definitions maintenance for creating or editing a data class. | ||||||||||||||||||||||||
|
(Available when a Class is entered) Button used to update element fields with current information from the selected data class. A message will display only if element fields are found that are populated with existing values different from the values in the selected data class. Clicking Yes will overwrite existing values for the listed element fields. Clicking No will not overwrite existing values for the listed element fields but will update element fields not currently populated. Clicking Cancel will not make any changes. Note:
| |||||||||||||||||||||||||
|
Alternate name for use in the alternate IOList (for legacy programs). If an alternate IOList is defined, then you must define an alternate name for all elements in the file. The alternate name must be a variable name (e.g. A$ or A$[1]). Supports only fields that use the Delimited format mask. See Format Mask. | |||||||||||||||||||||||||
|
(Not Applicable when File Type is a PxPlus Native File) Check box to indicate that a null value can be returned for the element when interacting with a Prefix or Link file created from an external database. See Using External Databases to Create a Data Dictionary. (The DB Null if Empty check box was added in PxPlus 2023.) | |||||||||||||||||||||||||
|
Check box to indicate that the element forms part of an external key and is not duplicated in the data portion of the record. Example: Key: CST_ID$ Data: CST_NM$, CST_ADDR$, CST_PHONE$ In this case, CST_ID$ forms the key and is not duplicated in the data portion of the record. | |||||||||||||||||||||||||
|
Check box to indicate that the element is a required field and must contain data before the record can be written in File Maintenance. | |||||||||||||||||||||||||
|
Check box to indicate that the data should always be in uppercase letters. Used by NOMADS sub-systems. | |||||||||||||||||||||||||
|
Check box to indicate that the element is designated as read only or locked. Used by NOMADS sub-systems. (The Read Only check box was added in PxPlus 2021.) | |||||||||||||||||||||||||
|
Properties |
| ||||||||||||||||||||||||
|
Brief description of the element, which can be a Fixed value, Expression or Message Library Reference. | |||||||||||||||||||||||||
|
Default / Input Value |
See Format Mask Options. | ||||||||||||||||||||||||
|
Validation / Rules |
See Format Mask Options. | ||||||||||||||||||||||||
|
Print / Input Format |
See Format Mask Options. | ||||||||||||||||||||||||
|
User Defined Tag Field |
See Format Mask Options. | ||||||||||||||||||||||||
|
Help Reference |
Help text to be launched when the user presses Shift - F1. Click the drop-down arrow for selections to access form fields for specifying the different definitions (either External or Internal).
| ||||||||||||||||||||||||
|
Floating Tip |
Mouse pointer message for the control (Fixed value, string Expression or Message Library Reference). You can customize the floating tip by adding a tip title, descriptive tip text and a hyperlink. These features enhance the visual display and functionality of the tip by providing users with much needed information at their fingertips. You can define either a Standard tip or an HTML tip that provides a simplified HTML Editor for customizing the tip text. To do this, click the button to the right of the Floating Tip multi-line input to invoke the Define Info Tip dialogue. See Defining an Info Tip. Note:
| ||||||||||||||||||||||||
|
Notes |
A multi-line input control used for entering notes about the element. Press Enter to start a new line. Maximum 1024 characters. Alternatively, notes can be added or edited for an element by using the Add/Edit Notes button beside the Data Elements grid. (Support for increasing input maximum was added in PxPlus 2022.) | ||||||||||||||||||||||||
|
Query Type |
Type of query to associate to the control: Panel, Program, Non-Query Logic, Spinner. Depending on the Query Type selected, different information is entered. For an explanation of each type and the information to enter, see Query Type. (Support for Non-Query Logic was added in PxPlus 2018.) | ||||||||||||||||||||||||
|
Panel/Program Attributes |
(Available if Query Type is Panel or Program)
(The Define button was added to Element Description in PxPlus 2023 Update 1.) | ||||||||||||||||||||||||
|
Non-Query Logic |
(Available if Query Type is Non-Query Logic) Select the type of logic (Link, Perform, Call, Execute, etc.) and the program logic reference "program;label". (Support for Non-Query Logic was added in PxPlus 2018.) | ||||||||||||||||||||||||
|
Spinner Attributes |
(Available if Query Type is Spinner) (Numeric Only) Associate a spinner control with the element in place of a query. Sets the Increment value for scrollbar movement, as well as the Start (initial) and End (maximum) values. Example: If Increment = 1, Start = 1, and End = 9999, then the initial value would be 1, scrollbar movement would increase/decrease by 1 and the maximum would be 9999. | ||||||||||||||||||||||||
|
ODBC Hide/No Show Options |
| ||||||||||||||||||||||||
|
| |||||||||||||||||||||||||
|
Button used to set up and access the optional security system that controls user access to the system. See Security Manager. | |||||||||||||||||||||||||
|
Clear |
Button used to clear the current record and put focus on the Name field. | ||||||||||||||||||||||||
|
Delete |
(Available when an existing element is selected) Button used to delete the selected data element. When selected, a message asks to confirm the deletion. | ||||||||||||||||||||||||
|
OK |
Adds or updates the current element, then closes the Element Description window. The new element is added to the bottom of the Data Elements grid. Use the Move Up/Move Down buttons beside the grid to change the position of the new element. If saving changes to a Global Dictionary element and elements with the same Name and Type exist in other data files, a message asks if you want to apply the same changes to the other elements. Responding Yes invokes the Update Global Dictionary Elements window for updating all or only selected elements. Responding No does not change the other elements. (Update Global Dictionary Elements was added in PxPlus 2019.) | ||||||||||||||||||||||||
|
Cancel |
Closes the Element Description window without saving any changes and returns to the Elements tab. | ||||||||||||||||||||||||
|
Apply |
Allows you to consecutively insert or update multiple data elements to the Data Dictionary for the current table without having to exit the Element Description window. After entering all the details for the element being added or modified, select Apply. A message displays to confirm that the element has been added or updated. The Element Description window is then cleared, and you can add or modify another element. If saving changes to a Global Dictionary element and elements with the same Name and Type exist in other data files, a message asks if you want to apply the same changes to the other elements. Responding Yes invokes the Update Global Dictionary Elements window for updating all or only selected elements. Responding No does not change the other elements. New elements that are entered consecutively and then saved using the Apply button are added to the bottom of the Data Elements grid in the same entry order. Use the Move Up/Move Down buttons beside the grid to change the order of the elements. (Update Global Dictionary Elements was added in PxPlus 2019.) | ||||||||||||||||||||||||
|
Data Storage Formats | ||||||
|
String Formats |
IOL Format |
Size |
Dlm |
Sign |
Decimal |
Pad |
|
Delimited |
Variable |
Y |
N/A |
N/A |
N/A | |
|
Fixed |
[CHR(l)] |
Fixed |
N |
N/A |
N/A |
Right/Space |
|
Padded |
[LEN(l)] |
Fixed |
N |
N/A |
N/A |
Right/Space |
|
Substring |
[LEN(l,SEP=sep$)] |
Fixed |
N |
N/A |
N/A |
Right/Space |
|
Last Substring |
[LEN(sep$, SIZ=l)] |
Fixed |
Y |
N/A |
N/A |
Right/Space |
|
Data Storage Formats | ||||||
|
Numeric Formats |
IOL Format |
Size |
Dlm |
Sign |
Decimal |
Pad |
|
Delimited |
Variable |
Y |
Explicit |
Explicit |
N/A | |
|
Fixed |
[NUM(l,s)] |
Fixed |
N |
None |
Implied |
Left/Zero |
|
Padded |
[NUM(l,s)] |
Fixed |
N |
None |
Implied | |
|
Substring |
[NUM(l,s)] |
Fixed |
N |
None |
Implied | |
|
Last Substring |
[NUM(l,s,SEP=sep$)] |
Fixed |
Y |
None |
Implied | |
|
Signed Fixed Numeric |
[SGN(l,s)] |
Fixed |
N |
Explicit |
Implied |
Left/Zero |
|
Decimal |
[DEC(l,s)] |
Fixed |
N |
Explicit |
Explicit |
Left/Space |
|
Decimal Delimited |
[DEC(sep$, SIZ=l,s)] |
Fixed |
Y |
Explicit |
Explicit | |
|
Binary Numeric* |
[BIN(l,s)] |
Fixed |
N |
Implied |
Implied |
Left/$00$ |
|
Unsigned Integer* |
[INT(l,s)] |
Fixed |
N |
N/A |
Implied |
Left/$00$ |
|
Examples
| ||||
|
String Formats |
Length |
Stores null as |
Stores "abc" as * |
Stores "abcdef" as * |
|
Delimited |
5 |
| |
abc| |
abcdef| |
|
Fixed |
5 |
^^^^^ |
abc ^^ |
abcde |
|
Padded |
5 |
^^^^^ |
abc ^^ |
abcde |
|
Substring |
5 |
^^^^^ |
abc ^^ |
abcde |
|
Last Substring |
5 |
^^^^^| |
abc ^^| |
abcde| |
|
Numeric Formats |
Length |
Stores 0 as * |
Stores -1.1 as * |
Stores 12345.678 as * |
|
Delimited |
6.2 |
0| |
-1.1| |
12345.678| |
|
Fixed |
6.2 |
000000 |
000110 |
234567 |
|
Padded |
6.2 |
000000 |
000110 |
234567 |
|
Substring |
6.2 |
000000 |
000110 |
234567 |
|
Last Substring |
6.2 |
000000| |
000110| |
234567| |
|
Signed Fixed |
6.2 |
00000+ |
00110- |
34567+ |
|
Decimal |
6.2 |
^^ 0.00 |
^ -1.10 |
Error #43 |
|
Decimal Delimited |
6.2 |
^^ 0.00| |
^ -1.10| |
Error #43 |
|
1 / 32767 |
-1 / 65535 | |||
|
Binary Numeric |
2 |
$0000$ |
$0001$ / $7FFF$ |
$FFFF$ |
|
Unsigned Integer |
2 |
$0000$ |
$0001$ / $7FFF$ |
$FFFF$ |
The following Format Mask options apply to key fields that are external only; i.e. not found in the data portion of the record:
|
Padded Key |
Field padded with spaces based on the defined length. | ||||||||||||
|
Fixed Key |
Field padded to the specified length, unless it is the last key component. For redundant external key fields (i.e. fields that form both the external key, as well as part of the data portion of the record), define the format as it should be defined for the data portion. Depending on the format chosen, the format for the corresponding key field defaults to the following:
| ||||||||||||
|
Length |
Set the maximum length of the data field. Numeric field lengths can be defined using implied decimal format. Example: 6.2: 6 represents total length of the field, including explicit signs and decimals, where applicable; 2 represents scaling factor or number of decimal places. | ||||||||||||
|
Occurs |
Dimension, if element represents an array (e.g. 1:3). If a single number (e.g. 3), represents a single element in the third position of an array (e.g. X$[3]) rather than the entire array. Note: | ||||||||||||
|
Default Value |
Value to be loaded when the field is first initialized. Can be a Fixed value, Expression or Message Library Reference. | ||||||||||||
|
Validation |
Comma-separated validation rules; e.g. 1-3,9 or Y,N,M. Can be Fixed text or an Expression. | ||||||||||||
|
Print Format |
Output format mask, either Fixed text (string literal) or Expression. | ||||||||||||
|
User Defined Tag Field |
Data/tag field used to pass information on such things as formatting, error messages and validation rules. Can be Fixed text (string literal) or an Expression (evaluated when the object is created). NOMADS places the contents of this field in a variable using the element name with a .TAG$ extension. |