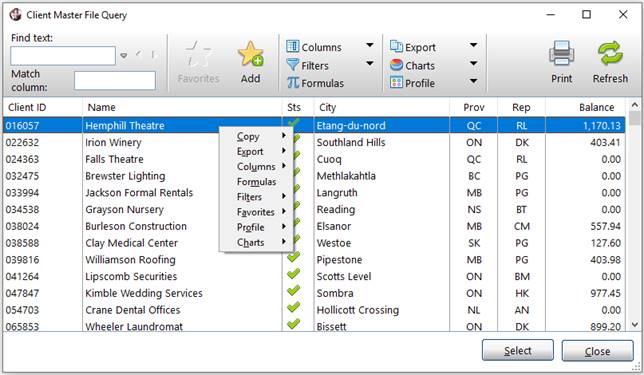
Run-Time Query Example
(with right click popup menu displayed)
|
Run-Time Query |
|
When a NOMADS Query Definition is invoked, a panel is displayed showing a list of records from which to choose.
For information on the different modes of query display, see Query+, Drop Queries and Classic Query.
|
|
|
Besides the basic display, the query offers a number of features (i.e. search, sort, filters, etc.) that are available to the end user at run time to further enhance the query experience. The Query Profile feature makes it convenient for end users to save run-time query settings, such as column order/width, filters and additional formulas, etc., so that the settings can be reloaded at a later time by selecting a named profile.
(The ability to save Query Profile settings was added in PxPlus 2019.)
These features are available either by selecting the toolbar button or by selecting from the right-click popup menu. The following links provide information about a particular feature:
|
|
|||
|
|
|||
|
|
|||
|
|
|||
|
|
Query+: Drop Query Mode
The query is initially loaded using the key selected in the query definition. Sorting by columns in ascending/descending order is available by clicking on the column headings. Column sorting ignores case and accents. If a column contains images, then the sort is undefined; therefore, it is recommended that an alternate sort algorithm be assigned for that column.
Classic Query: Default Sort Mode (Sort by File Key)
The query can be sorted by any of the key definitions associated with the data file.
Classic Query: Sort by Columns Mode
The query is initially loaded using the key selected in the query definition. Sorting by columns in ascending/descending order is available by clicking on the column headings or by selecting the column from the Sort By drop box. The key order that was used to initially load the query is also available in the Sort By drop box.
Query+: Match Column / Drop Query Goto
Enter a Match Column or Go to value to position the query at the record whose currently selected column matches the value. The user has to enter formatting characters in string input values (e.g. dashes for phone numbers formatted as 000-000-0000). Columns containing images or string values that use an alternate sorting algorithm will have undefined results. Numeric column matches are not supported.
Classic Query: Default Sort Mode (Sort by File Key)
Enter a Start at (or From) value to position the query at the record whose currently selected key matches the value. Because it is the key value being matched, the value entered does not necessarily match the data as displayed, especially if it is formatted.
Classic Query: Sort by Columns Mode
Enter a Start at (or From) value to position the query at the record whose currently selected column matches the value. The user has to enter formatting characters in string input values (e.g. dashes for phone numbers formatted as 000-000-0000), but not in numeric input. Columns containing string values that use an alternate sorting algorithm pose a particular problem because the value displayed in the column does not match the corresponding sort value. In this case, the Start at logic attempts to derive a workable sort value.
The search feature allows the user to search the contents of the query for occurrences of a specified text value. An option to specify whether the search should be case sensitive is also provided.
When a value is passed to the query, from a multi-line for example, that value is placed in the Find Text input field since that value is used to position the query.
(Populating the Find Text input field with the passed query value was added in PxPlus 2023.)
Individual records in the query data may be designated as Favorites, which may be displayed separately using Favorites display mode. Favorites mode replaces the normal display with just those records designated as favorites, allowing the user to have a personalized filter for those records required most often.
|
Show Favorites/Show All |
Toggle between the normal query display and the Favorites display. |
|
Add to Favorites |
While in normal query display mode, add a favorite by highlighting the record and clicking the Add to Favorites button or the right-click popup menu selection. Some items may be part of a group of records sharing the same identifier. In this case, all members of the group will be considered a favorite. |
|
Remove from Favorites |
While in Favorites display mode, remove a favorite by highlighting the record and clicking the Remove from Favorites button or the right-click popup menu selection. Some items may be part of a group of records sharing the same identifier. In this case, all members of the group will be removed from the Favorites list. |
You can highlight favorite records in the normal display by setting the %NOMADS'Query_Fave_Color$ property to the color to be used.
Example:
%NOMADS'Query_Fave_Color$="Dark Green"
%NOMADS'Query_Fave_Color$="RGB:192 64 0"
The Favorites feature is enabled by default. Individual queries have a Suppress Favorites option in the Query Header Definition (on the Options tab) with selections to Always or Never suppress favorites. A Default setting is also available that uses the %NOMADS'Query_Suppress_Favorites setting (0=Off, 1=On).
See %NOMADS'Query_Suppress_Popup$ and %NOMADS'Query_Fave_Color$.
When creating a query definition, individual columns can be defined with an Initially hide column option. This means that the column, although included in the definition, will not be displayed when the query is invoked for the first time. Once invoked, the user then has the option to show these columns, as well as hide any column.
Query+ also allows the user to change the order of the columns.
|
Hide (Column Name) |
Hides the column that was clicked on with the mouse. For example, if you clicked on the Vendor Name column, this option becomes Hide Vendor Name, and when selected, the Vendor Name column is hidden. |
|
Show/Hide/Reorder Columns |
Invokes the Show/Hide/Reorder Columns window for selecting the columns to be shown. You can also change their order (Query+, Drop Query) by dragging them to their new locations in the list or by moving them with the Move Up/Move Down buttons. |
|
Reset Default Columns |
Resets the column selection and order to that of the original query definition. |
|
Save Column Settings |
Select this option to automatically save the selection of shown/hidden columns, as well as their order and width for the current profile when the profile or query is exited. The columns displayed, their order and width will be restored when the query profile is next loaded. If not selected, the last saved or default Show/Hide settings, as well as the last saved or original column order and sizes will be restored the next time the query profile is loaded. These settings can also be saved using the Save option on the query Profile menu. |
Dynamic filters can be added to individual columns. Filters include tests for equality, inequality and range. A description of the filter can be viewed in the tip that appears over the column heading.
When filters are applied to more than one column, the conditions are applied using the AND operator (e.g. CustClass$ is equal to "xyz" AND Balance is less than 0).
If selection criteria is specified when a query definition is created, then the user filters are applied in addition to the selection criteria using the AND operator.
|
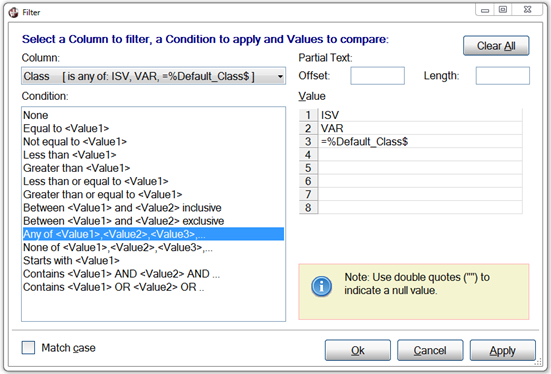
Add filter to (Column Name) |
Invokes the Filter window for adding, modifying and removing a column filter. This window consists of the following:
| ||||||||
|
Remove filter from (Column Name) |
Remove any filter that may be associated with the current column. | ||||||||
|
Disable User filters |
Toggle to disable/enable the current user filters. | ||||||||
|
Save filters |
Select this option to automatically save the current user filters when a profile or query is exited. The filters will be restored when the query profile is next loaded. If not selected, the filters will not be saved or restored unless saved from the query Profile menu. |
(Query+, Drop Query)
Select Formulas to invoke the Formula Wizard for defining a new formula, along with editing or deleting an existing one. The Wizard walks you through naming and defining the formula, as well as formatting the results.
Numeric formulas can be built from column values. Addition, subtraction, multiplication, division, exponentiation and modulus operations are supported. PxPlus functions, such as ABS( ) absolute value, INT( ) integer, MIN( ) minimum value, and MAX( ) maximum value, can also be used to manipulate values.
Text formulas can be built, which concatenate text components. These components can be comprised of literal values and column values. Partial items can be defined, and segments can be padded, have characters stripped, or be converted to upper/lowercase.
Formula-defined columns, like other columns, can also be shown/hidden, resized and re-ordered.
(Query+, Drop Query)
A query profile is a collection of run-time settings that has been applied to a standard query definition by a particular end user. The settings can consist of column settings (column order, column widths, hidden columns), as well as column filters and additional formulas that have been created at run time.
(The ability to save Query Profile settings was added in PxPlus 2019.)
A query profile can be saved with a name and recalled at a later time. The column and filter information that is saved is based on the whether the Save column Settings option (Columns menu) and the Save filters option (Filters menu) are selected. User formulas are saved immediately for the currently active profile but can be shared with other profiles either through inheritance when new profiles are created or by using the Copy formula to other profiles option in the Formula Wizard.
The *Main* profile is initially derived from the original query settings and consists of run-time settings made by the user that have not been assigned a name. Each user can create up to 10 profiles (including the *Main* profile) per query.
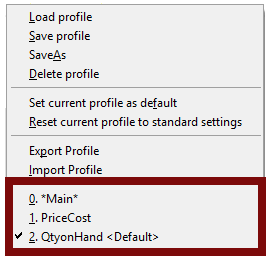
Query Profile Options
The query right-click popup menu provides options for loading, saving and deleting a query profile, along with other functions listed below. The Toolbar query view provides a Profile button that displays these options, and the main menu of the Hybrid and Menu query views has a Profile group with these options. See Query View for an explanation of each of these views.
Below is a list of query profile options:
|
Load profile |
Invokes the Load a Profile window for selecting a profile to load from a list of profiles that have been created (if available) for the current query. To load a profile, click the Load button. This window consists of the following:
Note: | ||||||||||||||||||
|
Save profile |
Saves the current settings to the currently active profile. | ||||||||||||||||||
|
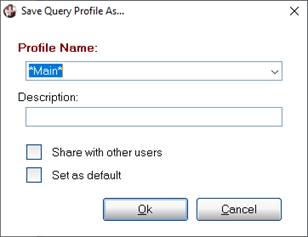
SaveAs |
Invokes the Save Query Profile As window for saving a new profile using the current settings or for saving an existing profile with different settings. This window consists of the following:
| ||||||||||||||||||
|
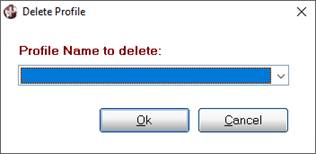
Delete profile |
Invokes the Delete Profile window for selecting the profile to delete. When the currently active profile is deleted, the query switches to the default profile. If the deleted query is also the default, then the query will switch to the *Main* profile. Note:
|
|
Profile Name to delete |
Click the drop-down arrow to select the profile to delete from the list of existing profiles. |
|
OK |
Deletes the selected profile and closes the Delete Profile window. |
|
Cancel |
Closes the Delete Profile window with no further action taken. |
Set current profile as default
Sets the currently active profile as the default profile, which will be used when the query invoked. If not set, the *Main* profile is used.
Reset current profile to standard settings
Resets the settings of the currently active profile to the original query settings. This includes column and filters settings, and removes any user formulas defined for the profile.
Export Profile
Invokes the Export Query Profile window for exporting the user's current query settings (i.e. column order, hidden columns, column filters, user formulas, and/or favorites) to an XML file that can be used later to import the settings to another system or user.
Settings can be saved for any query definition in any library that exists in the same directory where the current query is stored.
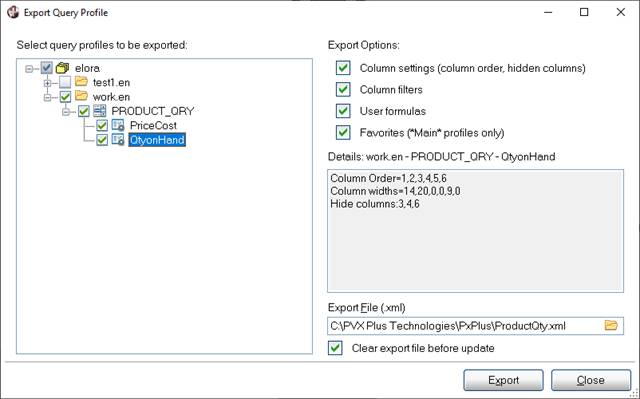
This window consists of the following:
|
Select query profiles to be exported |
Displays a tree view from which to select the libraries, panels and profiles whose settings are to be exported. |
|
Export Options |
Select the types of settings to export, which include column order, hidden columns, column widths, column filters, user formulas and/or favorites. |
|
Details |
Displays settings for the selected query profile. |
|
Export File (.xml) |
Enter the name of the file to which the exported query profiles/settings will be saved. Click the Query button to specify the file pathname. |
|
Clear export file before update |
When selected, the export file is cleared before current query settings are saved; otherwise, these settings will be added to the file's existing contents. |
|
Export |
The export process generates XML code to describe the settings, which is saved in the export file. |
|
Close |
Closes the Export Query Profile window. |
Import Profile
Invokes the Select query profiles to be imported window for importing a query profile.
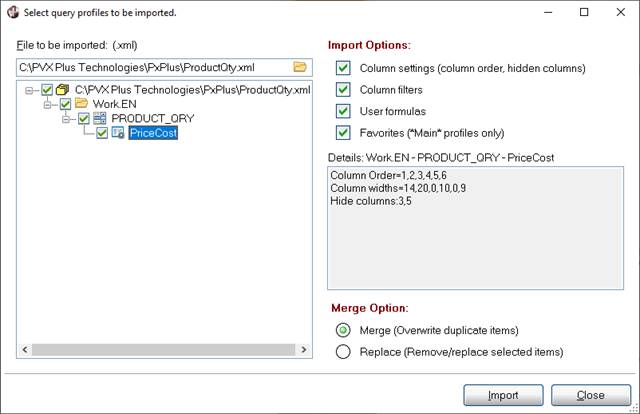
This window consists of the following:
|
File to be imported (.xml) |
Enter the name of the XML file with the profile to be imported. Click the Query button to specify the file pathname. | ||||
|
(List Box) |
Displays a tree view from which to select the libraries, queries and profiles whose settings are to be imported. | ||||
|
Import Options |
Select the types of settings to import, which include column order, hidden columns, column widths, column filters, user formulas and/or favorites. | ||||
|
Details |
Displays settings for the selected query profile. | ||||
|
Merge Option |
| ||||
|
Import |
The import process parses the XML file and either merges the imported settings with existing ones or replaces them, depending on the Merge Option. | ||||
|
Close |
Closes the Select query profiles to be imported window. |
A list of all profiles that the current user has saved for the current query.
To load a profile, click an entry in the list. A check mark next to a profile name indicates it is currently selected.
The Query Subsystem provides a facility to copy query data to the clipboard and to export it to comma- or tab-separated files, Symbolic Link Format files (.slk), or to SpreadsheetML files, an XML dialect.
The .slk and .xml formats represent the information in an MS Excel spreadsheet. SpreadsheetML files can be read by MS Excel 2003 versions and later. Symbolic Link files can be read by earlier versions. These file formats are also readable by other spreadsheet products such as Open Office.
|
Copy (Column Name) |
Copy the value of the cell where the mouse was clicked to the Clipboard. | ||||||||
|
Copy Other Column |
Copy the value of the specified column in the current row to the Clipboard. | ||||||||
|
Copy Selected Record |
Copy the current record to the Clipboard. | ||||||||
|
Copy All Records |
Copy all records in the query to the Clipboard. | ||||||||
|
Export All Records to File |
Export the query data to a file. The user must specify the file name and type:
| ||||||||
|
Export All Records to Spreadsheet |
Export the query data to an XML spreadsheet file in the user's designated Temp directory and open it. |
When copying or exporting data, hidden columns and records that are excluded due to column filtering are not included. In addition, if Favorites mode is currently in effect, then only the designated favorite records will be exported.
The Copy and Export features are enabled by default. Individual queries have a Suppress Export option on the Query Header Definition Options panel with selections to Always or Never suppress export. A Default setting is also available that uses the %NOMADS'Query_Suppress_Export setting (0=Off, 1=On).
See %NOMADS'Query_Suppress_Popup$.
(Query+ Only)
The NOMADS AutoChart feature allows the user to quickly define simple charts based on the columns of a query, to save the definitions, and to display the charts.
|
Define a chart |
Invokes the Chart Wizard that will step you through the process of creating, editing or deleting an AutoChart definition based on the query data. A public AutoChart definition can be used to generate and load data into a Smart Chart. See Smart Controls. |
|
Display chart |
Displays the chart designed for the query. If more than one chart was created, select the chart to display from the list of chart titles presented. |
|
Schedule Chart Image Generation |
(Available to Users Authorized to Create Public AutoCharts) Invokes Chart Image Generation Schedule Maintenance to schedule the generation of chart images. |
Edit the data file. The current record is loaded into the specified File Maintenance window, although any record(s) may ultimately be edited.
When returning to the query, the data is updated, and the last record manipulated is highlighted.
(Classic Query without Sort by Columns Option)
Generates a sub-query based on the current entry in the selected column.
Click the Print button to produce a simple report listing the title, file name and column headings, followed by a list of all the records that pass the selection criteria. Report columns are formatted in the same way as the screen display.
The font size is adjusted to fit all columns on the page. If your query has a large number of fields or very wide columns, NOMADS prints the report using a small font to fit the information into the space allotted. If the font is too small, users can select landscape orientation to increase the report width and thus the font size. If it is still too small, you may need to redesign your query panel by decreasing column size or the number of fields to create a usable report.
The Print feature is available by default. The No Print Button option on the Query Header Definition Options panel allows you to suppress this feature.
(Classic Query with Sort by Columns Option, Query+, Drop Query)
Refreshes the contents of the query. In Query+, hover the mouse over the Refresh toolbar button to display a tooltip indicating the number of entries.
You can exclude certain types of features from the query popup menu and toolbar. This is accomplished by setting the %NOMADS'Query_Suppress_Popup$ property with any combination of the following:
C Copy
E Export
F Filters
G Charts
H Hidden columns
P Profile
U User formulas
V Favorites
Example 1:
%NOMADS'Query_Suppress_Popup$="EC"
This example will suppress the Export and Copy options.
Example 2:
%NOMADS'Query_Suppress_Popup$="PGU"
This example will suppress the Profile, Graphs/Charts and User Formulas options.
(The order of the letter codes does not matter.)
To suppress all features, set:
%NOMADS'Query_Suppress_Popup$="*"
The settings for suppressing Favorites and Export/Copycan be overridden on a per-query basis by setting the Suppress Favorites and Suppress Export query header options for the individual query to a value other than Default.