|
Split File Maintenance Utility |
Two interfaces, one for Text Mode and the other for Graphical, are needed to provide the capability to convert a file into a split file, add new splits, and set/reset Read Only attributes.
The Text Mode Split File Maintenance Utility works on a series of keyword commands, followed optionally with parameters. The basic logic is similar to the DBG command that allows keywords to be abbreviated to their first letter.
To access the Text Mode interface, enter the command SPLITFILE from the Command line. Optionally, the SPLITFILE command can be followed by the pathname of the file to be split or whose split attributes are being maintained or the keyword GUI to invoke the graphical utility.
The following keywords (and their arguments) are supported:
|
Keyword |
Description |
|
OPEN path |
This command opens the file in the specified path. The path can be either a file to be split or a file that already has splitting enabled. If splitting is enabled, the system displays the current number of split segments and their pathnames. |
|
ADD path |
This command adds the file path as a new segment split to the currently open file. If the file has not been split before, file will become the first segment and all existing data will be moved to this file. Note: |
|
DROP path | index |
This command can be used to drop the specified path or index from the segment list. If you drop the only segment, the file is reverted back to a standard non-segmented file. You can provide either the path of the segment to drop or its index. |
|
TEST name$(ofs,len) |
Define the field in the file that will be tested to determine which file is to be used when adding new records. If not set, new records go in the last added segment. |
|
CONDITION path | index val, val,.. |
This command sets the values of the condition field that will indicate where new records will be added. Example: TEST 1:2013 will indicate that segment 1 will be used if the value of the condition field contains "2013". Multiple values may be specified (comma separated) or a range by separating the lower and upper bounds with a dash. |
|
LOCK path | index |
This command locks the segment specified by path or index. Locked segments cannot have information written to them. |
|
UNLOCK path | index |
This command unlocks the segment specified by path or index. Unlocked segments can be updated. Only the primary segment can have records added or removed. |
|
KEY keyno A | D | N |
This command allows the user to specify whether the key specified is always Ascending or Descending between segments. The system uses this information to help optimize some of the internal accesses. |
|
GUI |
Run the graphical maintenance utility. |
|
HELP |
Displays a list of valid commands and their function. |
|
QUIT |
Exits the utility. |
To access the Graphical Split File Maintenance Utility interface, use one of the following methods:
|
Location |
Method |
|
From the PxPlus IDE Main Launcher |
Expand the Data Management category and select Historical File Splitting. |
|
Select an existing table name and click the File Splitting toolbar button. |
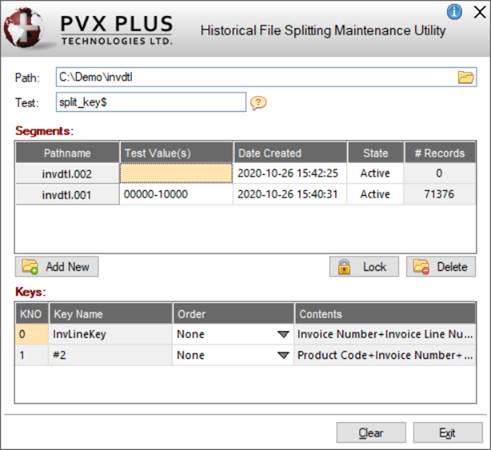
The following interface is displayed:
This interface consists of the following:
|
Path |
Entering the pathname for the file displays all the existing Segments and their respective information, as well as the Keys structure. |
|
Add New |
To add a new segment, click the Add New button. An OPEN FILE dialog is displayed, where you can enter or select the segment pathname. If the file does not exist, the system displays a prompt to confirm the creation of the file. |
|
Lock |
To lock a segment, first select the segment to highlight it, and then click the Lock button. If the segment selected is already locked, the button changes to Unlock, allowing the user to remove the segment lock. |
|
Delete |
To delete a segment, first select the segment from the segment list to highlight it, and then click the Delete button. |
|
Clear |
(Available when a valid Path is entered) Clears all fields and leaves the utility open. (The Clear button was added in PxPlus 2017.) |
|
Exit |
Closes the utility. |
For each key on the file, you can change the sort order between each segment. If a key always ascends from the top file segment in the grid down to the bottom file segment, you can set the Order to Ascending (or Descending, if the value always descends). By default, the Order is set to None, which indicates that the key order between the file segments is random (providing that the key order, when one exists, can speed up processing and key retrieval).