Enhanced View

Standard View
|
IDE Main Launcher (Windows) |
|
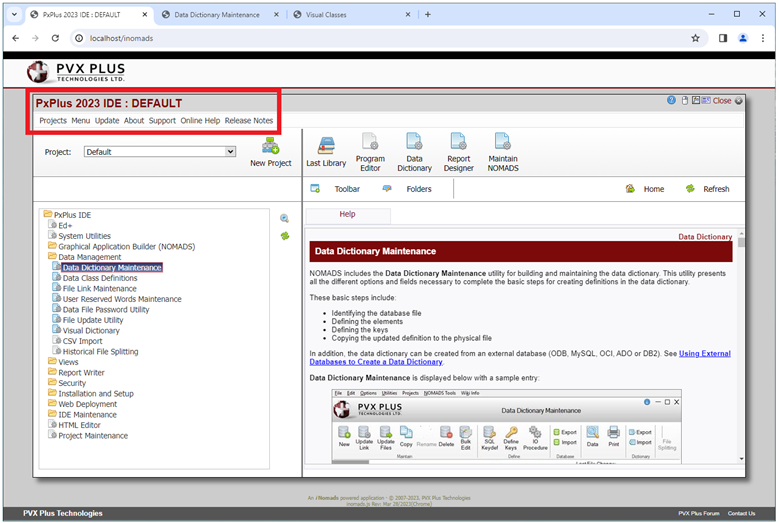
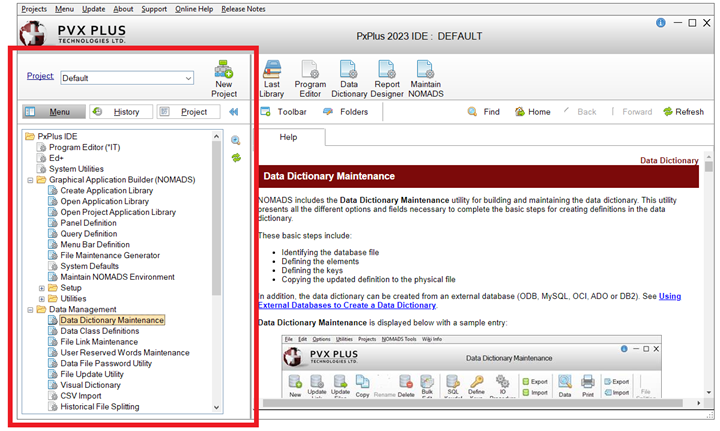
When launched from a Windows platform, the IDE Main Launcher presents all the PxPlus development tools, installation and setup components in a tree-like format with expandable/collapsible nodes. Expanding a "parent" node (e.g. Data Management) displays a list of different tasks that are available under that category. Tasks are launched one task at a time; however, you can launch multiple tasks.
As of PxPlus 2020, the IDE Main Launcher was enhanced with Web capability and streamlined access to Menu, History and Project tasks. The ribbon toolbar can be customized with up to 10 buttons for launching commonly used tasks. This is done by using the drag-and-drop method or by right clicking on a selected task in the Menu list. Web pages (up to 10) can be added so that frequently used Web sites are just a single click away. A Find button is provided for entering specific text to search for in a displayed Web page. The IDE Main Launcher includes maintenance utilities for managing ribbon toolbar buttons and Web page tabs. A single button switches the Main Launcher to the standard IDE view, which does not include Web capability.
A Web version of the PxPlus IDE Main Launcher is also available that provides easy access to many of these PxPlus development and setup tools. See IDE Main Launcher (Web).
(The Windows version of PxPlus IDE was added in PxPlus 2014.)
(The Web version of PxPlus IDE was added in PxPlus 2016.)
(The Find button was added in PxPlus 2021 Update 2.)
|
|
|
|
The IDE Main Launcher can switch between enhanced or standard view as desired by clicking the Switch to Enhanced/Standard button (double arrow) located beside the Project button. However, the IDE ribbon toolbar and HTML folder tabs are available in the enhanced view only. If an Internet connection is not available, the IDE Main Launcher will display in standard view only.
Only one instance of the IDE Main Launcher can be displayed at a time. The size and location of the IDE Main Launcher persist when the dialog is closed so that these remain the same the next time the dialog is opened.
The IDE title bar displays the PxPlus version associated with the IDE Main Launcher (i.e. PxPlus 2023 IDE) followed by the name of the current project. If the IDE Main Launcher is running on WindX, the word "WindX" is included in the title (i.e. PxPlus 2023 IDE WindX).
(The ability to display "WindX" in the title when applicable was added in PxPlus 2016 Update 0001.)
The menu bar consists of the following options: Projects, Menu, Update, About, Support, Online Help and Release Notes.
(The Projects > Project Maintenance menu option was added in PxPlus 2023.) | |||||||||||||||||||||||||||
| |||||||||||||||||||||||||||
|
Launches the Update Manager dialog that is used for accessing the Online Update feature. See Online Update. When an online update is ready to be applied, the Update menu bar item changes to *Update* (with asterisks) as a visual cue. Once the online update is successfully applied and no other updates are pending, the menu bar item changes back to Update (without asterisks). (Displaying *Update* when an online update is available was added in PxPlus 2023.) | |||||||||||||||||||||||||||
|
Launches a separate dialog with detailed licensing information about the current PxPlus installation. This information includes the Serial Number, PxPlus Software package, Expiry Date, User Count and Version. (The About option was added in PxPlus 2017.) | |||||||||||||||||||||||||||
|
Launches the PVX Plus Support Center for submitting a HelpDesk ticket. (The Support option was added in PxPlus 2021 Update 2.) | |||||||||||||||||||||||||||
|
Launches the online PxPlus Help documentation (https://manual.pvxplus.com). (The Online Help option was added in PxPlus 2024.) | |||||||||||||||||||||||||||
|
Provides quick access to the Release Notes (in the PxPlus Online Help) that correspond with the current PxPlus installation. (The Release Notes option was added in PxPlus 2019.) |
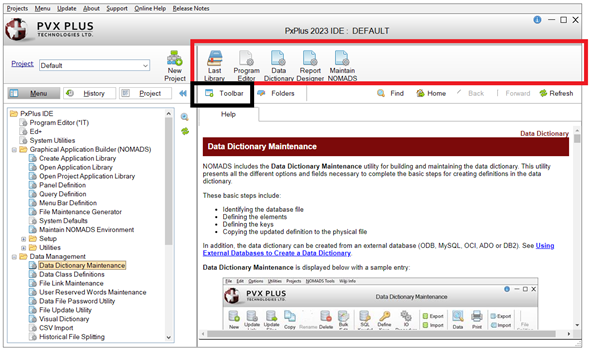
Certain tasks are project related and therefore must be assigned to a project. Designating a task as project related is controlled by the Project Related? check box option on the Task Definition dialog. An icon precedes each of the tasks displayed on the Main Launcher. To distinguish between a project related and a non-project related task, different icons are used. For example, in the screen shot above, the icon for the project related task Data Dictionary Maintenance is a different color than the icon for the non-project related task CSV Import.
For a project related task, the current working directory is changed to the working directory defined for that project. If present, the Start_up program in that directory will be run prior to launching the task. Only one project can be worked on at a time.
The IDE Main Launcher can be customized to meet the needs of an individual or a company by using the tasks accessed through the IDE Maintenance category on the tree view. These tasks consist of Task Definition, Menu Maintenance, Import Menu Structure and Export Menu Structure.
When initially starting the IDE Main Launcher, a Default project is already provided. To create additional projects, click the New Project button (beside the Project drop box) or select the Create Project option on the Projects menu.
Tasks are launched one task at a time; however, multiple tasks can be launched.
Tasks can be added to the IDE Ribbon Toolbar in a few ways:
Drag and drop a selected task from the Menu list to the IDE ribbon toolbar.
Use the Toolbar button.
Select the Add to Toolbar option from the popup menu when right clicking on a task in the Menu list.
This section of the IDE Main Launcher consists of the following:
|
Project |
Select the current project from the drop-down list of projects that have been created. When a project is selected, the name of that project displays in the IDE header. Hover the mouse pointer over the Project hyperlink to display a floating tip with the current Working Directory. Click the Project hyperlink to invoke the Edit Project dialog to modify the current project or select a different project. Note: | ||||||||||||||||||||||||||||
|
New Project |
Click this button to launch the Create Project dialog. Alternatively, use the Create Project option on the Projects menu. (The New Project button was added in PxPlus 2021.) | ||||||||||||||||||||||||||||
|
Menu |
Click this button to display a list of Menu tasks. Any number of tasks can be launched. See Menu Maintenance. Note:
|
|
(Open All/Close All) |
Button that is used to toggle between opening or closing all tree view nodes. |
|
(Refresh) |
Button that is used to refresh the contents of the Menu display. |
Right click on a Menu task to display the following popup menu:
|
Insert Task |
Displays the Task Definition dialog for selecting the task to insert. The task will be inserted below the selection currently highlighted on the tree view menu, depending on whether a parent node or a subordinate branch is highlighted. |
|
Insert Task on Menu |
(Available only when a parent node is highlighted) Displays the Task Definition dialog for selecting the task to insert as a subordinate branch under the highlighted parent node. |
|
Delete Task |
(Available only when a subordinate branch is highlighted) Removes the currently highlighted task from the tree view menu only. |
|
Add to Toolbar |
(Available only when a subordinate branch is highlighted) Adds a button to the IDE Ribbon Toolbar for quick access to the highlighted task. |
(The Menu button was added in PxPlus 2020.)
Click this button to display a list of the libraries, panels (windows and dialogues), programs, menus, queries, data dictionary tables and reports that have been recently accessed and/or created. HTML Editor tasks are also included in this list.
(Support for including HTML Editor tasks in the History list was added in PxPlus 2021.)
A task type icon precedes each listed task. To see a list that describes what these icons represent, hover the mouse pointer over the ? button beside the list box. Tasks are launched based on the current working directory to which they were associated at the time they were added to history.
When selecting to open a NOMADS panel that is a generated File Maintenance panel, a message will display.
(The ability to open File Maintenance panels in NOMADS from the History list was added in PxPlus 2023.)
Up to 25 tasks, including those flagged as favorites, can be saved to history. When this number is exceeded, the task list rolls forward to continuously reveal the most recent 25 tasks.
The grid side buttons are:
|
Add/Remove from Favorites |
Button that is used to toggle between adding or removing the "favorite" designation (star) to/from a highlighted task. Also available from the popup menu when right clicking on a highlighted task. Tasks flagged as "favorites" are repositioned to the top of the list. | ||||||||||||
|
Properties |
Button that displays a Properties dialog with the following details about the highlighted task (for information only). Also available from the popup menu when right clicking on a highlighted task.
| ||||||||||||
|
Refresh |
Button that is used to refresh the contents of the History list with any new objects that have been recently accessed and/or created. | ||||||||||||
|
Task Type Icons |
Button that displays a floating tip with a list of task type icons and their descriptions. (The ? button was added in PxPlus 2017.) |
Right click on a History task to display the following popup menu:
|
Add/Remove from Favorites |
Same as the Add/Remove from Favorites grid side button. |
|
Show Properties |
Same as the Properties grid side button. |
|
Add to Project xxxxxx |
Adds the selected task to the current project xxxxxx displayed in the Project drop box, as well as the IDE Header. See Note below. |
|
Add to another Project |
Displays the Add to Project dialog for selecting another project to which the selected task will be added. See Note below. |
Click this button to display a tree view list of all tasks for the current project, grouped into categories (i.e. screen libraries, programs, panels, reports, etc.). HTML Editor tasks are also included in this list.
(Support for including HTML Editor tasks in the Project list was added in PxPlus 2021.)
A task type icon precedes each listed task (same icons used to identify the History tasks). For a list that shows what these icons represent, hover the mouse pointer over the ? button beside the list box.
When selecting to open a NOMADS panel that is a generated File Maintenance panel, a message will display.
(The ability to open File Maintenance panels in NOMADS from the Project list was added in PxPlus 2023.)
|
Refresh |
Button that is used to refresh the contents of the Project display. |
|
Task Type Icons |
Button that displays a floating tip with a list of task type icons and their descriptions. (The ? button was added in PxPlus 2017.) |
Right click on a Project task to display the following popup menu:
|
Launch Task |
Runs the selected task. |
|
Remove from Project |
Removes the selected task from the current project. When the last task listed under a main heading is removed, the main heading is removed at the same time. |
|
Add to another Project |
Displays the Add to Project dialog for selecting another project to which the selected task will be added. |
(Enhanced/Standard IDE)
(Double arrow) Button that is used to toggle between the enhanced IDE (with Web) or standard IDE (without Web).
(The Enhanced/Standard IDE toggle button was added in PxPlus 2020.)
Project Maintenance can be used to add one or more tasks of various types to a predefined project, as well as remove tasks, all at one time. To invoke this utility, select the Project Maintenance task near the bottom of the PxPlus IDE tree view or select Project Maintenance from the Projects menu.
If adding a task to a project with a working directory that differs from the working directory for the task, a Working Directory Conflict message will display to notify you of this difference and inform you that continuing with this process may result in problems when accessing the task in the new project. At this point, you have the option to select OK to continue with adding this task to the project or select Cancel to terminate the process.
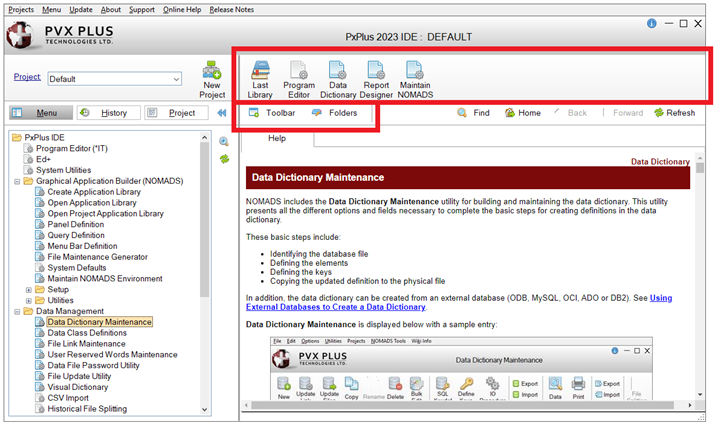
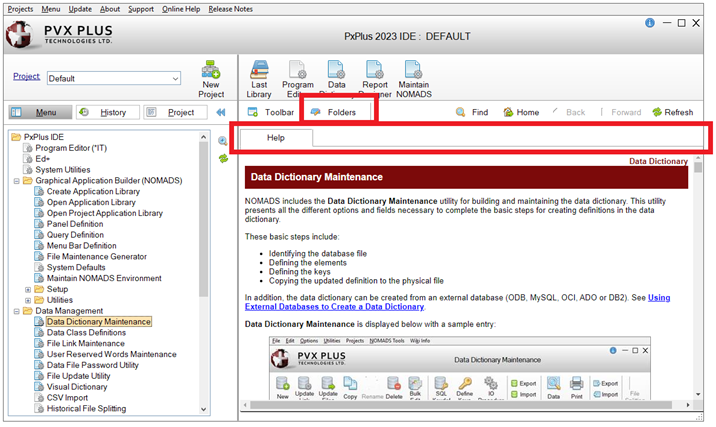
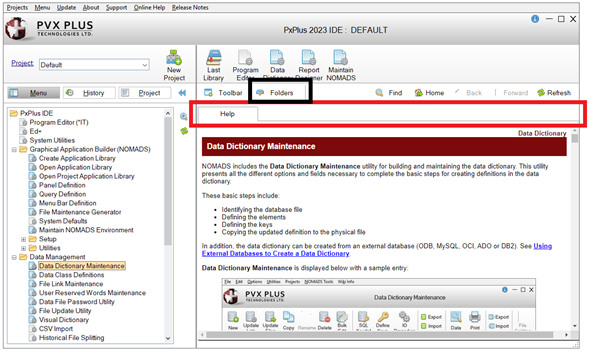
The enhanced IDE Main Launcher includes a ribbon toolbar and HTML folder tabs, both of which can be easily customized so that commonly used tasks and information are readily accessible with just one click.
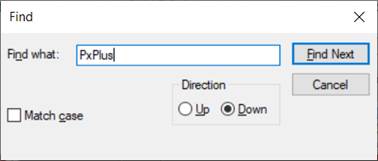
In addition, you can search for specific text in a displayed IDE Web page by using the Find button.
|
|
|
|
|
|
This section of the IDE Main Launcher consists of the following:
|
(IDE Toolbar) |
Ribbon toolbar that can be customized to display task buttons for quick access to commonly used PxPlus development tasks. See Maintain IDE Toolbar Buttons. | ||||||||||
|
Toolbar |
Click this button to launch the Maintain IDE Toolbar Buttons dialog. (The Toolbar button was added in PxPlus 2020.) | ||||||||||
|
Folders |
Click this button to launch the Maintain IDE HTML Tabs dialog for adding and maintaining HTML tabs. | ||||||||||
|
Click this button to enter specific text to search for in a displayed IDE Web page. Alternatively, click inside the Web page and use the Ctrl+F hot key. This window consists of the following:
(The Find button was added in PxPlus 2021 Update 2.) | |||||||||||
|
Home |
Buttons that are used to navigate and refresh the Web site that is associated with the currently selected HTML tab. Note: |
(The IDE ribbon toolbar, HTML tabs and navigation buttons were added in PxPlus 2020.)
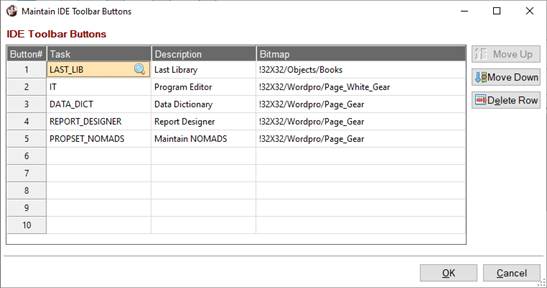
The Maintain IDE Toolbar Buttons dialog is used to add, maintain and delete task buttons in the IDE ribbon toolbar. A maximum of 10 task buttons can be added.
To invoke this dialog, click the Toolbar button below the ribbon bar. Alternatively, right click on an existing task button in the ribbon toolbar and select Maintain Toolbar from the popup menu.
|
|
|
|
This dialog consists of the following:
|
Button# |
Task button order. |
|
Task |
Task name. Click the Query button (magnifying glass) for a list of the tasks defined in Task Definition. |
|
Description |
Enter the task description (optional) that will display below the task button in the ribbon toolbar. If the task is dragged and dropped from the Menu list to the ribbon toolbar, the description will default from Task Definition and can be modified if needed. If the task is selected from the Query button, the description will not default. It can be manually entered or left blank. |
|
Bitmap |
Enter the bitmap (optional) to display for the task button in the ribbon toolbar. If the task is dragged and dropped from the Menu list to the ribbon toolbar, the bitmap will default from Task Definition and can be modified if needed. If the task is selected from the Query button, the bitmap will not default. It can be manually entered or left blank. |
|
Move Up |
Rearranges the order of the task buttons in the ribbon toolbar. |
|
Delete Row |
Removes the selected task button from the ribbon toolbar only. The task definition is not removed. |
|
OK |
Saves any changes and closes the Maintain IDE Toolbar Buttons dialog. New buttons, if defined, are added to the ribbon toolbar (in Button# sequence). |
|
Cancel |
Cancels any changes and closes the Maintain IDE Toolbar Buttons dialog. |
(The Maintain IDE Toolbar Buttons dialog was added in PxPlus 2020.)
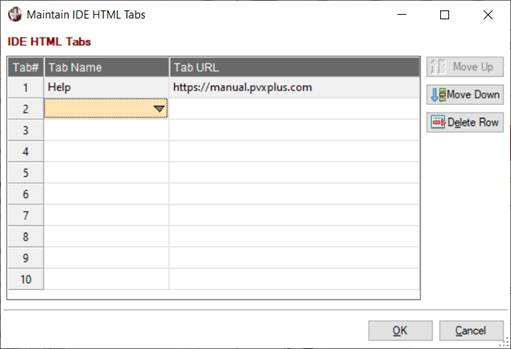
The Maintain IDE HTML Tabs dialog is used to add, maintain and delete HTML tabs in the IDE Main Launcher. A maximum of 10 HTML tabs can be added.
To invoke this dialog, click the Folders button below the ribbon toolbar.
|
|
|
|
This dialog consists of the following:
|
Tab# |
Tab order. |
|
Tab Name |
Enter the text to display on the tab or select a pre-defined tab name from the drop-down list. Note: |
|
Tab URL |
Specify the URL to use for the tab. Note: |
|
Move Up |
Rearranges the order of the tabs. |
|
Delete Row |
Removes the selected tab. |
|
OK |
Saves any changes and closes the Maintain IDE HTML Tabs dialog. New tabs, if defined, are added (in Tab# sequence). |
|
Cancel |
Cancels any changes and closes the Maintain IDE HTML Tabs dialog. |
(The Maintain IDE HTML Tabs dialog was added in PxPlus 2020.)
The Task Definition dialog is used to define tasks that are to be performed in an application. You can enter a new Task Name and Description or click the Query button (binoculars) to select an existing task name from the list.
This dialog is invoked by selecting IDE Maintenance > Task Definitions from the main tree view or by selecting Menu > Task Definition from the main menu bar.
The available options are presented on two tabs, Logic and Display:
|
Task type |
Click the drop-down arrow for a list of transaction types:
(The Web Service task type was added in PxPlus 2017.) | ||||||||||||
|
Project Related? |
Check box to indicate if the current task is assigned to a project. | ||||||||||||
|
Windows Only? |
Check box to indicate if the current task is for Windows only. These tasks will not appear in the tree view when not in a Windows environment. | ||||||||||||
|
PxPlus Task? |
Check box to indicate if the current task is a PxPlus task. Internal field. | ||||||||||||
|
Task for |
Click the drop-down arrow for a list of possible locations from which this task can be launched: Both Desktop and Web, Desktop Only, Web Only. | ||||||||||||
|
Panel/Program |
(Not Applicable for Menu/Sub-Menu Task Type) Enter the panel/program that is associated with launching the task. See Examples - Panel/Program by Task Type. | ||||||||||||
|
Parameter 1 - 4 |
These four fields are used to define parameters to be passed when launching a program, panel or object. | ||||||||||||
|
ICON/Image |
If no bitmap is specified for a transaction, the standard menu and task bitmaps are used. However, these may be overridden for individual tasks by entering bitmap information in this field. | ||||||||||||
|
Wiki/URL |
Used to enter a Wiki page or URL address containing online help associated with the current task. | ||||||||||||
The table below provides examples of Panel/Program entries for each applicable task type.
|
Task Type |
Panel/Program |
|
Object to instantiate |
Enter the object pathname: Example: *ide/tasks This example instantiates the *ide/tasks object. |
|
Program to run |
Enter the program pathname: Example: *plus/util/dictdef This example runs the *plus/util/dictdef program. |
|
Report to produce |
Enter the report pathname: Example: *plus/winutl/windows_services.pvr This example displays the list of Windows Services defined in the Report Viewer. |
|
Screen to process |
Enter the screen and the screen library: Example: Themes;*win/scrnlib.en This example processes the Themes screen located in the *win/scrnlib.en library. |
|
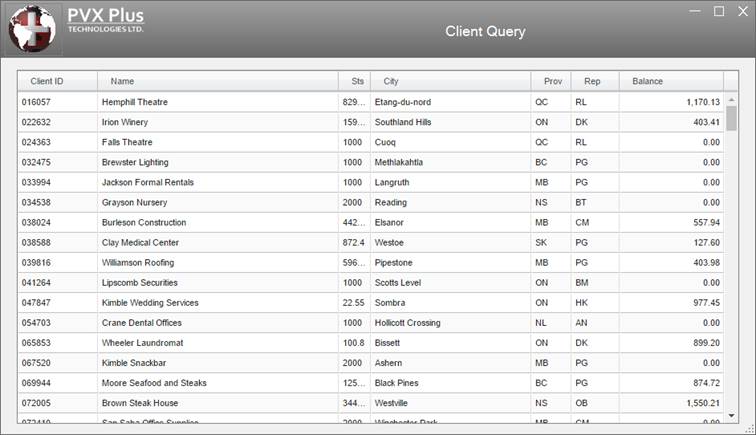
Enter a Web Service ID or a URL. If entering a Web Service ID, a Web server other than localhost can be specified as Parameter 1. See PxPlus Web Services. (The ability to enter a host URL was added in PxPlus 2018.) Example 1: Panel/Program: id=CLIENT_QRY This first example processes the CLIENT_QRY Web Service (defined in Web Services Maintenance) by running the EZWeb Server locally. Example 2: Panel/Program: http://servername:8888/services/rpt.pxp?rpt=gl_trialbal.pvr&type=html This second example processes the specified Web Service report using the "servername" Web server running on port 8888. Example 3: Panel/Program: id=CLIENT_QRY This third example processes the CLIENT_QRY Web Service (defined in Web Services Maintenance) using the "servername" Web server running on port 8888. Once a Web Service task has been defined, you can add this task to a menu using Menu Maintenance and then launch it from the IDE Main Launcher. The results of the Web Service will be displayed on a resizable panel. If a Web Service ID is entered without a server name and port specified as Parameter 1, the task will be launched running the EZWeb Server locally. Below is an example of the CLIENT_QRY Web Service launched from the IDE Main Launcher. Note:
|
The Menu Maintenance dialog allows tasks previously defined through Task Definition to be added to a menu or sub-menu for display on an application launcher. Invoke this dialog by expanding the IDE Maintenance category on the tree view and selecting Menu Maintenance or by selecting Menu > Menu Maintenance from the Launcher menu bar.
This dialog consists of the following:
|
Menu Entry |
This drop-down list is loaded with all tasks defined with the Task type Menu/Sub-Menu. |
|
System Transactions |
System Transactions (on the left) is a list of tasks that are not yet located on the selected menu. |
|
Delete |
Deletes a selected item from the Transactions in selected menu list (on the right). Pressing the Delete key also deletes a selected item. |
|
Up |
Use these buttons to change the item order in the Transactions in selected menu list (on the right). |
|
Reset |
This button becomes available after a change has been made to the Transactions in selected menu list (on the right). Click this button to revert to the initial state of the menu. |
|
Save |
This button becomes available after a change has been made to the Transactions in selected menu list (on the right). Click this button to save the changes. |
|
Close |
Closes the Menu Maintenance dialog. If any unsaved changes are detected, you are prompted to save the changes. |
The Import Menu Structure dialog allows a menu structure to be imported. Invoke this dialog by expanding the IDE Maintenance category on the tree view and selecting Import Menu Structure.
In this dialog, the box on the left displays the existing menu structure. The box on the right displays the name and structure of the menu to be imported.
The Export Menu Structure dialog allows either the entire existing menu structure or a portion of it to be exported. Invoke this dialog by expanding the IDE Maintenance category on the tree view and selecting Export Menu Structure.
In this dialog, click the Select All button to select all the menu items for export. To export only specific sub-menus or individual menu items, click the Unselect All button to clear all selections, and then click the check box beside only the desired items.
How to Use the PxPlus IDE Launcher
Project Maintenance
Adding Tasks to Projects from Other Locations
IDE Main Launcher (Web)