|
Parameters |
|
Parameters are values that are supplied by the user or application program when a report is generated. These may be displayed in the report, used in formulas, or used to set up selection criteria. For example, a report may be designed to generate data for a particular department to be specified by the user requesting the report. In addition, a report may be designed to display transactions between a certain start and end date to be specified at run time.
The Report Parameters window is used to define parameters.
To invoke this window, select Parameters from the Report Designer Data menu or right click on the data source in the left data pane and select Define Parameters from the popup menu.
A parameter definition is comprised of the following:
|
Parameter Name |
Name of the data variable. It is used mainly in formulas and filter definitions and must start with an alpha character, followed by alphanumeric characters, underscore or period. Maximum 30 characters. |
|
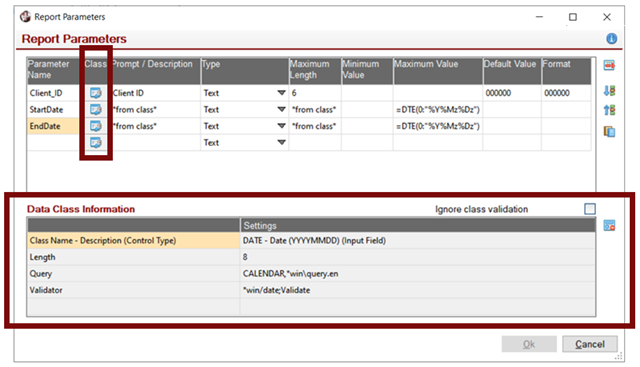
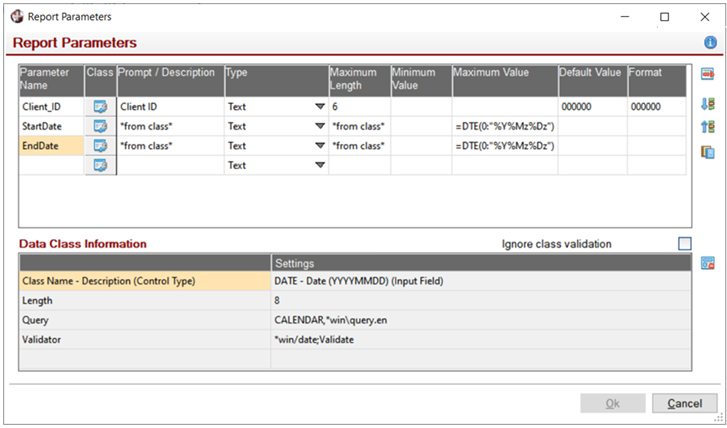
Click the Class button to assign a Data Class to a parameter. Data classes can have descriptions, input lengths, default values and formats assigned to them, which will be applied to the default interactive interface. They may also have drop box definitions, check box input and queries that will be applied. Prompt/Description, Maximum Length, Default Value and Format values are loaded from the Data Class definition but may be overridden. When a Class is selected, pertinent Class information is displayed in the Data Class Information grid below the parameters. For data classes using a Multi-line control type with an assigned Validator program or Extended Validation, an option to Ignore class validation is available. This option allows the end user at run time to enter a value that would not pass the validation test and is useful for entering general Start and End value ranges. To remove Data Class specifications from parameters, select the parameters and click the button next to the Data Class Information grid. You will be prompted to confirm your selection prior to the deletion. Note:
| |
|
Prompt to display in the user interface that is presented when the report is generated. This should explain to the user what value to enter and its format. By default, the prompt is a Fixed value; however, an Expression can be used by preceding the expression with an = (equals sign): =%DatePrompt$ (The ability to use an Expression to set a parameter was added in PxPlus 2020.) | |
|
Type |
Text or numeric (computational) value. |
|
Maximum Length |
Maximum length of the value to be entered by the user. By default, the maximum length is a Fixed value; however, an Expression can be used by preceding the expression with an = (equals sign): =%MaxLength (The ability to use an Expression to set a parameter was added in PxPlus 2020.) |
|
Minimum Value |
(Optional) Minimum value that can be entered. By default, the minimum value is a Fixed value; however, an Expression can be used by preceding the expression with an = (equals sign): =DTE(0:"%Y%Mz%Dz") (The ability to use an Expression to set a parameter was added in PxPlus 2020.) |
|
Maximum Value |
(Optional) Maximum value that can be entered. By default, the maximum value is a Fixed value; however, an Expression can be used by preceding the expression with an = (equals sign): =DTE(0:"%Y%Mz%Dz") (The ability to use an Expression to set a parameter was added in PxPlus 2020.) |
|
Default Value |
(Optional) Pre-set value that will automatically be loaded. By default, the default value is a Fixed value; however, an Expression can be used by preceding the expression with an = (equals sign): =DTE(0:"%Y%Mz%Dz") (The ability to use an Expression to set a parameter was added in PxPlus 2020.) |
|
Format |
An input format may be assigned to a parameter to simplify and restrict user input. By default, the format is a Fixed value; however, an Expression can be used by preceding the expression with an = (equals sign): =%MyFormat$ Example: A date format defined as 0000/00/00 limits the input to eight digits and acts as a visual cue that the input is a date. Note:
|
Parameter definitions can also be added by selecting existing definitions from Report Writer libraries. These can be accessed by clicking the Select Parameter Fields button next to the grid. Library parameters are displayed with their name prefixed by an * (asterisk), and the associated definition is locked. See Adding Library Elements to a Report Definition.
Once parameters have been defined, they will appear in the data pane of the Report Designer, above the data source and its elements. From here, they may be dragged and dropped onto the report definition.
When the report is generated, by default a generic interactive parameter interface is presented to the user to input the values required for the report generator if parameters are defined. These values are validated for correct type, length and minimum/maximum values. If a parameter has been assigned a Format, input is restricted as per the specified format. If the parameter has been assigned a Data Class, the class definition may supply drop lists of valid items, check box inputs or queries from which to select a value.
There is no validation beyond type, length and value range unless the parameter has been assigned a Multi-line class with an assigned validator. If the latter is not the case, be sure to create prompts that describe the required input as thoroughly as possible, as invalid parameter values can result in unexpected data or empty reports. The default parameter interface presents the parameters in the order that they appear in the parameter definition.
To change the order of the parameters, re-order the entries in the parameter definition by selecting an entry and clicking the Move Up and Move Down buttons. To remove a selected entry, click the Delete Row button.
It is also possible to create your own interface to input parameter values, which can then be passed to the report generator at run time. Parameters can be set programmatically using the Report Writer object (*rpt/pvxreport) or passed as panel or program arguments by setting the Parameter Interface report option. See Custom Interfaces.