|
How to Copy a Theme |
Starting with PxPlus 2024, the Copy Theme utility provides the ability to copy and create Themes. With this utility, you can copy a selected Theme from one directory to another and optionally copy related Visual Classes. You can use this utility to create new Themes, as well as Visual Classes.
Using Themes and Visual Classes enhances the look of your application and gives it a fresh, modern look.
Standard PxPlus Themes and Visual Classes are found in the *plus/winutl directory. Themes are stored in the providex.dfs file, and Visual Classes are stored in the providex.ccl file.
How to Copy a Theme
These steps show you how to copy a Theme:
|
1. |
From the IDE Main Launcher, expand the Graphical Application Builder (NOMADS) category, and then expand the Setup menu. | |
|
2. |
From the Setup menu, select Copy Theme. If the Themes file does not exist, the following message will display: | |
|
3. |
Click OK. The Copy Theme utility is displayed. | |
|
4. |
If the Themes file exists, the Input Directory will be populated based on Project settings. A different directory can be entered or selected by clicking the Query (folder) button. If the Themes file does not exist, the Copy Theme utility will display, and the Input Directory will be blank. | |
|
5. |
To copy PxPlus Themes, select the Use PxPlus Themes check box. The Input Directory defaults to the location where the PxPlus Themes and Visual Class definitions are stored and is disabled.
| |
|
6. |
Enter an Output Directory or click the Query (folder) button to specify where the Themes/Visual Classes are to be copied. The Output Directory can be the same as or different from the Input Directory. It cannot be the same location where the PxPlus Themes and Visual Class definitions are stored (i.e. *plus/winutl); otherwise, a message will display. | |
|
7. |
Select a Copy from Theme from the drop box. All the Themes are loaded into the drop box. | |
|
8. |
Enter a new Copy to Theme or keep the defaulted value. If the Input Directory and Output Directory are the same, a new Copy to Theme name that is different from the Copy from Theme name must be entered; otherwise, a message will display. | |
|
9. |
Select the Copy Visual Class Records check box to copy all Visual Classes for the selected Theme.
| |
|
10. |
Click Proceed to start the copy process. If the Themes/Visual Classes already exist, see Step 15. | |
|
11. |
If you click Proceed but the Themes file does not exist in the Output Directory, a message will display, asking to create it. | |
|
12. |
Select Yes to create the Themes (Templates) file or select No to abort the file creation and close the utility. | |
|
13. |
If you select Yes to create the Themes file but the Visual Classes file does not exist in the Output Directory, a message will display, asking to create it. This will only apply if the Copy Visual Class Records check box was selected. | |
|
14. |
Select Yes to create the Visual Classes file or select No to abort the file creation and close the utility. | |
|
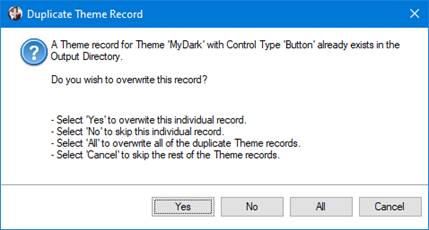
If the Theme already exists, the following message will display:
| ||
|
16. |
Select an option to continue copying Themes. | |
|
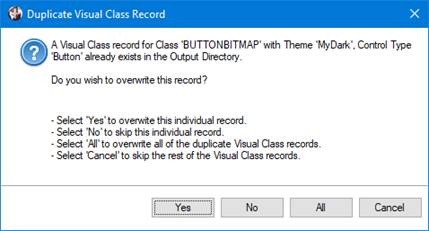
17. |
If the Visual Class for the Theme already exists, the following message will display: | |
|
18. |
Select an option to continue copying Visual Classes. | |
|
19. |
Once the copy is completed, a Copy Complete dialog displays the number of Theme and Visual Class records that were copied. | |
|
20. |
Click OK. You are returned to the Copy Theme utility. You can copy more Themes/Visual Classes or exit the utility. |
Copy Theme
Themes
Visual Classes