How to Use the Library Bulk Edit and Search Utility |
The Library Bulk Edit and Search utility is used to bulk edit panels that are in a single library or in multiple libraries within the same directory. You can use it to find controls with particular characteristics and then bulk edit those controls with the changes you specify. This utility is similar to the Panel Bulk Edit utility, which is used in the NOMADS Panel Designer to bulk edit controls on the current panel only.
There are many reasons for using the Library Bulk Edit and Search utility:
The steps below show you how to:
a. Search a single screen library to find all buttons with bitmaps.
b. Bulk edit the bitmap buttons by applying a pre-defined Visual Class that controls the appearance of bitmap buttons.
c. Use the Search Library functionality to view the library file records that were edited.
How to Use Library Bulk Edit and Search
1. |
Invoke the Library Bulk Edit and Search utility. This can be done by using one of the following methods: Method 1: From the IDE Main Launcher, expand the Graphical Application Builder (NOMADS) category. Then, expand the Utilities category and select Library Bulk Edit. OR Method 2: From NOMADS Library Object Selection, select Utilities > Library Bulk Edit from the menu bar. OR Method 3: Invoke the NOMADS Session Manager from the PxPlus Command line by entering nom. Then, select Utilities > Library Bulk Edit from the menu bar. |
2. |
The Library Bulk Edit and Search window displays and presents a warning message about making a backup. Click OK to acknowledge the message.
|
3. |
In the top section, specify the criteria (i.e. Type, Control Type, Filter options) for locating the controls to be edited. Start by selecting the Type of search: Select Library if you want to search a particular library file. Select Directory if you want to search more than one library file in the same directory. If the search should include library files found in the sub-directories of the specified directory, also select the Include Sub-Directories check box. By default, Library is selected. For this example, leave this setting as is.
|
4. |
In the adjacent input control, enter the pathname of the library file or click the Query (folder) button to select it (e.g. C:\PVX Plus Technologies\PxPlus\Lib\_demo\2021\data\scrnlib.en). Note: |
5. |
Select the Control Type. By default, All Controls is selected. Click the drop down arrow and select Button. |
6. |
The Filter options are used to define search criteria to further specify the controls you want to find. By default, the Expression, Case-Sensitive and Is Not check boxes are not selected. Leave these as is. Enter the criteria to search for buttons with bitmaps. In the input control beside the Is Not check box, enter {! (open curly bracket followed by an exclamation point). This will cause data containing {! in any fields to be returned by the search. Since the bitmap is stored in the init_text$ library field surrounded by { } (curly brackets), all bitmap buttons should be located. |
7. |
Click the Find Controls button. Button controls that are from the selected library file and also match the filter criteria are loaded into the Selected Controls tree view.
The top node shows the pathname of the selected library. This is followed by another level of nodes for each of the panels. Below each panel node is an indented list of Button controls. Right clicking in the tree view displays a popup menu with selections for accessing Library Object Selection or the NOMADS Designer. |
8. |
Select the controls to be bulk edited. This can be done by using one of the following methods: Method 1: To select only certain controls, select the check box beside the individual controls. OR Method 2: To select all controls on a panel, select the check box beside the individual panels. OR Method 3: To select all controls in the selected library, click the Select All button or select the check box beside the library node at the top of the tree view. For this example, click the Select All button. The check boxes beside all controls are selected, and the Select All button text changes to Deselect All.
|
9. |
In the Properties to Edit grid, enter the property changes to be applied to the selected controls. The property to edit is the Visual Class property, which is listed near the bottom of the Properties to Edit grid. Use the vertical scroll bar to access this property.
|
10. |
Click the dotted button beside the Visual Class property. The Visual Class dialog displays:
|
11. |
For this example, an existing Visual Class defined for button controls will be selected. If needed, a new Visual Class can be defined by clicking the Visual Class Maintenance button (beside the drop box on the right) to invoke the Visual Classes Maintenance utility. For the drop box on the left, change the As is value by clicking the drop down arrow and selecting Fixed. Then, for the drop box on the right, click the drop down arrow and select a Visual Class defined for the Button control type.
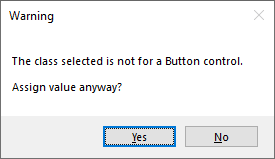
If a Visual Class is selected which was not defined for a Button control type, a message will display:
|
12. |
In the Visual Class dialog, click OK to accept the entry and return to the main Library Bulk Edit and Search window.
|
13. |
In the Properties to Edit grid, the Visual Class property displays the new selection.
|
14. |
For this example, this is the only property being edited. Click the OK button below the Properties to Edit grid to process this change. |
15. |
The Complete message displays, showing the number of libraries, panels and controls that were edited. This message may take a little extra time to display, depending on the number of controls that were previously selected in the Selected Controls tree view. Click OK to acknowledge this message. The Library Bulk Edit and Search utility closes.
|
How to Use the Search Library Functionality
Now that a bulk edit has been applied to all bitmap buttons in the selected library, these next steps show you how to use the Search Library functionality to view the library file records that were edited.
1. |
Invoke the Library Bulk Edit and Search utility. This can be done by using one of the following methods: Method 1: From the IDE Main Launcher, expand the Graphical Application Builder (NOMADS) category. Then, expand the Utilities category and select Library Bulk Edit. OR Method 2: From NOMADS Library Object Selection, select Utilities > Library Bulk Edit from the menu bar. OR Method 3: Invoke the NOMADS Session Manager from the PxPlus Command line by entering nom. Then, select Utilities > Library Bulk Edit from the menu bar. |
2. |
The Library Bulk Edit and Search window displays. Click OK to acknowledge the warning message about making a backup. |
3. |
The Type drop box defaults to Library. Leave this setting as is. |
4. |
In the adjacent input control, enter the same pathname of the library file used in the steps above or click the Query (folder) button to select it (e.g. C:\PVX Plus Technologies\PxPlus\Lib\_demo\2021\data\scrnlib.en). |
5. |
Click the Search Library button.
|
6. |
The Library Bulk Edit and Search – Search window displays.
|
7. |
Without entering any Filter criteria, click the Search button. All records in the library file are loaded into the list box.
Initially, this list displays the following information: Column 1: Key to each record The total number of records displays below the grid. |
8. |
Click the Customize button.
|
9. |
The Library Bulk Edit and Search – Customize Search window displays. It is used to select the columns you want to display in the Search list box, which also determines the data that will display.
The Key value always displays in Column 1 of the Search list box and is not customizable. The library values that display in the Search list box by default (i.e. _obj_nme$, _obj_type$ and init_val$) are indicated by check marks in the Select column. If desired, other columns can be selected for display. To select certain IOList variables one at a time, choose the appropriate check box in the Select column. To select all of the IOList variables, choose the Select / Deselect All check box above the grid. Note: |
10. |
For this example, choose the Select / Deselect All check box. All check boxes in the Select column are selected.
|
11. |
Click OK to accept the selections and close this window. |
12. |
You are returned to the Library Bulk Edit and Search – Search window. The Search list box is reloaded with all of the IOList variables populated for all of the records. In most cases, a Search would be done to find certain records in a file rather than view the contents of an entire file.
To view the columns to the right, use the horizontal scrollbar or manually resize the window. In this example, the window was resized. Notice that the Filter options above the list box are similar to the ones on the Library Bulk Edit and Search main panel except for the addition of the Regular Expression check box. |
13. |
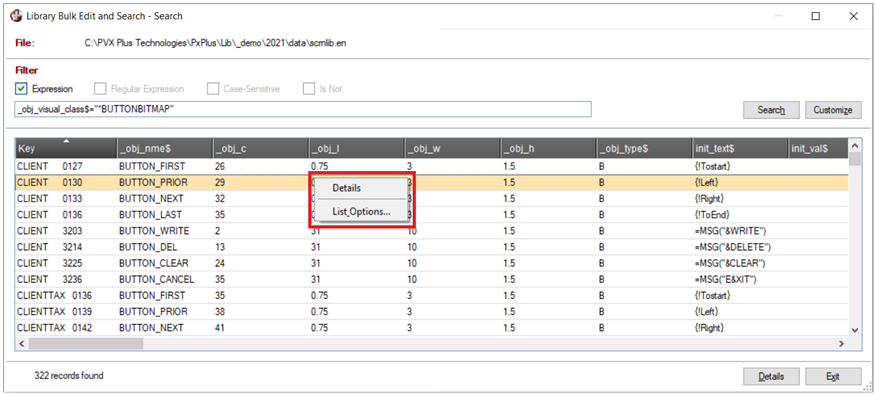
Select the Expression check box. Then, enter the following in the Filter input control: _obj_visual_class$="*BUTTONBITMAP" |
14. |
Click the Search button. |
15. |
The matching records, which were previously edited with the Visual Class *BUTTONBITMAP, are displayed. Use the horizontal scroll bar to see the _obj_visual_class$ values of *BUTTONBITMAP.
|
16. |
Click on any row of the Search list box to select it. Then, click the Details button.
|
17. |
The Record Details window displays, showing all of the values in the selected record. Use the vertical scroll bar to see all the values.
|
18. |
Click the Exit button to close this window. You are returned to the Library Bulk Edit and Search - Search window. |
19. |
Right click on any line in the Search list box. A popup menu displays with two options: Details and List_Options.
|
20. |
The Details option displays the same window as clicking the Details button. Select List Options. A popup menu displays with options to copy records, export records, search, print, etc.
|
21. |
Click the Exit button under the Search list box. You are returned to the main Library Bulk Edit and Search window. |
22. |
Click the Exit button to exit the utility. |
Library Bulk Edit and Search Utility
Panel Bulk Edit Utility
NOMADS Library Variables
Visual Classes