Enhanced View
Standard View
|
How to Use the PxPlus IDE Launcher |
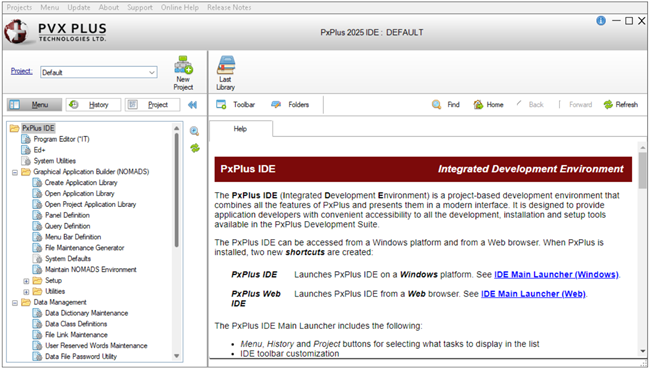
The PxPlus Integrated Development Environment (or IDE) is a project-based development environment that integrates all of the various features of PxPlus in an easy-to-use interface. The PxPlus IDE can be accessed from a Windows platform or from a web browser.
When launched from a Windows platform, the IDE can be displayed in enhanced view or in standard view. The main difference between these views is that the enhanced view has additional functionality and can be customized. You can add folder tabs to launch helpful web pages with just a single click. A Help tab is already provided to display the PxPlus Online Help information for the current task. You can add buttons to the IDE ribbon toolbar to quickly access commonly used PxPlus tasks.
|
|
|
How to Switch Between Views
These steps show you how to switch between enhanced view and standard view at any time.
|
1. |
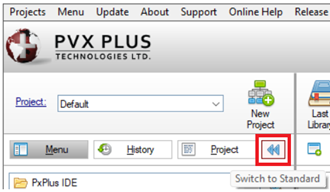
Hover the mouse over the double left arrow button to the right of the Project button. Notice the button tooltip that reads "Switch to Standard". |
|
2. |
Click this button. The PxPlus IDE changes to standard view. |
|
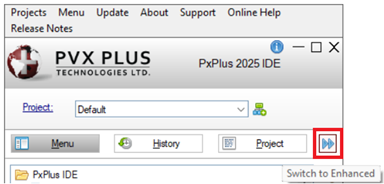
3. |
Hover the mouse over the double right arrow button to the right of the Project button. Notice the button tooltip now reads "Switch to Enhanced". |
|
4. |
Click this button. The PxPlus IDE changes back to enhanced view. |
In this tutorial, you will learn about the enhanced view and its four distinct sections: Project, Tasks, Ribbon Toolbar and Web Page Folder Tabs.
Projects provide a structured method for grouping and managing the various tasks (i.e. objects, programs, data files) and settings used in PxPlus for the development of business applications.
The Project section consists of a Project hyperlink button, a Project drop box and a New Project button. When you initially start the IDE Launcher, a Default project is already provided in the Project input field.
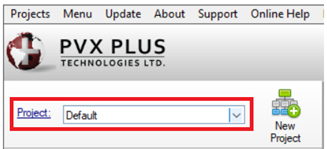
You can create additional projects. Projects are created one at a time either by clicking the New Project button beside the Project drop box or by selecting Projects > Create Project from the top menu bar.
See the tutorial How to Create and Edit a Project.
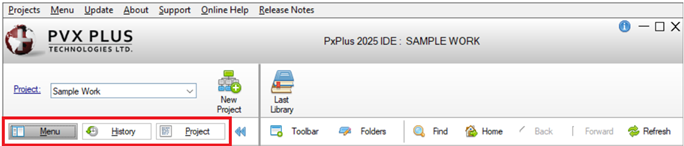
This example shows that a new project called Sample Work was created.

If multiple projects are created, you choose the project you want to work on by selecting it from the Project drop-down list.
When you select a project from the list or create a new project, the IDE relaunches and shows the name of the current project in the Project input field and in the top header bar.
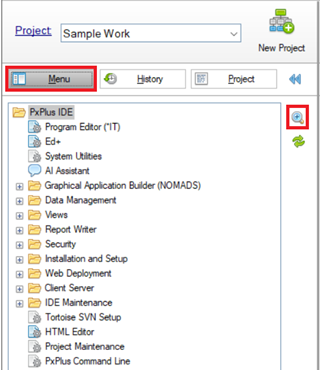
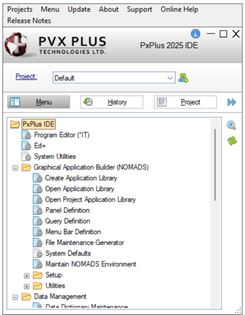
The Tasks section consists of three main components - Menu, History and Project.
|
|
Menu |
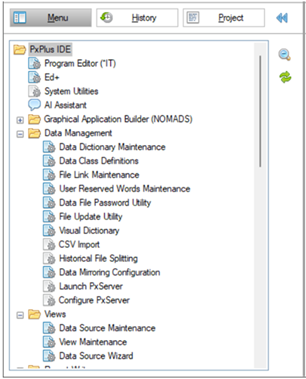
Selecting this button displays a list of all PxPlus tasks and utilities in a tree view format. |
|
|
History |
Selecting this button displays a list of PxPlus tasks that have been recently accessed. |
|
|
Project |
Selecting this button displays a list of PxPlus tasks that have been added to the selected project. |
Right clicking on a task displays a menu with additional options. Beside the list of tasks are side buttons that provide additional functions.
How to Use the Menu Tree View
These steps show you how to use the Menu tree view.
|
1. |
Click the Menu button if it is not already highlighted. |
|
2. |
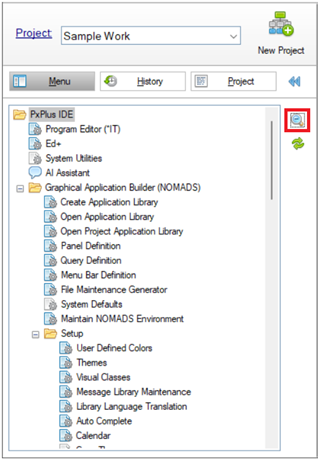
Expand all the nodes in the tree view by clicking the first side button (magnifying glass with + sign). This button acts as a toggle to either expand or collapse all the nodes in the tree view. |
|
3. |
All the nodes in the tree view are expanded. Notice that the magnifying glass now shows a (minus) sign. Use the vertical scroll bar to scroll the task list up to the top. |
|
4. |
Individual nodes can also be collapsed or expanded as needed. Collapse the Graphical Application Builder (NOMADS) node only by clicking the preceding minus sign.
|
|
5. |
The Menu tree view looks like this: |
|
6. |
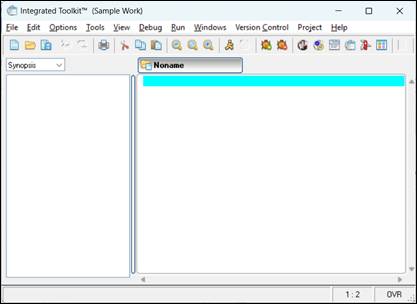
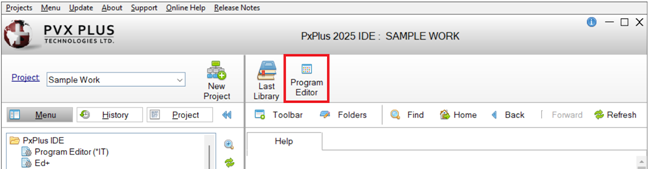
You will now open and close a task. Double click on the Program Editor (*IT) task at the top of the Menu tree view. The Integrated Toolkit™ window opens, showing the name of the current project (Sample Work) in the title bar. Close this window by clicking the X in the top right corner. |
|
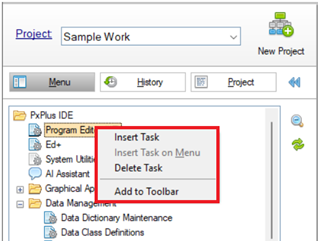
7. |
In the Menu tree view, the Program Editor (*IT) task is still highlighted. Right click on this task to open a menu with additional options. The first and second options, Insert Task and Insert Task on Menu (currently disabled), both launch the
Task Definition window for selecting a defined task to insert. |
|
8. |
For now, close this right click menu by left clicking anywhere inside the white space beside the Menu tree view. |
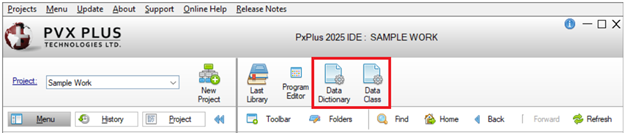
You can add up to 10 buttons on the ribbon toolbar to launch tasks most often used, as well as edit and delete buttons.
How to Add a Task Using the Toolbar Button
These steps show you how to add a task by using the Toolbar button.
|
1. |
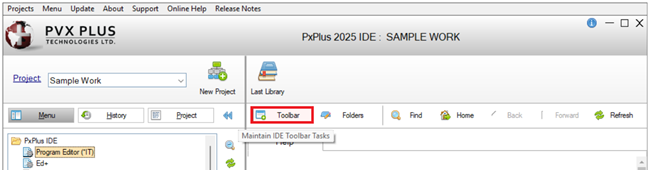
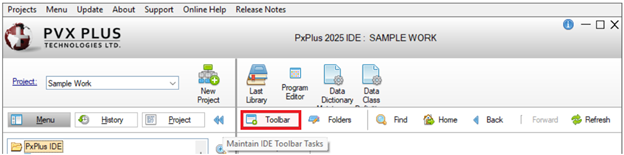
Click the Toolbar button located to the left of the Folders button. |
|
2. |
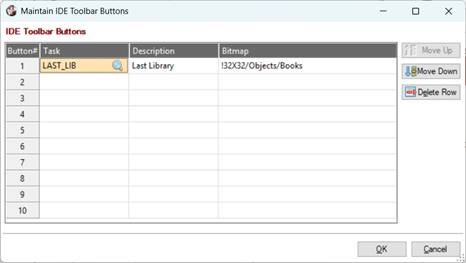
The Maintain IDE Toolbar Buttons window opens. |
|
3. |
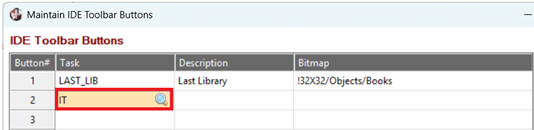
You will be adding Button #2 for the Program Editor (*IT) task. On the second row, under the Task column, enter IT. This is the Task ID for the *IT Program Editor. You can also select it from a list by clicking the lookup button (magnifying glass). |
|
4. |
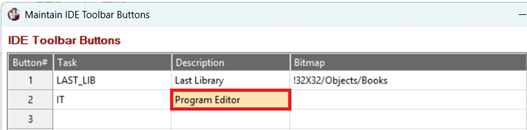
Under the Description column, enter Program Editor. This is the description that will display in the toolbar. |
|
5. |
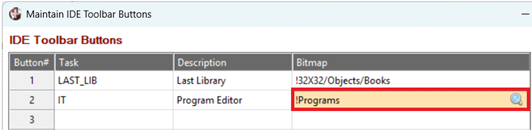
Under the Bitmap column, enter !Programs. This is the bitmap that will display in the toolbar. You can also select a bitmap by clicking the lookup button (magnifying glass). |
|
6. |
Click OK to save your changes. |
|
7. |
The task button is added to the toolbar. |
How to Add a Task Using the Menu Tree View
These steps show you the two methods for adding a task using the Menu tree view.
Method 1: Right click on a task in the Menu tree view and select the Add to Toolbar option.
|
1. |
Under Data Management, right click on the Data Dictionary Maintenance task. A menu with four options displays. |
|
2. |
Select the Add to Toolbar option. |
|
3. |
The task button is added to the toolbar. Notice that the text is cut off. You will learn later how to edit this button. |
OR
Method 2: Left click on a task in the Menu tree view and then drag it to an empty spot on the IDE ribbon toolbar.
|
1. |
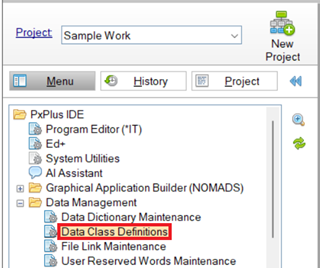
Under Data Management, left click on the Data Class Definitions task, hold down the mouse button, and drag the mouse pointer to an empty spot in the toolbar. |
|
2. |
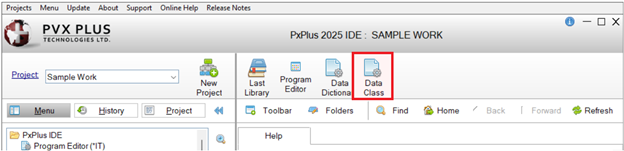
Release the mouse button. The task button is added to the toolbar. |
How to Edit a Task Button
These steps show you how to edit a task button.
|
1. |
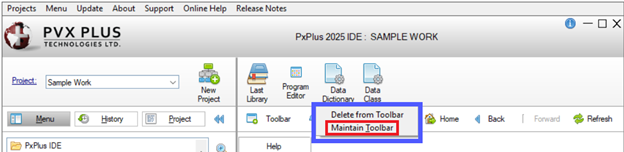
Invoke the Maintain IDE Toolbar Buttons window. This can be done by using one of the following methods: Method 1: Click the Toolbar button below the ribbon toolbar. OR Method 2: In the ribbon toolbar, right click on the task button that you want to edit and then select Maintain Toolbar from the popup menu. |
|
2. |
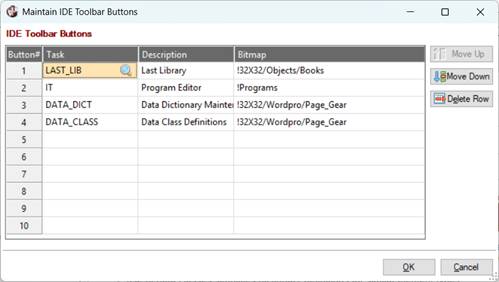
The Maintain IDE Toolbar Buttons window opens. It is used to add, maintain and delete task buttons in the IDE ribbon toolbar. |
|
3. |
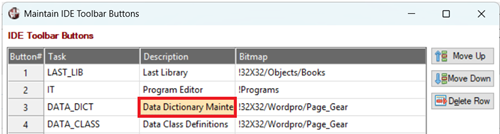
The description for the Data Dictionary Maintenance task button is too long, so you will be editing this. Under the Description column, click the description for Button #3. |
|
4. |
Type Data Dictionary and then press Enter. The description is changed. |
|
5. |
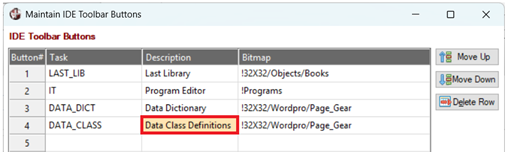
The description for the Data Class task button is also too long. Under the Description column, click the description for Button #4. |
|
6. |
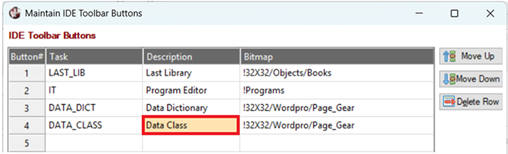
Type Data Class and then press Enter. The description is changed. |
|
7. |
Click OK to save your changes. |
|
8. |
The ribbon toolbar shows the edited task bar descriptions. |
How to Move a Task Button
These steps show you how to move a task button to change the order of the task buttons on the ribbon toolbar.
In this example, you will be moving the Data Dictionary task button to the second position.
|
1. |
Invoke the Maintain IDE Toolbar Buttons window by using either of the two methods mentioned previously. |
|
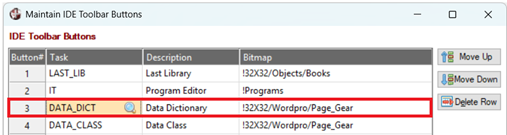
2. |
Click anywhere in the Button #3 row for the Data Dictionary task button. |
|
3. |
Click the Move Up button. |
|
4. |
The Data Dictionary task button is now in the second position. |
|
5. |
Click OK to save your changes. |
|
6. |
The ribbon toolbar shows the Data Dictionary task button in the second position. |
How to Delete a Task Button
These steps show you how to remove a task button from the ribbon toolbar. This can be done by using one of the following methods:
Method 1:
In this example, you will be removing the Data Class task button.
|
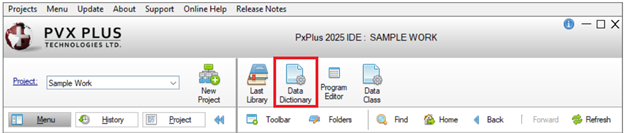
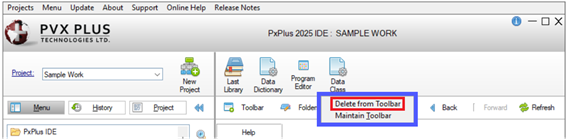
1. |
In the ribbon toolbar, right click on the Data Class task button and then select Delete from Toolbar from the popup menu. |
|
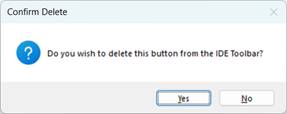
2. |
A message asks you to confirm that you want to delete this button. Click Yes. |
|
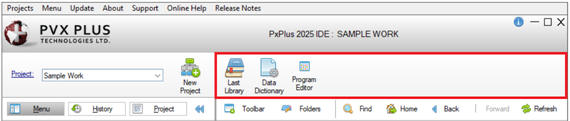
3. |
The Data Dictionary task button is removed from the ribbon toolbar. |
OR
Method 2:
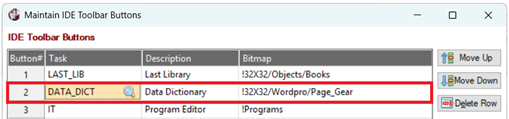
In this example, you will be removing the Data Dictionary task button.
|
1. |
Invoke the Maintain IDE Toolbar Buttons window by using either of the two methods mentioned previously. |
|
2. |
Click anywhere in the Button #2 row for the Data Dictionary task button. |
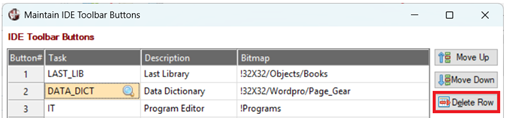
|
3. |
Click the Delete Row button. |
|
4. |
The Data Dictionary task button row is deleted. |
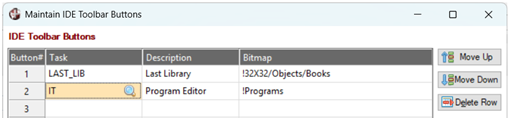
|
5. |
Click OK to save your changes. |
|
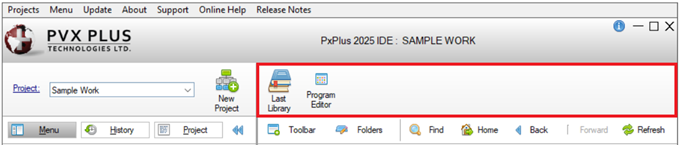
6. |
The Data Dictionary task button is removed from the ribbon toolbar. |
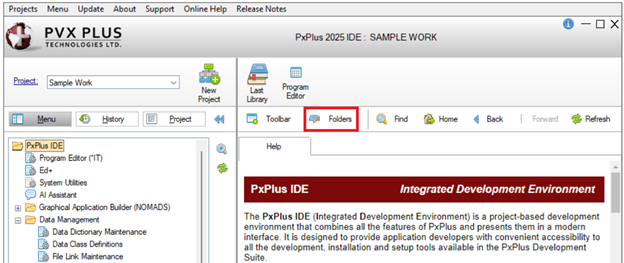
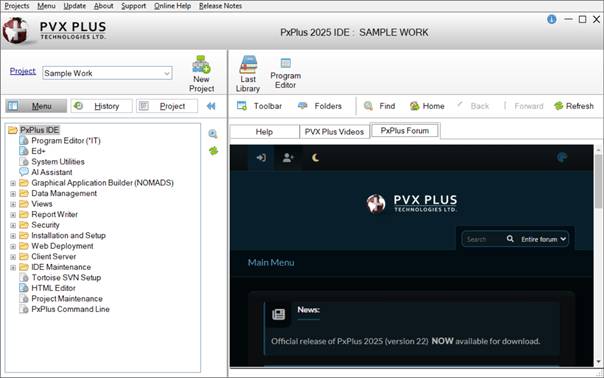
You can add up to 10 HTML folder tabs to easily access websites from the IDE.
How to Add a New Folder Tab
These steps show you how to add a new web page folder tab to the IDE.
|
1. |
Click the Folders button located to the right of the Toolbar button. |
|
2. |
The Maintain IDE HTML Tabs window opens. Tab #1, which is named Help, is already provided. It cannot be modified, deleted or moved. |
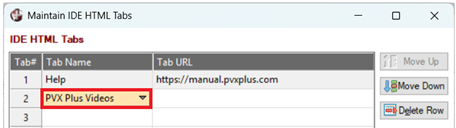
|
3. |
You will be adding Tab #2 to launch the PVX Plus YouTube page. Under the Tab Name column, enter PVX Plus Videos as the name to appear on the folder tab. |
|
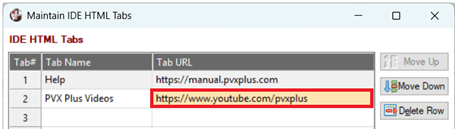
4. |
Under the Tab URL column, enter https://www.youtube.com/pvxplus. |
|
5. |
Click OK to save your changes. |
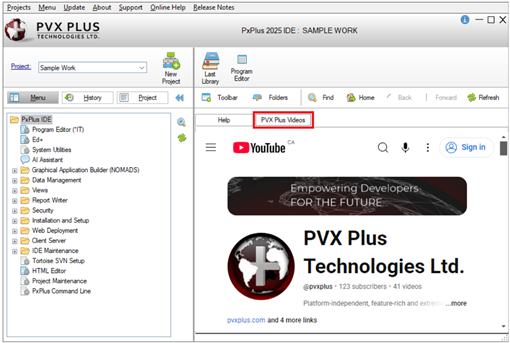
|
6. |
The PVX Plus Videos folder tab is added. |
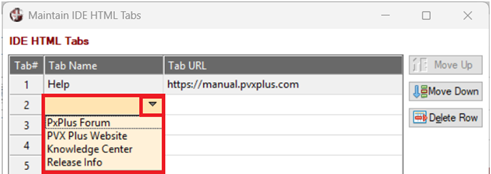
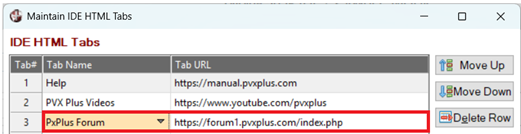
How to Add a Predefined Folder Tab
These steps show you how to add a predefined folder tab (i.e. PxPlus Forum, PVX Plus Website, Knowledge Center and Release Info) to the IDE.
|
1. |
On the Tab Name field, click the drop-down arrow and select a predefined tab name from the list. In this example, select PxPlus Forum. |
|
2. |
The Tab URL field is automatically populated. |
|
3. |
Click OK to save your changes. |
|
4. |
The PxPlus Forum folder tab is added: |
How to Edit a Folder Tab
These steps show you how to edit a web page folder tab that has already been added to the IDE.
In this exercise, you will change the name of the PVX Plus Videos tab.
|
1. |
Click the Folders button to invoke the Maintain IDE HTML Tabs window. |
|
2. |
For Tab #2, click the Tab Name field. |
|
3. |
Enter the new name, PxPlus Videos. |
|
4. |
Click OK to save your changes. |
|
5. |
The tab is changed to PxPlus Videos. |
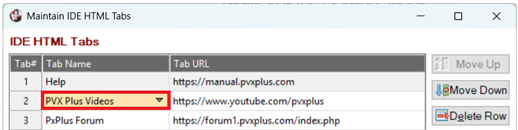
How to Change the Order of the Folder Tabs
These steps show you how to change the order of the web page folder tabs on the IDE.
In this exercise, you will be moving the PxPlus Videos tab.
|
1. |
Click the Folders button to invoke the Maintain IDE HTML Tabs window. |
|
2. |
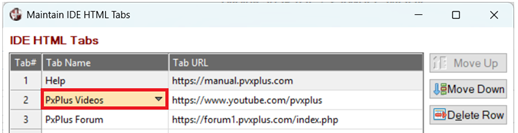
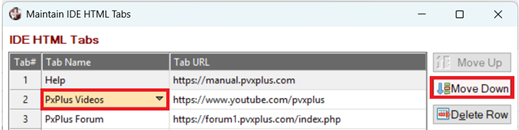
Under the Tab Name column, click on PxPlus Videos. |
|
3. |
Click the Move Down button. |
|
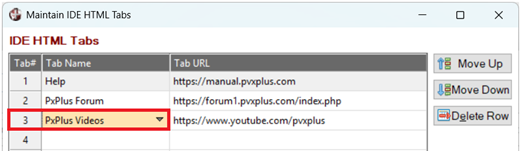
4. |
This tab now becomes Tab #3. |
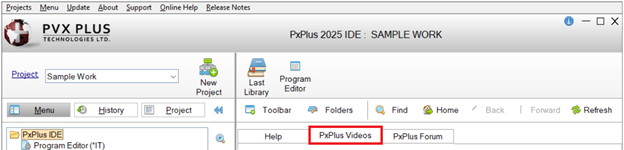
|
5. |
Click OK to save your changes. |
|
6. |
The PxPlus Videos tab is now the third tab. |
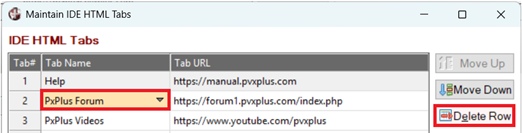
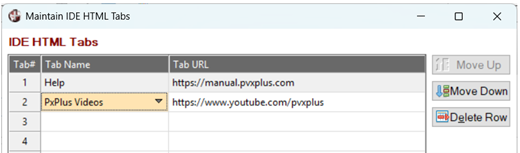
How to Delete a Folder Tab
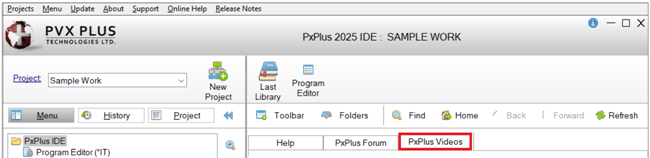
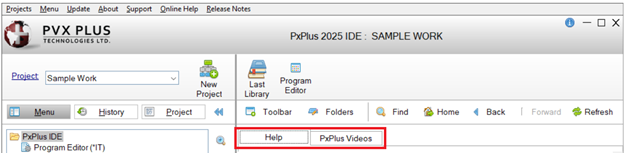
These steps show you how to remove a web page folder tab from the IDE.
In this exercise, you will remove the PxPlus Forum tab.
|
1. |
Click the Folders button to invoke the Maintain IDE HTML Tabs window. |
|
2. |
Under the Tab Name column, click on PxPlus Forum. |
|
3. |
Click the Delete Row button. |
|
4. |
The PxPlus Forum row is removed. |
|
5. |
Click OK to save your changes. |
|
6. |
The PxPlus Forum tab is removed. Two tabs, Help and PxPlus Videos, remain. |
Using the Navigation Buttons
Four navigation buttons are provided to control the current website displayed:
|
|
Home |
Returns the current website to home. |
|
|
Back |
Moves the website one page back. |
|
|
Forward |
Moves the website one page forward. |
|
|
Refresh |
Refreshes the current website. |