|
File Maintenance Generator (Legacy) |
Historical Reference |
Important Note:
This page is for historical reference only.
As of PxPlus 2019, a new
File Maintenance Generator was created to make it easier to generate file maintenance (or inquiry-only) panels. As of PxPlus 2021, it can also be used to generate
Webster+ HTML pages.
Using the File Maintenance Generator, you can automatically generate file maintenance panels with built-in editing and browse functionality based on data files defined in a PxPlus
Data Dictionary. Panels are built with controls representing the data fields described within the Data Dictionary and Data Class Objects. The data dictionary also supplies key structure information to enable accessing and writing the data records. Element names, prompts, default values, validation rules, print formats, associated queries and help, as well as control types, are derived from dictionary and class definitions.
Options are provided to create a single panel or a panel with multiple folders, to place edit and browse buttons at the bottom or side of the panel, to determine whether acknowledgement and confirmation messages are to be displayed, and to determine what update logic should be used.
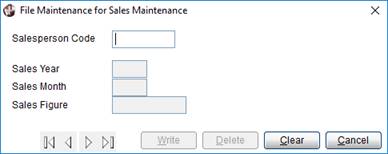
Example:
Below is an example of a generated File Maintenance panel.
File and Field Types Supported
The File Maintenance Generator is designed to maintain native PxPlus files defined in a PxPlus data dictionary. Therefore, the file and field types it handles are those that are supported by the data dictionary. These include normalized files, which can be Keyed or Direct files. In addition, the data dictionary must be embedded in the file. Field types include string or numeric, stored as Delimited, Padded, Fixed, Substring or Last Substring formats.
Even though the data dictionary supports arrays, the File Maintenance Generator does not. If you define an array in the data dictionary, then generate a file maintenance panel, only one control will be generated for the array, and it will be referenced as a scalar variable (i.e. not an array - no subscripts). You would have to manually add the controls and code to handle the array logic.
Limitations
There is a limitation to the number of elements that can be used in File Maintenance panels. This limit is not based on a particular number but is based on restrictions imposed by record size and program constraints.
When generating panels that use the Generic option, the limit is based on the record size of the library file, which is 2048 bytes (512 in older libraries). When file maintenance panels are generated, some of the library records contain strings that hold key definitions, lists of required variables, and lists of numeric variables. The limit depends on the size of these lists and other data in the record not exceeding the record size.
When generating panels using the custom program option, there is a limit of 95 elements based on the current line numbering limitations of the generated program.
Generic or Custom?
NOMADS supplies a generic program, *win/flmaint, that can be used as a quick and easy starting point for creating file maintenance panels. See
Generating a File Maintenance Panel below. However, there are several ways to customize these panel objects as explained below.
Custom Program Logic
The File Maintenance Generator allows you to generate a maintenance program to write, update and delete records, and browse the file. You can modify this program or add new routines. The generated program may be invoked as the maintenance program rather than the generic program. It is recommended that you write new routines using line numbers starting at 20000 and that additions to existing routines be made using line numbers not divisible by 10. If you need to regenerate the program, select the Merge option. See
Creating a New File Maintenance Definition.
Generic Program Logic
The *win/flmaint program may be copied to another program name. You can customize the logic and then enter the name of the customized version as the Maintenance Program in the File Maintenance Generator. See
Generating a File Maintenance Panel below.
Warning!
Your customized program must be derived from the current version of *win/flmaint to ensure that all procedures called by the generated panels exist.
File Maintenance Objects
The Generic and Custom programs may be derived from OOP-based programs. See
File Maintenance Objects.
Custom Buttons and Bitmaps
NOMADS supplies a set of predesigned Write, Delete, Clear, Cancel and Browse buttons. However, you can copy the flmaint and flmaint.ver objects from the *win/scrnlib.en library to an alternate library and then customize the button text and bitmaps as desired. Load the global variable %FLMAINT_LIB$ with the pathname of an alternate library (i.e. at start up). Then, NOMADS will use the flmaint and flmaint.ver screens from the alternate library for your file maintenance panel.
Note:
If the new text for a button is derived from a message library reference, load the global variable %FLMAINT_MSG$ with the name of the message library. See
Message Library Maintenance.
Panel Designer
Once they are generated, file maintenance panels can be easily modified using the
NOMADS Panel Designer. However, be aware that the changes you make using the Panel Designer will be lost if you generate the panels via the same definition. See
Updating a File Maintenance Definition.
The File Maintenance Generator is used to generate a file maintenance object panel. It is accessed via the
Library Object Selection window using one of the following methods, depending on your display selection from the Views menu (Button View, Toolbar View, Menubar View):
|
View |
Method |
|
Button View |
Enter an object name in the Name field, and then either click the File Maint button or select Objects > File Maint from the menu bar. |
|
Toolbar View |
Click the File Maint button on the toolbar, and then enter an object Name when prompted. You can also select Objects > File Maint from the menu bar. |
|
Menubar View |
Select Objects > File Maint from the menu, and then enter an object Name when prompted. |
Note:
When entering a new file maintenance object name, valid characters are: letters (A-Z, a-z); numbers (0-9); ~ (tilde); ! (exclamation point); @ (at symbol); . (period); $ (dollar sign); _ (underscore); - (dash); + (plus sign). If an invalid character is used, a message will display. |
The File Maintenance Generator window is displayed.
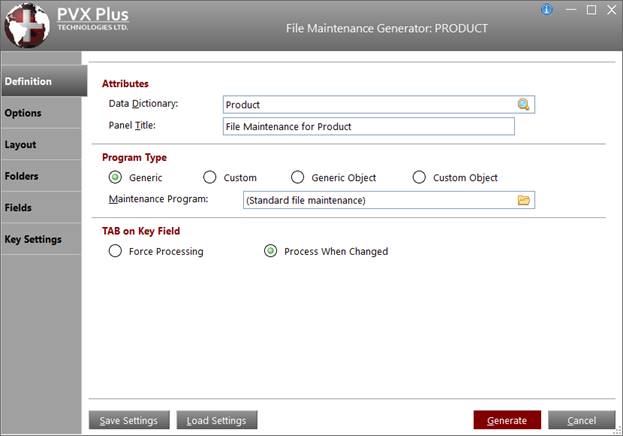
The options for the File Maintenance Generator window are presented in a series of tabbed folders (
Definition,
Options,
Layout,
Folders,
Fields and
Key Settings). These options are explained below.
|
Definition |
|
Attributes |
|
Data Dictionary |
Name of the file for which the file maintenance object is being defined. Click the Query Table View button (magnifying glass) for a tree view of table names by Group. For information on creating a filter to locate a specific table name, see
Filtering the Table Names Lookup. |
|
Panel Title |
Heading to be displayed (left aligned) at the top of the generated panel. | |
|
Program Type |
|
Options indicating the type of Maintenance Program: |
|
Generic |
Existing program used by many file maintenance objects, either standard generic *win/flmaint or programmer-defined program (based on flmaint). |
|
Custom |
Program to be generated specific to the selected file. |
|
Generic Object |
Existing generic object program (win/flmaint.pvc). Maintenance Program field is preloaded with the text. (Standard file maintenance object) |
|
Custom Object |
A custom object program to be created for the file definition. |
Note:
About File Maintenance Objects:
If a Custom Object is selected, then a custom .pvc program is created. The Generic Object consists of two programs: File IO is handled by flmaintIO.pvc, and panel/control events are handled by flmaint.pvc. See
File Maintenance Objects. |
|
Maintenance Program |
Name of the program or object to be generated. By default, this field displays (Standard file maintenance). In that case, the standard generic maintenance program, *win/flmaint, will be used. You can also click the Query button (yellow folder) to select from existing generic or custom programs/objects to modify. The type is determined via the Program Type buttons explained above. | |
|
TAB on Key Field |
|
Two options for controlling Tab behaviour are provided: |
|
Force Processing |
Sets Signal On Exit for the key fields. NOMADS executes Signal On Exit to find and load the record whether the key field has changed or not. A user simply presses the Tab key to have NOMADS retrieve and display the record with focus on the first data field. |
|
Process When Changed |
NOMADS executes the logic to find and load the record only if the value in the key field has changed. (If it has not changed, then the user has to press Enter and then Tab to select the record.) | |
|
Options |
|
Update Options |
|
Review Before Write |
Record's contents are to be reviewed before the record is written to determine if another user changed any fields. |
|
Lock Record |
To lock the record. |
|
No Lock |
To write with no lock. | |
|
Message Options |
|
Confirm New Record |
Displays a message to confirm new records before proceeding. |
|
Confirm Delete Request |
Displays a message to confirm deletions before proceeding. |
|
Acknowledge Writes |
Displays a message to notify users the selected record has been updated. |
|
Acknowledge Deletes |
Displays a message to notify users the selected record has been deleted. | |
|
New Records |
Toggle buttons indicating whether previous data is to be left in or cleared from the data fields when a new record key is entered. |
|
Interface Program |
Allows the user to define a program that will be called by the standard File Maintenance system when initialized, when exited or when a file is updated. Each file maintenance panel can have a unique interface program assigned to it. This program will be performed at a number of predefined entry points, each prefixed with FM_. |
|
Update These Options Only |
For Generic program types, selecting this button will change any of the options selected in the Options folder without regenerating the object.
This button is disabled for Custom program types - the object must be regenerated to incorporate changes. |
|
Layout |
|
Basic Layout |
|
Position |
Placement of the generated panel on the desktop. Selections are Absolute, Relative, Centered. Default is Relative. |
|
Column |
Starting vertical position for the top left corner of the generated panel. Default is 5, but this can be changed by typing a new value or clicking the adjacent up/down arrows. Increasing this number will position the top left corner of the panel further to the right. |
|
Line |
Starting horizontal position for the top left corner of the generated panel. Default is 5, but this can be changed by typing a new value or clicking the adjacent up/down arrows. Increasing this number will position the top left corner of the panel further down. |
|
Spacing |
Determines the amount of vertical spacing between controls on the generated panel. Default is 0.50, but this can be changed by typing a new value or clicking the adjacent up/down arrows. Increasing this number will increase the line spacing between controls. |
|
Min Width |
Minimum width (in number of columns) for the generated panel. If the number of columns required for the width of the panel is fewer than the number of columns entered at this field, then the panel width will automatically be adjusted to the number of columns entered at this field. Default is 0 (zero), but this can be changed by typing a new value or clicking the adjacent up/down arrows. Leaving this field set at 0 will automatically calculate the appropriate width for the generated panel, based on the number of columns needed to accommodate the widths of the controls extending across the panel. |
|
Min Height |
Minimum height (in number of lines) for the generated panel. If the number of lines required for the height of the panel is fewer than the number of lines entered at this field, then the panel height will automatically be adjusted to the number of lines entered at this field. Default is 0 (zero), but this can be changed by typing a new value or clicking the adjacent up/down arrows. Leaving this field at 0 will automatically calculate the appropriate height for the generated panel, based on the number of lines needed to accommodate the number of controls and the line spacing setting. | |
|
Prompts |
|
Alignment |
Sets the alignment of the text controls displayed as field names on the generated panel. Selections are Left and Right. Default is Left. |
|
Min Width |
Minimum width of the text controls. Default is 15, but this can be changed by typing a new value or clicking the adjacent up/down arrows. If Alignment is set to Left, this value affects the amount of space between the end of the text control and the beginning of its corresponding data control. If Alignment is set to Right, this value will be the total width for the text control, including the leading spaces preceding the right-aligned text. |
|
Append Colon |
Selecting this check box adds a : colon to the end of the text control, e.g. City: (Default is On) | |
|
Embedded Panels |
|
You can define up to three embedded panels. For each embedded panel, the following three components must be selected: |
|
Library |
Select the library that will contain the embedded panel. |
|
Panel |
Select the name of the panel that will be embedded. A library must be selected first to view a list of the available panels. |
|
Position |
Select the position at which the panel will be embedded. Selections are Top Left, Top Center, Top Right, Left Edge, Right Edge, Bottom Left, Bottom Center, Bottom Right, to Right of Key. Default is Top Left. | |
|
Button Locations |
|
Defines the placement of the Write, Delete, Clear, Cancel and Browse buttons. Selections are: |
|
Bottom |
Buttons are positioned side-by-side on a single row on the bottom of the generated panel. Default location is Bottom. |
|
Side |
Buttons are positioned in a grouping on the right side of the panel. Note:
Selecting this option will also result in a slightly wider panel. |
|
Manual |
Buttons are not created. The assumption is that the buttons will be on the embedded panel(s). | |
|
Folders |
|
Display Options |
|
Single Panel
Folders |
Toggle buttons indicating whether to generate a single panel or an object with folders (sub-panels). |
|
Columns |
Specify the number of columns (1 or 2) to use for displaying fields on the main panel. |
|
Col. 1 Width
Col. 2 Width |
Enter the width for each column. (Applies only if the number of columns selected is 2.) |
|
Position |
Defines the placement of the folder tabs. (Applies only if the Folders option is selected.) Selections are:
|
Top |
Tabs display across the top of the panel. |
|
Left Sidebar |
Tabs display along the left side of the panel. | |
|
Tab Width |
Enter the width of the folder tabs. (Applies only if the Folders option is selected.) | |
|
Folders |
|
Tab Label |
Text to appear as a folder tab label (either Fixed value, string Expression or Message Library Reference). |
|
Folders |
List of up to nine folders that you may define for your file maintenance object. For each folder, indicate the number of columns. If selecting two columns, indicate the width of each column.
|
Insert |
Button used to add the current Folder Tab Label into the list. |
|
Remove |
Button used to delete a folder name from the list. |
|
Update |
Button used to change an existing folder. |
|
Up/Down |
Buttons used to change the order of the folders in the list. For more information on how folders (sub-panels) work in NOMADS, see
Folder Controls . | | |
|
Fields |
|
Fields |
|
Unselected Items |
List of file elements that are available for including on the File Maintenance panel. |
|
Selected Items |
List of file elements to be placed on the selected panel or folder. This list is presented in a tree-view structure to provide a clear picture of the placement of these fields within the columns on the main panel and on the folders, if previously defined.
To add items to this list, select from the Unselected Items list using the following methods:
- Double-click on individual items to add them one at a time to the Selected Items tree view.
- To add multiple items at the same time, use the Shift-click or Ctrl-click combinations to highlight the items, then select the Items button.
To transfer items from this list back to the Unselected Items list, double-click on individual items. |
|
Up/Down |
Buttons used to change the order of the file elements in the Selected Items tree view. |
|
Reset |
Button used to reset the order of the file elements in the Selected Items tree view back to the order that corresponds with the last generated panel layout. | |
|
Frames |
Click the Frame button to insert a frame on the Selected Items tree view. File elements placed directly under the inserted frame branch will display as a group of controls enclosed within a frame box on the generated panel. You can optionally enter text to display as the title on the frame. Note:
Frames are used for display purposes only to visually group sections of a panel; for example, to frame controls used for shipping information or for invoicing information. No other functionality is associated with a frame. |
|
Key Settings |
|
Fixed Key Segment |
|
Lock First Segment |
Allows the first key segment (if your prime key has more than a single segment defined) to be locked to contain a fixed value that does not change. Selecting this check box enables use of the other options. See
About Key Settings below. | |
|
Attributes |
Indicates whether the field is to be disabled or hidden at run time. |
|
Value to Pre-load |
Sets a value to preload. This can be defined as a fixed value or as an expression. |
|
Cross Reference Key Field |
|
Field that Contains
'Reference Key' |
Select the field containing the unique identifier that is generated by the system to cross-reference with the primary key field. | |
About Key Settings
These options allow the definition of a fixed key segment; i.e. if the first segment of the key contains a fixed value that does not change, then that field can be preloaded, and the field disabled or hidden at run time.
If your prime key has a single segment, then all controls in the Key Settings folder will be disabled. This is because a fixed key segment is not applicable to a key with only one segment. If your prime key has more than a single segment, then you will be able to select the Lock First Segment check box to access the Attributes and Value to Pre-load controls.
Save Settings, Load Settings and Generate Buttons
The Save Settings, Load Settings and Generate buttons are explained below:
|
Save Settings
Load Settings |
The Save Settings button saves specified settings to a file name so that they can be applied to subsequent panels to be generated.
The two methods to achieve this are as follows:
|
Method 1: |
To specify the settings that will default every time the File Maintenance Generator is accessed. This method is useful for maintaining a consistent look and feel to panels each time they are generated. To do this, first define the default settings, then select the Save Settings button. A Save Settings file window opens, displaying the default file name fmaint_def.txt. This file is reserved specifically for storing panel default settings. You can save to this file name or enter a different file name, then click Save. |
|
Method 2: |
To save multiple variations of settings to different file names so that they are ready to apply when you need them. This method is useful for providing a unique look and feel to panels each time they are generated. To do this, first define the default settings, then select the Save Settings button. When the Save Settings file window displays, enter a unique file name to save each variation. |
To apply the settings from a saved file to a new file maintenance object being defined, select the Load Settings button. A Select Settings file window displays. Select the file name with the specific settings to be applied, and then click Open.
Settings for only certain options can be saved, as specified below for each folder tab:
|
Folder Tab |
Option(s) Saved |
|
Definition |
Only the TAB on Key Field option can be saved. |
|
Options |
All of the options can be saved. |
|
Layout |
All of the options can be saved. |
|
Folders |
None of the options can be saved. |
|
Fields |
None of the options can be saved. |
|
Key Settings |
None of the options can be saved. | |
|
Generate |
Generates the File Maintenance panel.
If the Position option (Folders tab) is set to Left Sidebar, the following takes place when the folder panel is generated:
- The folder placement is set to column 0 (zero) and fills the entire width of the main panel.
- The Tab Width option is automatically increased to 12 (minimum setting) only if the original value entered prior to generation was less than 12. If the original value was 12 or higher, then this value is retained after generation.
- The width of the folder panel's working area is decreased by the tab width.
- The Frame Style option for the folder panel is set to Top/Bottom line.
|
After all the necessary parameters have been set (folders defined, data fields selected, etc.), select the Generate button to create file maintenance panels for the file. The main panel will be generated using the object name specified in the
Library Object Selection window, and any additional folders will be created with the name object_name.n where n is a sequence number beginning with 1.
If the Custom program type has been selected, a program with the name specified in the Maintenance Program field will be generated. If a program with the name already exists, you will be asked to choose between replacing the previous program or merging it with the new version.
|
|
Replace |
The original program will be erased and replaced by the new one. |
|
|
Merge |
Code with line numbers not divisible by 10 or greater than or equal to 20000 will be merged from the original custom program into the new one. |
To update a file maintenance definition, you can use one of the following methods, depending on your display selection from the Views menu (Button View, Toolbar View, Menubar View):
|
View |
Method |
|
Button View |
Enter an existing object name in the Name field in the
Library Object Selection window, and then click the File Maint button. |
|
Toolbar View |
Click the File Maint button on the toolbar and then enter an existing object Name when prompted. |
|
Menubar View |
Select Objects > File Maint from the menu and then enter an existing object Name when prompted. |
The current definition will be reloaded, and you can then change program names, display options, folders names, field selection, etc. Select the Generate button to create new file maintenance panels for the file.
Warning!
When you generate panels for an existing object definition, you will lose any modifications that you made after the initial panels were generated. For instance, if you relocate, resize or add anything via the
NOMADS Panel Designer, you will have to redo those changes.