File Maintenance Generator
|
Input Field |
Step 6: Field Layout |
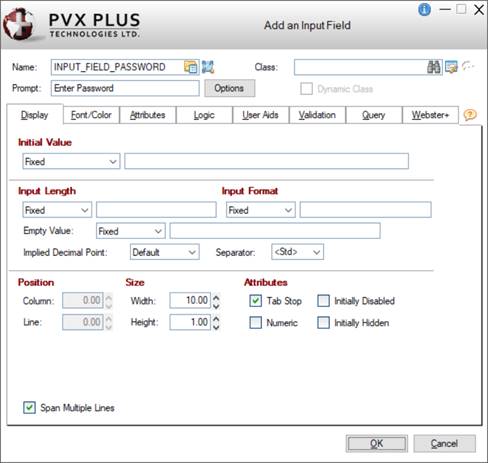
The Add an Input Field window is used to add (and edit) an Input Field on the file maintenance panel.
(The ability to add/edit an Input Field was added in PxPlus 2022.)
To invoke this window, use one of the following methods:
Click the Add Object button (above the Layout Grid) and select the Input Field option. OR
Right click on a cell in the Layout Grid, select Add Object from the popup menu and then select the Add or Edit an Input Field option.
This window is divided into tabbed folder panels for defining Input Field properties, depending on whether a NOMADS panel and/or a Webster+ HTML page are being generated.
Many of these properties are also available when defining a Multi-line control (see
Multi-line Properties) in the NOMADS Panel Designer, except for these differences:
|
Name |
Enter a unique name or use the default name provided. (Same as
Name property in Multi-Line Properties.) |
|
Prompt |
Enter text to describe the Input Field. The text displays as a field name on the generated panel. |
|
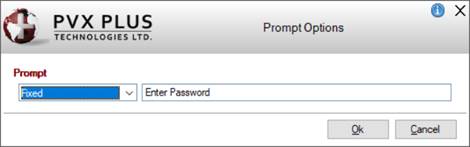
Options |
Button that launches the Prompt Options window for defining the Input Field prompt.
This window consists of the following:
|
Prompt |
Click the drop-down arrow to select whether the prompt will be defined as a Fixed value (Default), a string Expression, or a Message Library Reference.
If a Message Library Reference will be used and the Input Field will be added to a Webster+ HTML page, the message that is selected must also exist (with the same key) in the Webster+ Message Library. See Webster+
Message Library Maintenance. |
|
Ok |
Updates the Prompt field on the Add an Input Field window with the value entered. The value will be preceded with an = (equals sign) if an Expression or Message Library Reference was entered. |
|
Cancel |
Cancels any changes and returns to the Add an Input Field window. |
(The Options button was added in PxPlus 2022 Update 1.) |
|
Display |
|
|
Span Multiple Lines |
(Applicable for NOMADS Panels Only)
When selected (Default), the Input control spans according to its size. Fields placed in the rows below the Input control and below the adjoining cell (in a two-column layout) are pushed down to accommodate the Input control. The field in the adjoining cell remains in place beside the Input control.
Deselecting this option allows fields to be placed beside the Input control (in a two-column layout). However, fields below the Input control (in the same column) are not pushed down, which may result in overlapping and hidden fields.
This option works the same for Smart List Boxes, Smart Charts, Images and Embedded Panel/HTML Short Codes. For an example using a Smart List Box, see
Example - Span Multiple Lines. |
|
Webster+ |
|
|
HTML |
(Available when
HTML Page check box is selected for Form Type)
|
Class |
A single HTML Class can be entered (e.g. bold). Multiple classes can be entered, separated by either spaces or commas. When spaces are used as the delimiter, the values must be within double quotes (e.g. "bold text_red fill_cyan" or bold,text_red,fill_cyan).
See
Webster+ Defined Classes. |
|
Event |
Enter an optional
HTML Event. |
|
Calculation |
Enter an HTML calculation. Fields used in the calculation must either exist on the panel Layout Grid or be included as
Hidden Variables.
Example:
ytdSales+prvSales |
|
Priority |
(Available when an HTML Calculation is entered)
Controls the order in which the HTML calculations are done. Can be any number between 1 and 9 (1 is first priority). The default priority is 5 for each calculation defined.
The
[addcalc] short codes, which correspond to all the HTML calculations entered on the panel Layout Grid, are added at the end of the generated HTML page, sorted by priority. If two or more HTML calculations are assigned the same priority level, calculations will be done in field name sequence within each priority level.
If the order of the HTML calculations is not important, the priority can be left as 5 for all HTML calculations.
(The HTML Calculation Priority was added in PxPlus 2022 Update 1.) |
|
Other Options |
One or multiple short code options associated with the
[input] short code can be entered. Multiple options must be separated by a space.
See Webster+
Short Code Options.
Example:
tip=FloatingTip
tip=FloatingTip link=https://www.pvxplus.com Important Note:
The Other Options field should not be used for entering class=xxx or event=xxx short code options. | |