|
Step 1: File Maintenance Object Definition |
Select the type of form(s) to create and the data dictionary table to use. The file maintenance object for the file definition is also specified, if applicable.
This panel consists of the following:
|
Select the file maintenance template and layout format |
Select a template to apply its settings to the new panel(s) or HTML page(s) to be generated. A template consists of predetermined settings that define the appearance of a panel or HTML page. Using templates makes designing new panels or HTML pages easier and gives them a consistent look and feel. The templates data file "maint_templates.dat" is created according to the prefix settings the first time the File Maintenance Generator is accessed on a new PxPlus installation or for a new PxPlus project. Therefore, different PxPlus projects may have unique template data files. (Support for creating the templates data file according to prefix settings was added in PxPlus 2021.) Different templates can be used to create different panel or HTML page designs. For example: A simple maintenance panel with (or without) browse buttons To save template settings for future use, click the Save Template button in Step 7: Finish. | ||||||||||||
|
(Available when a template exists) Click the drop-down arrow for a list of previously saved templates (if applicable). See Save Template (in Step 7: Finish). When a template is selected, its settings are applied to the current panel or HTML page to be generated. If no templates exist or an existing template is not selected, the default will be None. If a template was saved with the Default Template check box selected (see Save Template), that template name will be the default when a new file maintenance panel is being generated, and the words *Default Template* will display. Note:
| |||||||||||||
|
(Available when creating a new file maintenance panel) Click the drop-down arrow to select the panel layout to use in Step 6: Fields. Starting with PxPlus 2024, the default is the Enhanced layout.
The Layout option cannot be changed when regenerating a panel. If you are creating a new panel and have not entered anything in Step 6: Fields, you can still go back to Step 1: Definition and change the Layout option; otherwise, a message will display. Note:
| |||||||||||||
|
(Copy Templates from another location) |
(Available when no templates are defined) Button (beside the File Maintenance Template drop box) that launches the Copy File Maintenance Templates window. This window is used to copy the file maintenance templates from an existing templates data file (maint_templates.dat) to the templates data file in the current PxPlus installation or project. This allows previously defined templates to be available in subsequent PxPlus installations or projects without having to recreate them. For example, assuming that file maintenance templates were defined in PxPlus 2020, after installing PxPlus 2021, you would need to use the Copy Template button to copy those existing templates to the currently empty templates data file in PxPlus 2021. This window consists of the following:
Note:
| ||||||||||||
|
(Delete Template) |
(Available when a previously saved template is selected) Button (beside the File Maintenance Template drop box) that is used to delete a template. Prior to deleting a template, a message will display. This button is enabled when a previously saved template (other than None) is selected from the File Maintenance Template drop box. Note: | ||||||||||||
|
Reset Template |
(Available when an existing panel is being regenerated) Select this check box to enable the File Maintenance Template drop box and reset the template by choosing one from the drop box. The settings associated with the selected template will be used instead of the settings when the panel was generated. If the Reset Template check box is unchecked after another template has been selected, the original template name and its settings will be put back to the way they were on the original panel. By default, this check box is not selected. When generating a new file maintenance (or inquiry-only) panel, this check box is hidden. (The Reset Template option was added in PxPlus 2020.) | ||||||||||||
|
(Available when an existing panel is being regenerated) Button that opens the regenerated file maintenance panel in the NOMADS Panel Designer. If any File Maintenance settings were changed, a message will display when clicking this button. (The Screen Designer button was added in PxPlus 2023.) | |||||||||||||
|
A NOMADS panel, an HTML page or both types can be created. Non-File Maintenance forms, which do not use the standard file maintenance logic, can also be created. | |||||||||||||
|
Form Type |
Select the type of form(s) to create: a NOMADS Panel (Default), a Webster+ HTML Page, or both types. The Non-File Maintenance Form check box is used for creating a NOMADS panel and/or HTML page that does not use the standard file maintenance logic. Selecting this check box provides the capability to generate informational/dashboard-like panels or pages. Entering a data dictionary table is optional. If a table is entered, fields can be added to the layout if desired. The Non-File Maintenance Form setting is not saved to a template. Before an HTML page can be created, a location must be defined to store the Webster+ generated HTML forms. This is done by selecting Webster+ > Directory on the Library Object Selection menu bar. If the location is not defined and the HTML Page option is selected, a message will display. (The Form Type option was added in PxPlus 2021.) | ||||||||||||
|
A definition must exist in the data dictionary (providex.ddf and providex.dde files) to generate a new panel. | |||||||||||||
|
Table Name |
Name of an existing data dictionary table for which the file maintenance object is being defined. Click the Query Table View button (magnifying glass) to invoke the Lookup Table Names window to search for a table name or type the table name. If the Non-File Maintenance Form check box is selected, the table name is optional. Note: | ||||||||||||
|
Panel Title |
Title to display at the top of the generated panel. The panel title is required before proceeding to the next step. By default, the panel title displays as xxxxxx Maintenance (where xxxxxx is the Table Name selected from the data dictionary). If the Inquiry Only check box is selected, the panel title defaults to xxxxxx Inquiry. If the Non-File Maintenance Form check box is selected, a panel title must be entered. Note: | ||||||||||||
|
(Applicable for HTML Pages Only) A symbol can be optionally added before the panel title in Webster+ HTML pages. It can be either a Font Awesome symbol or a standard PxPlus bitmap selected from the Bitmap Library lookup button. For a list of Font Awesome symbols, visit https://fontawesome.com/v4/icons/. Note:
| |||||||||||||
|
Enter the maintenance object |
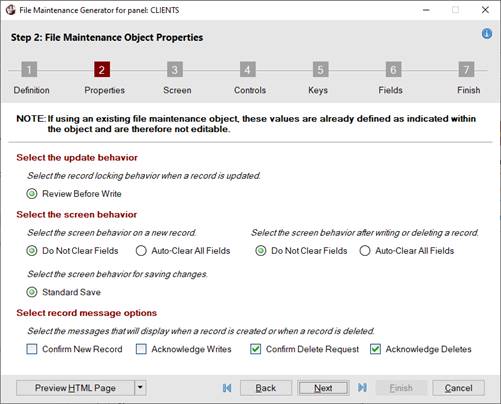
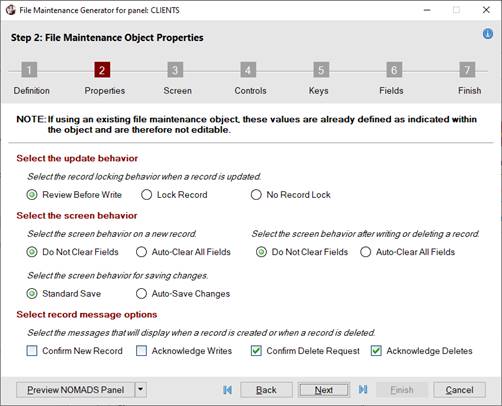
Generated file maintenance panels require a file maintenance object as the Default Program in the Panel Header for a generated main panel. This object contains properties that correspond to the options on the Step 2: Properties panel. This object can be unique to each generated file maintenance panel or can be shared among different generated file maintenance panels. | ||||||||||||
|
File Maintenance Object |
Click the drop-down arrow for available selections:
(The File Maintenance Object drop box was added in PxPlus 2020.) | ||||||||||||
|
Object Name |
Input depends on the File Maintenance Object drop box selection:
Note: | ||||||||||||
|
Select this check box to create a file maintenance panel in inquiry mode, which allows view-only access to records. Records cannot be added, edited or deleted. If this check box is selected, the Panel Title defaults to xxxxxx Inquiry. In addition, all options in Step 2: Properties, as well as the Required Fields option in Step 4: Controls, are disabled. | |||||||||||||
|
As with the File Maintenance logic in NOMADS, hooks are available to allow additional logic to be performed for the HTML page. If the HTML page requires additional logic at some or all of the following points, ensure that the methods are named as shown below:
| |||||||||||||
|
Interface Program |
(Applicable for HTML Pages Only) Enter the name of the interface program or click the Query button. An interface program is needed if you want to add code for any of the methods listed above. It is also needed to code events associated with various Objects (Buttons, Grids, Input Fields, etc.) that you are adding to the HTML page in Step 6: Fields. If adding a Grid object, the HTML interface program is required to create a method to load the Grid using a memory file. The interface program name entered will be used as the default Initialization Program. For an example of an interface program, see Grid Example. For additional Grid information, see Using Grids in Webster+. (The Interface Program option was added in PxPlus 2021.) | ||||||||||||
|
(Edit Interface Program) |
(Applicable for HTML Pages Only Available when Interface Program is entered) Button (beside the Interface Program field) that is used to create or edit the interface program by launching the program editor. The program editor that is launched will either be the Integrated Toolkit™ (*IT) or Ed+, depending on whether the %NOMADS'Program_Editor$ property has been set. If this property is not set, the default will be the Integrated Toolkit. If running the File Maintenance Generator from the Web IDE, the program editor will be Ed+. (The Edit Interface Program button was added in PxPlus 2025.) |
File Maintenance Generator Steps