|
Service Queries for Web, Email, Map and Open File |
Generally, the query interface is used to display and select data, whether it is using a Query Definition, a Calendar interface to display and select a date, a Calculator interface, and so on.
It is also possible to use the NOMADS Query interface to launch service programs. These are programs that perform functions related to the control to which they are attached, other than displaying and returning data.
You can set up service programs in the NOMADS Panel Designer Query tab by selecting Query Program as the Query Type and entering the program to run. See Assigning a Query.
You can set up the following service queries:
|
|
Launches a specified website | |
|
|
Generates a new email window addressed to a particular person or company | |
|
|
Displays a Google map for a given location | |
|
|
Displays a standardized file selection dialog (similar to GET_FILE_BOX) to allow users to select or enter a file name to open |
(The Open File Query was added in PxPlus 2020.)
The Web query provides a convenient way to launch a website for a specified Web address that is entered in a Multi-Line control. After entering a valid Web address, selecting the query button invokes the website that corresponds to that address.
Example:
The following is an example of a Web address entered in a Multi-Line control for which the Web query has been defined.
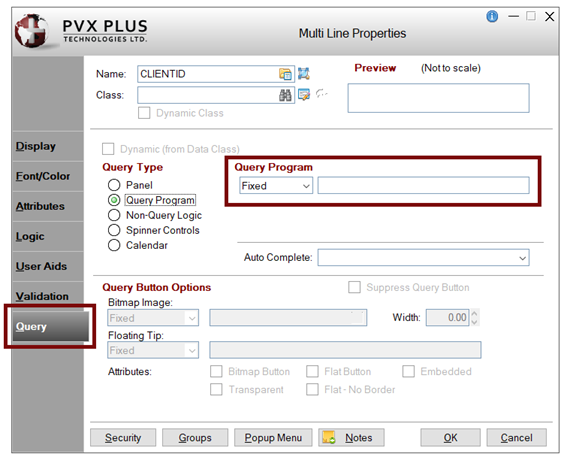
Defining a Web Query
To define this query for a Multi-Line control, select the Query tab in the Multi-Line definition in the NOMADS Panel Designer (see Multi-Line Properties). Set the Query Type to Query Program, and enter *win/url as the program. You can also select new Query Button Options such as Bitmap Image, Width, etc. to determine the appearance of the query button that will be displayed. See Assigning a Query.
Using a Web Query
To use the Web query, the user enters a valid Web address into the Multi-Line, then clicks the query button or presses Shift - F2 to launch the website using the default browser. If the Web address is not valid or cannot be found, the browser will display an appropriate message.
The Email service query launches a new email window with the specified email address, automatically populating the To: distribution line.
Example:
The following is an example of an email address entered into a Multi-Line control for which the Email query has been defined.
Defining an Email Query
To define this query for a Multi-Line control, select the Query tab in the Multi-Line definition in the NOMADS Panel Designer (see Multi-Line Properties). Set the Query Type to Query Program, and enter *win/email as the program. You can also select new Query Button Options such as Bitmap Image, Width, etc. to determine the appearance of the query button that will be displayed. See Assigning a Query.
Using an Email Query
To use the email service query, the user enters an email address into the Multi-Line, then clicks the query button or presses Shift - F2. A new email window for the address entered is launched, assuming that a default email client has been defined and configured on the current computer.
The Map query, when defined for Multi-Line controls containing appropriate address information, invokes a Google map displaying the location of the address entered, if found. The address information can be presented either as a single Multi-Line control with all the required address components or as a grouping of Multi-Line controls that collectively contain all the necessary components of the address (i.e. street, city, province or state).
Defining the Map query differs slightly from the Web and Email queries in that consideration must be given to how the address information will be presented, i.e. in a group of Multi-Line controls or in a single Multi-Line. This is important for ensuring that all necessary steps for defining the query have been taken so that the query will function as expected.
Example:
The following is an example of a single Multi-Line control containing all the address information in one place.
To view a video presentation on how to add a Google map query, go to How to Add a Google Map.
Defining a Map Query
To define a map query for a Multi-Line control, select the Query tab in the Multi-Line definition in the NOMADS Panel Designer (see Multi-Line Properties). Set the Query Type to Query Program, and enter *win/map as the program. You can also select new Query Button Options such as Bitmap Image, Width, etc. to determine the appearance of the query button that will be displayed. See Assigning a Query.
Example:
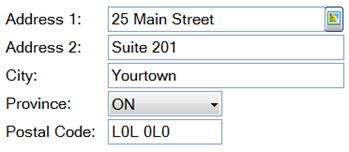
The following is an example of a grouping of Multi-Line controls that collectively comprise the necessary address information, with the Map query defined for the first Multi-Line (i.e. Address 1).
If the address segments are comprised of a group of Multi-Lines, then the query button is typically associated with the first Multi-Line in that group; in this case, Address 1. However, the street information in Address 1 is, on its own, insufficient for the Google mapping application to accurately pinpoint the location. Additional information, such as City, Province or State, is required as well. To ensure that all the necessary components of the address are passed to the Google mapping application, the User Tag property for the Multi-Line (i.e. Address 1) must be defined to identify all the information it will need.
The User Tag property is defined in the Multi-Line definition on the Attributes tab under the section titled Other. Select Fixed as its type, and enter a string comprising values that must be passed to the Google mapping application to pinpoint an accurate location.
Example:
Using the above example showing the group of address Multi-Line controls, Address 1 (street information), City and Province are required; therefore, the names of these Multi-Line controls are entered, as shown below. (This example assumes that the Suppress.VAL attribute for the panel header is set to On.) The value for Address 2 (suite number) is not included in this example because it does not contain information that can be used to map the location. The Postal Code is optional.
If a User Tag is not defined, then only the information in the single Multi-Line control to which the query is associated will be passed to the mapping application.
Using a Map Query
To use the map query, the user enters the pertinent address information and clicks the query button or presses Shift - F2. If the address is complete, a map interface displays, similar to the one below, indicating the mapped location and address. If the address information passed to the mapping application is incomplete or invalid, unexpected results can occur when mapping the location.
Standard Google Map functionality, as well as screen resizing, is available.
The Open File query can be defined for a Multi-Line control or a Grid cell. When invoked, the Open File query displays a standardized file selection dialog (similar to GET_FILE_BOX) to allow users to select or enter a file name to open. The specified pathname is then loaded into the associated control.
See Defining an Open File Query for steps on defining this query for a Multi-Line or Grid cell. No additional coding is required to display the file selection dialog. It will display automatically when the query button is selected at run time.
(The Open File Query was added in PxPlus 2020.)
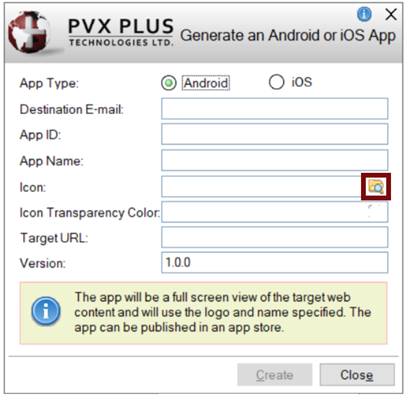
Two examples of where the Open File query is currently used in PxPlus are the Generate an Android or iOS App utility (Icon field) and the Create Self-Signed SSL Certificate utility (Target PEM file path field):
|
|
|
An Open File query can be defined for a Multi-Line control (using the Query tab in Multi-Line Properties) or a Grid cell (using the Presets tab in Grid Properties). Refer to the steps below for defining an Open File query for a Multi-Line or for a Grid Cell. These steps include adding a query button for invoking the file selection dialog.
For Multi-Line:
|
|
1. |
Open the Properties window. Select the Query tab. | ||||||
|
|
2. |
Under Query Type, select Panel. | ||||||
|
|
3. |
Under Panel Information, define the following:
| ||||||
|
|
4. |
Under Query Button Options, define the appearance for the query button:
Note: | ||||||
|
|
5. |
The User-Defined Tag field (on the Attributes tab) can be optionally used to customize settings, such as return the full pathname, display a different title, set the default file extension and/or set the file extensions list. Use the following format to set one or a combination of these settings (separated with a semi-colon): fullpath;title=My Title;ext=png;filters=Images|*.png\;*.bmp\;*.jpg\;*.jpeg,Text|*.txt\;*.log,All Files|*.*, Note: |
|
|
1. |
Open the Properties window. Select the Presets tab. | ||||
|
|
2. |
In the Presets grid, select Query from the Property drop box. Specify the applicable Column/Row. | ||||
|
|
3. |
For Value/Expression, click the Query button to invoke the Query Display panel. | ||||
|
|
4. |
Under Query Type, select Panel. | ||||
|
|
5. |
Under Panel Information, define the following:
| ||||
|
|
6. |
Under Query Button Options, specify the Bitmap Image for the query button. | ||||
|
|
7. |
The User-Defined Tag field (on the Attributes tab) can be optionally used to customize settings, such as return the full pathname, display a different title, set the default file extension and/or set the file extensions list. Use the following format to set one or a combination of these settings (separated with a semi-colon): fullpath;title=My Title;ext=png;filters=Images|*.png\;*.bmp\;*.jpg\;*.jpeg,Text|*.txt\;*.log,All Files|*.*, Note: |