|
Security Class Maintenance |
|
In Security Class Maintenance, add and maintain the security classifications assigned to users. Security classifications are used in Object Security Definition to control which users have full or view only access to specific objects (i.e. screens, panel controls, queries, query columns, data dictionary, data elements, views, reports).
By default, the system creates two classifications: ADMIN (for system administration) and USER (for general users). Only users in the ADMIN classification are allowed to add/edit security classes and other users. Users who are not in this classification can only view existing security class information.
To invoke Security Class Maintenance, use one of the following methods:
|
Location |
Method |
|
From the PxPlus IDE Main Launcher |
Expand the Security category and select Security roles/classifications. |
|
From the NOMADS Session Manager |
From the menu bar, select Security > Classifications. |
This window consists of the following:
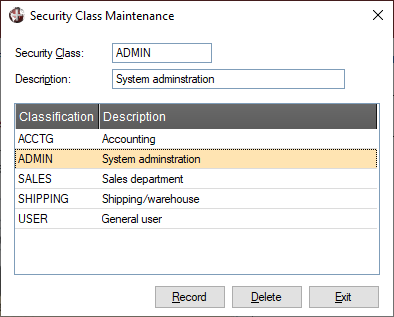
|
Security Class |
Name of the security classification (e.g. ADMIN, SALES). Existing classifications and their descriptions are displayed in the list box. |
|
Description |
Free-form description to identify the classification of users (e.g. Sales Dept.). |
|
Classification/Description |
Lists the security classes added to the system. |
|
Record |
Updates your system's security settings with the new or modified security class. |
|
Delete |
Removes the selected security class from your system. Warning! |
|
Exit |
Closes Security Class Maintenance without saving any changes. Note: |
When you are setting up security classifications for the first time, the following steps occur:
|
Step |
Description | ||||||
|
1. |
The system detects that the NOMADS security classification file does not exist and asks to create it. Click Yes to continue. (Click No if you do not want to proceed with the set up process at this time. You can restart the set up later.) | ||||||
|
2. |
The system displays a notification that this default file will be created with two default classes:
Click Yes to acknowledge this message. This allows the system to create the file and complete the set up by launching Security Class Maintenance. (Click No if you do not want to complete the set up process at this time. You can restart the set up later.) | ||||||
|
3. |
When Security Class Maintenance displays, the ADMIN class is initially selected. The Record and Delete buttons are also available only for users with the ADMIN classification. At this point, you can either add other classifications or click the Exit button and add more classifications later if needed. | ||||||
|
4. |
The next step is to add users in User Maintenance. |
Restricting Access
Security Sign On