|
User Maintenance |
In User Maintenance, add and maintain users and assign one or more Security Classifications to each user defined. This information is used to restrict or allow access to specific objects. For information on defining object security and the various locations where security can be applied, see Restricting Access.
Only users assigned to the ADMIN classification are allowed to add/edit other users and security classifications. Users not assigned to this classification can only edit their own user information.
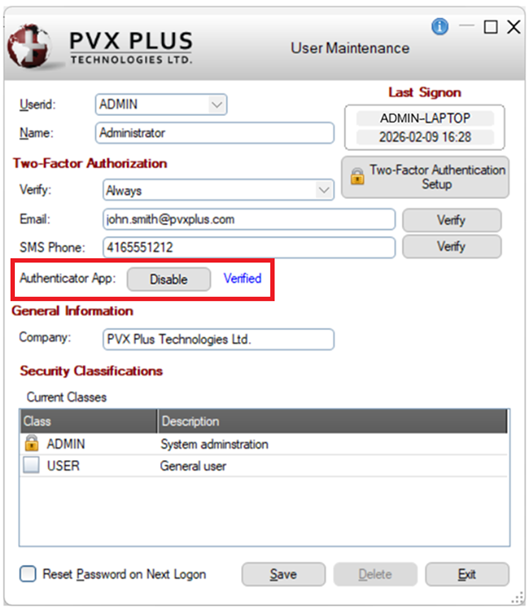
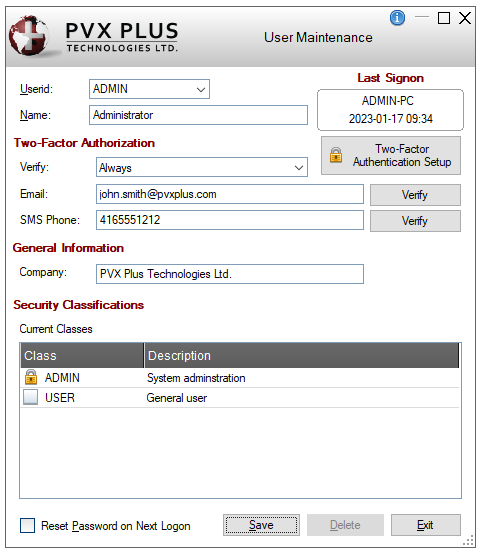
For added security, PxPlus provides the option to set up Two-Factor Authentication (2FA), which requires users to verify their identity using a second method - such as email, text message, or an authenticator app - in addition to their user ID and password when logging into the system. If set up, two-factor authorization settings must also be defined for each user.
(The option to set up Two-Factor Authentication was added in PxPlus 2023.)
(The ability to integrate to a third-party authenticator app was added in PxPlus 2026.)
In addition, Webster+ System Security provides an option that allows it to use the NOMADS security files.
To invoke User Maintenance, use one of the following methods:
|
Location |
Method |
|
From the PxPlus IDE Main Launcher |
Expand the Security category and select User Definitions. |
|
From the NOMADS Session Manager |
From the menu bar, select Security > Users. |
This window consists of the following:
|
Userid |
Short form for the user's logon ID. String, maximum of 12 characters in length. Click the drop-down arrow for a list of existing user IDs. | ||||||||||||||||||||||||
|
Name |
Free form (full) name of the individual user. | ||||||||||||||||||||||||
|
Last Signon |
Displays the device name, date and time when the current user signed on. (The Last Signon box was added in PxPlus 2023.) | ||||||||||||||||||||||||
|
(Available Only to Users with ADMIN Classification) Button that invokes the Two-Factor Authentication Setup window for defining the settings for Two-Factor Authentication (2FA) on the system. (The Two-Factor Authentication Setup button was added in PxPlus 2023.) | |||||||||||||||||||||||||
|
Define the Two-Factor Authorization settings for the user:
(The Verify drop box, Verify buttons, Email and SMS Phone fields were added in PxPlus 2023.) | |||||||||||||||||||||||||
|
General Information |
(The Company field was added in PxPlus 2023.) | ||||||||||||||||||||||||
|
Security Classifications |
Displays a list of known security classes for your system, along with their descriptions. This list includes the two default classes, ADMIN and USER, as well as any new classes that were added in Security Class Maintenance. Each new user must be assigned a security classification. To assign one or more classes, select the applicable Class check box. | ||||||||||||||||||||||||
|
When selected, the Password Change window will be invoked after the initial logon at run time to allow the password to be changed. When defining a new user, this option is initially checked and disabled to force the new user to change the password when logging on for the first time. After that, this option becomes enabled and unchecked. (The wording change from "Reset Password" to "Reset Password on Next Logon" was added in PxPlus 2023.) | |||||||||||||||||||||||||
|
Save |
Saves a new or modified user record. To use Two-Factor Authentication, a verified email address, SMS phone number and/or authenticator app is required before saving the user record. If the Verify drop box is set to Always and an authentication method has not been verified, a message will display when Save is selected. (The wording change from "Write User" to "Save" was added in PxPlus 2023.) | ||||||||||||||||||||||||
|
Delete |
(Available Only for Users with ADMIN Classification) Removes the selected user record. Before proceeding, a message will ask you to confirm the deletion. Warning!
| ||||||||||||||||||||||||
|
Exit |
Closes User Maintenance without saving any changes. Note: |
When setting up users for the first time, the following steps occur:
|
Step |
Description | ||||
|
1. |
The system detects that the NOMADS user registration file does not exist and asks to create it. Click Yes to continue. (Click No if you do not want to proceed with the set up process at this time. You can restart the set up later.) | ||||
|
2. |
The system displays a notification that this default file will be created with a default user ID of ADMIN (default password ADMIN) and automatically assigned the default class of ADMIN. The ADMIN class provides full access and allows a user with this class to add/edit other users and security classes. Click Yes to acknowledge this message. This allows the system to create the file and check for the existence of the security classification file to determine if security classes have been set up. (Click No if you do not want to complete the set up process at this time. You can restart the set up later.) Depending on whether the security classification file exists, the system determines how it should proceed:
| ||||
|
3. |
When User Maintenance displays, the ADMIN user shows two default security classes, ADMIN and USER, along with any other classes that might have been previously added in Security Class Maintenance. The Delete button is available only for users with the ADMIN classification. At this point, you can either add other users or click the Exit button and add more users later if needed. In addition, Two-Factor Authentication can be set up by any user with the ADMIN classification. (Two-Factor Authentication Setup was added in PxPlus 2023.) |
Restricting Access
Security Sign On