Display Format
When an item is dropped on a cell, a display format mask is automatically assigned to the value. Use this option to change the assigned mask. Format masks can be Fixed values or PxPlus Expressions. Format mask expressions are displayed prefixed with an = equals sign; e.g. =%F$. Expressions are evaluated at run time.
Text Font
All cells are initially set up using a default font, font size, style and orientation. Font size refers to Point Size. The list of Style selections includes Normal (default), Bold, Italics or Bold+Italics. Orientation selections are: Horizontal (default), Vertical Up (90 degrees) or Vertical Down (270 degrees), if supported by the particular font and output destination; e.g. raster fonts and HTML output do not support vertical fonts. In addition, vertical fonts cannot be displayed in the Designer grid, even though they will appear correctly in the output.
The Text Font option allows you to change the font and its attributes in the selected cells. This option also allows you to change the default font. When the default font is set, all cells currently defined with the default font (in terms of font, size and style) will change to the new default. The default font settings will stay in effect until changed using this option, or an existing report definition with a different default font is loaded into the Report Writer.
The font may be selected from the list or entered in the input box above the list. This means you can select a font for a report that is not resident on the designer's system.
See Designer Options to set up a default font for all your reports.
Text Colour
Set the text colour of the selected cells.
Background Colour
Set the background colour of the selected cells. (Default is White.) If a report also uses the Alternate Background Colours report option to highlight detail lines, then the background cell colour, if defined, will take precedence, unless the background colour is white.
For information on the Alternate Background Colours report option, see Colours.
When an item is added to the layout, a text item will be Top Left justified and a numeric item will be Top Right justified.
Text alignment for selected items can be adjusted by clicking one of the horizontal alignment buttons (Left, Center, Right) and/or one of the vertical alignment buttons (Top, Middle, Bottom).

(Compound text alignment menu options were added in PxPlus 2019.)
(Horizontal/vertical alignment toolbar buttons were added in PxPlus 2020.)
Borders
All borders are black. Available selections are Full grid; Edges Only, Inside only, Left Edge; Right Edge, Top Edge; Bottom Edge, No Borders.
Be aware that the proximity of the border to the values shown in a cell may in practice be closer than that displayed in the Report Designer. If Background Colours are used in conjunction with borders, borders on the bottom or right of a cell may be overdrawn by the background colour of the cell to the right or beneath.
Border Size
Adjust the border width to Thin, Medium or Wide. The width must be set prior to adding the border. The currently selected width is displayed on the Border width button on the Report Designer tool bar.
Merge the highlighted cells. If the value in a cell spills into the next column, you should join the cells. For printed output, this may not always be necessary as the value will print outside of the cell area, but HTML output requires that such cells be joined to maintain proper column spacing. A common use of joined cells is to centre titles across several columns. Cells may be joined across columns and rows, but the rows must be in the same section.
In iNomads, where only one cell can be highlighted, the Join Cells window shown below is presented to specify the total number of columns and/or total number of rows, including the anchor cell, to be joined.
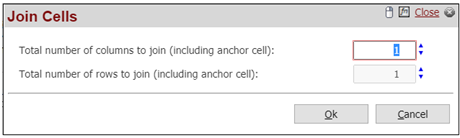
(The Join Cells window was added in PxPlus 2018.)
Unjoin
Reset joined cells to individual cells.
(Applicable to Printer/PDF/Viewer Output Only)
Wrap the cell text within the defined cell dimensions. The contents will self-wrap or break at a line-break character ($0A$). If the contents of the cell contain other characters denoting a line break, you can substitute for them using a formula, such as SUB(text$,$09$,$0A$). HTML output wraps by default, and Clipboard output is not formatted.
If the length of text in an individual cell or multiple cells varies so that different line heights are required to display the full contents, the Variable Line Height option (accessible from the right-click popup menu) can be turned On to accommodate this.
Used for editing several formatting attributes in a range of cells simultaneously. Attributes that can be set include Word Wrap, Text Alignment, Borders (including border size), Font, Font Style, Point Size and Orientation, as well as Text and Background Colors.
To set an attribute for all the selected cells, choose a setting for the attribute from the drop-down list. In the case of Font, you can also enter a font name that is not in the list, thus allowing a font to be selected, which may not exist on the designer's computer.
Bulk Edit also has an option to Include alternate cell definitions, which will update alternate cell definitions that exist within the selected cells as well. If a single cell is selected, Bulk Edit displays all the current format settings for that cell.