|
CSV File Import Utility |
|
The CSV File Import utility is used for importing data in a CSV (Comma Separated Values) file or a TSV (Tab Separated Values) file directly into PxPlus.
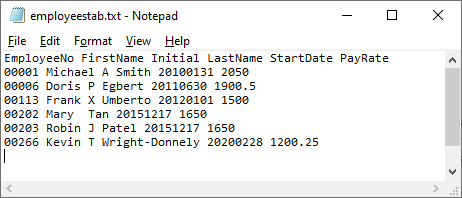
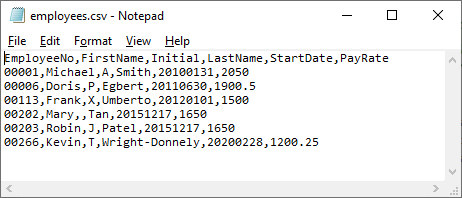
Below is an example of sample employee data in a CSV file and a TSV file. The first line in each file contains the field names and is not considered part of the data. Each line below the first line is a record that consists of the data fields separated by a comma (CSV file) or a tab (TSV file). The addition of a separator after the last field is optional.
CSV file:
TSV file:
To invoke the CSV File Import utility, use one of the following methods:
|
Location |
Method |
|
From the PxPlus IDE Main Launcher |
Expand the Data Management category and select CSV Import. |
|
From the NOMADS Session Manager |
Select Utilities > CSV File Import from the menu bar. |
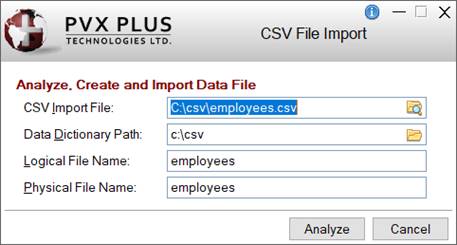
The following window is displayed:
This window consists of the following:
|
CSV Import File |
Enter the name of the file to import or click the Query button. The Logical File Name and Physical File Name will default to the CSV Import File name without the file suffix. |
|
Data Dictionary Path |
Location where the physical file will be created. If the providex.dde and providex.ddf files are not in this location, then a new set will be created. Click the Browse button to select the location of the directory. |
|
Logical File Name |
Logical file name that will be created and loaded into the data dictionary. |
|
Physical File Name |
Physical file name that will be created in the location entered for the data dictionary location. |
|
Analyze |
Initiates the analysis phase of the utility, which makes several passes of the file being imported. Phase one reads through the file and determines the number of fields, name, size and type of fields to import. Phase two determines how many fields are required to create unique identifiers to act as the primary key. When the analysis is completed, the Adjust Import Settings window displays the results of the analysis and allows the findings to be modified. |
|
Cancel |
Exits the utility with no further action taken. |
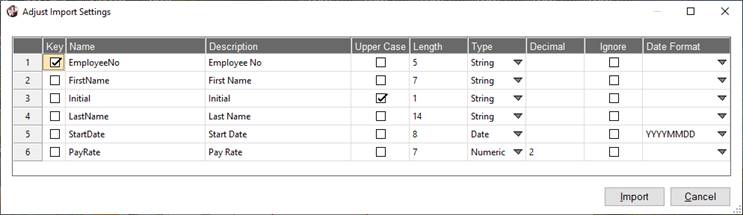
The Adjust Import Settings window displays the results of the analysis and allows the settings to be adjusted according to the user's requirements.
This example shows the results of the analysis based on the CSV file containing the sample employee data.
This window consists of the following:
|
Column Name |
Description |
|
Key |
Indicates which fields were selected by the analysis as the unique fields required to be the primary key. The analysis routine begins with the first field and continues to add fields sequentially until a pass is made where all the record keys are unique. |
|
Name |
Contains the column header text. Characters that are not valid characters are replaced with the _ underscore character. Valid characters are A to Z, a to z, 0 to 9 and _. |
|
Description |
This is a duplicate of the Name field. |
|
Upper Case |
Indicates which fields were determined to be all uppercase during the analysis phase. |
|
Length |
Indicates the number of characters that the field was found to contain during the analysis. |
|
Type |
The type of field was determined during the analysis of the data. Types can be String, Numeric or Date. Based on the results of data validation, certain data can be interpreted as a "date type" data field. This can be modified in the Adjust Import Settings window. |
|
Decimal |
Fields that were found to be numeric fields were checked for any decimal points. |
|
Ignore |
If selected, this will notify the import routines that this particular field should be skipped during this import session. |
|
Date Format |
Whenever a date is discovered in the analysis, a date format will be determined. When a single date format cannot be determined, multiple formats will be displayed in the Date Format column. Select the appropriate date format and proceed with the Import. When a date format cannot be determined, the field will be left as a String type field and will be imported as is. To force the import of the date when the analysis cannot determine the date format, the import file will require that the column be adjusted to conform to a valid date format. Note: |
|
Import |
Proceeds with the import of the file. See CSV File Import Process. |
|
Cancel |
Closes the Adjust Import Settings window and exits the utility with no further action taken. |
Selecting the Import button begins the CSV File Import process to import the file into the system according to the Import settings. If the file being created already exists in the location specified for the Data Dictionary Path, a message will display, allowing you to select whether to continue or terminate the process. Allowing the process to continue will overwrite the existing file with the new import.
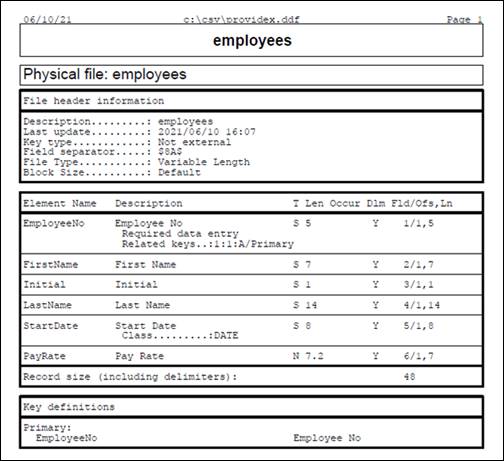
You will then be prompted to print the data dictionary report. Responding Yes displays the Print Data Dictionary Definition window, which includes options for printing either a Detailed or Summary report and for selecting the printing destination (Viewer, PDF or Printer). The default selections are to print a Detailed report (first Example below) to the Printer. Responding No to the prompt bypasses this step and initiates the next step, which is to generate a report of the Import process (second Example below).
Example:
Below is an example of a Detailed data dictionary definition, which is based on the CSV file containing the sample employee data.
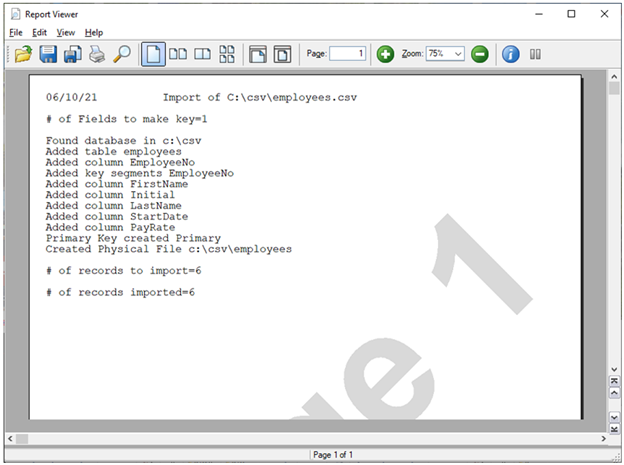
After printing the data dictionary definition, a report of the Import process is generated, summarizing the information that was added/created.
Example:
Below is an example of the report that shows the details of the Import process, which is based on the CSV file containing the sample employee data.
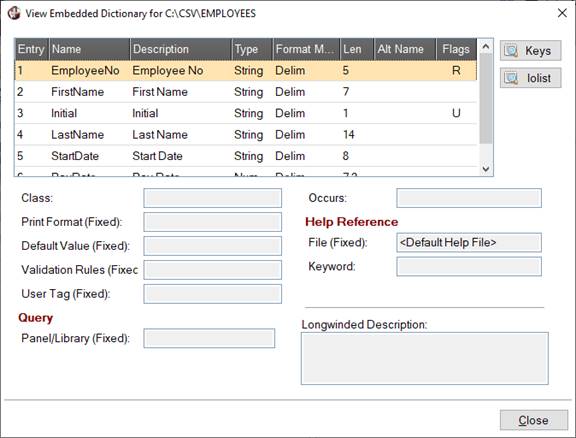
You can access the System Utilities to review the dictionary created and the data imported during the Import process.
Example:
To view the dictionary details as in the example below, click the Primary Dictionary button on the System Utilities Tool Bar.
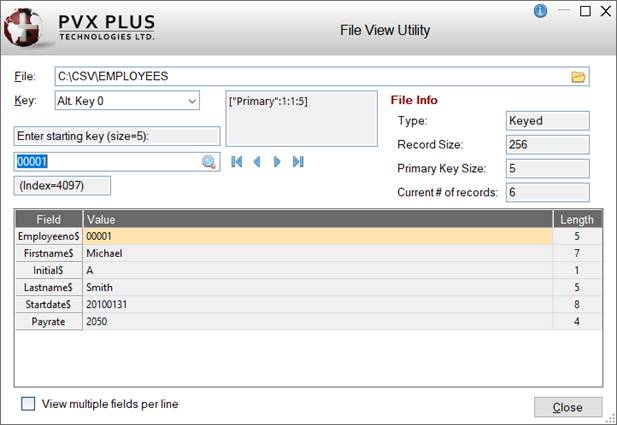
Example:
To view the imported data using the File View Utility as in the example below, click the View File button on the System Utilities Tool Bar.