|
Grouping the Data |
|
Data can also include logical data groupings based on sort sequence. Whenever a value in the sort sequence changes, this marks the end of one data group and the beginning of the next. This is also known as a control break. For example, if an input source is sorted by company and department, then the data may be grouped by company, with each department as a sub-group.
In addition, you can generate multiple individual reports based on data groupings. For example, if you want to produce invoices using the Report Writer, you may want each invoice in a separate PDF file. If you are printing customer statements, you may want each statement in an individual file for emailing.
See Generating Multiple Reports.
(The ability to generate multiple reports by groups was added in PxPlus 2022.)
Each group level can have associated group functions to calculate counts, totals, averages, minimums and maximums. Each group can also have its own header and footer lines defined.
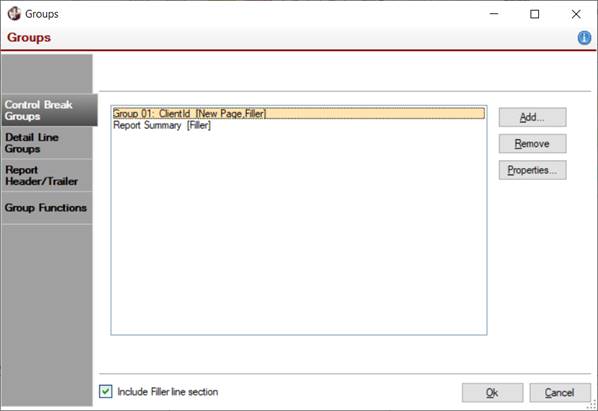
To add, update or remove control break groups, select the Control Break Groups tab on the Groups window.
To invoke the Groups window, select Groups from the Report Designer Edit menu or right click on the data source in the left data pane and select Define Groups and Group Functions from the popup menu. Alternatively, click on the cell displaying a small arrow next to a section line in the leftmost column of the layout.
The Control Break Groups tab consists of the following:
|
Add |
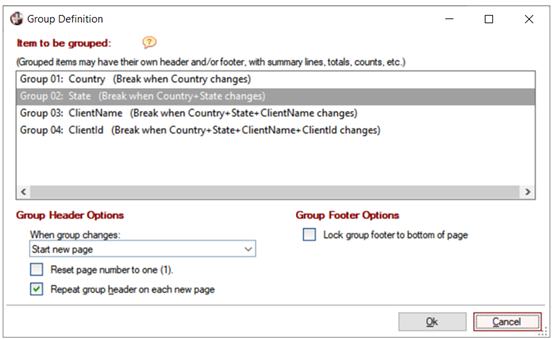
Launches the Group Definition window for adding a new group. When adding groups, start with Group level 01 (based on the first element in the sort sequence), then add other groupings in sequential order. You cannot skip groups. If you do not want headers/footers for a particular group, you can later remove the lines from that section of the report. This window consists of the following:
| ||||||||||||||||||||
|
Remove |
Deletes a selected group. Prior to deleting the group, a message will display. | ||||||||||||||||||||
|
Properties |
Updates the settings for a selected group. | ||||||||||||||||||||
|
Include Filler line section |
Adds a Filler section to the Report Designer grid immediately before the Page Footer. See Filler Line. |
When groups have been added, the layout will be updated with header and footer sections for the new groups, highlighted in green.
By default, a single output report is generated for a report definition. It is also possible to generate separate reports for individual groups within a report. For example, if you want to produce invoices using the Report Writer, you may want each invoice in a separate PDF file. If you are printing customer statements, you may want each statement in an individual file for emailing.
To create individual reports for a particular group, set the Group Header option When group changes to Start new report. (This option can only be set for one group.) The result will be individual reports based on that group, which will include their own report header, summary and report footer sections, if defined. This will apply to reports being sent to the printer, PDF files, HTML files and tab-delimited files. Reports sent to the Viewer or Clipboard, however, will result in a single output (i.e. a single Viewer instance or Clipboard data), but each grouping that would have been a single report will still have its own report header, summary and footer.
To create separate reports, it is necessary to specify a Destination Path Expression in the report definition, as each report going to PDF, HTML or tab-delimited output requires a unique name. The Destination Path Expression should be designed to evaluate to a unique path name for each file, possibly using record fields or date/time stamps in the path expression. If unique names are not generated for each file, the individual reports will be written together in one physical file.
Once a report is defined for multiple file output, the report can be generated interactively through the Report Designer interface or programmatically using either the called program *rpt/runreport with a single argument being the name of the report definition file or the RunReport(RptDefFile$) method of the pvxreport object. You can also generate reports using the *rpt/runreport program with two arguments (the second being an output file path or output channel) or the RunReport(RptDefFile$,Chan) method. However, when a file name or channel is supplied, the Destination Path Expression is overridden, and the individual reports are written together in a single output file. See Generating a Report.
(The ability to generate multiple reports by groups was added in PxPlus 2022.)
Conditional Detail Groups
Report Header and Trailer
Group Functions
Line and Page Advancement