|
Report Designer |
|
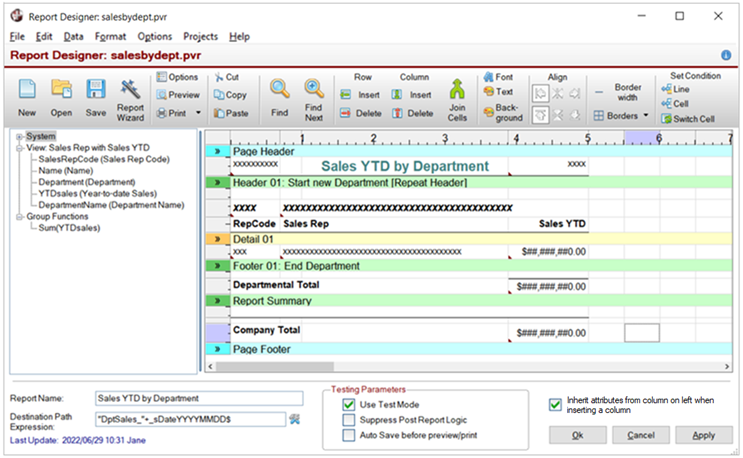
The Report Designer is used for designing the layout of the report. The Menu Bar and Tool Bar provide convenient access to Report Designer functions.
Report layouts are saved as PxPlus report definition files, which are used to generate the reports. Single reports can be generated, or multiple individual reports can be generated based on data groupings. For example, if you want to produce invoices using the Report Writer, you may want each invoice in a separate PDF file. If you are printing customer statements, you may want each statement in an individual file for emailing. See Generating Multiple Reports.
A Destination Path Expression may be entered, which will generate a destination pathname for the output file created when a report is generated. You also have the option to Suppress Post Report Logic that has been defined for the report while testing via the Preview or Print buttons.
(The Destination Path Expression and Suppress Post Report Logic options were added in PxPlus 2022.)
Below is an example of a report layout that was designed using the Report Designer:
To invoke the Report Designer, use one of the following methods:
|
Location |
Method |
|
From the PxPlus IDE Main Launcher |
Expand the Report Writer category and select Report Designer. |
|
From the NOMADS Session Manager |
From the Utilities menu, select Report Writer. |
|
From the PxPlus Command line |
Enter: RW (Report Writer) |
The Report Designer can also be made available to end users (within an application) using the PROCESS directive.
Example:
PROCESS "Design","*rpt/rpt.en"
To update a specific report, the Report Definition file can be included as an argument.
Example:
RW myreport.pvr
or
PROCESS "Design","*rpt/rpt.en","myreport.pvr"
A specific report can also be updated from within the Report Designer by selecting File > Open from the menu bar, by clicking the Open tool bar button, by using the file browser, or by selecting a file from the file history list in the File menu.
Additional menu items applicable to the development environment (such as Data > File Link Maintenance and Projects > Create New Project and Projects > Add to Project) can be added to the main menu of the Report Designer by including a second argument for developer access set to "1".
Example:
PROCESS "Design","*rpt/rpt.en",reportname$,"1"
After the Report Designer has been invoked, the following options are available on the Main panel:
|
Report Name |
Descriptive name of the report. Can be used to identify the contents of the report. | ||||||
|
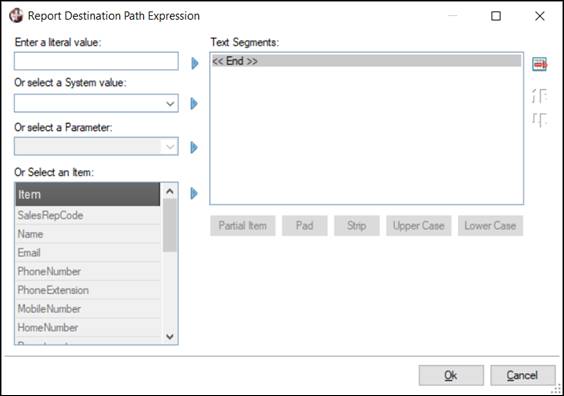
Expression used to generate a destination pathname for the output file created when a report is generated. The destination path is optional for single reports but is required for definitions that generate multiple reports. If supplied, the destination path will only be applied to PDF, HTML, tab-delimited and custom output. It will override the DestinationFile$ property of a custom output class. If an output file is opened independently for the report, the destination path expression will be ignored. The destination path expression may or may not include a file extension. If omitted, a file extension will be added when the report is generated based on the output destination specified for the report (.pdf for PDF documents, .htm for HTML files, and .txt for tab-delimited files). If an extension is included in the expression that does not match the output destination specified for the report, the output destination will be changed to match the extension when the report is run. This behavior occurs when the report is run through the Report Designer or when using a RunReport method or called program. Example: "custlist" will result in a report file called custlist.pdf, custlist.htm or custlist.txt if the output destination is PDF, HTML or tab-delimited. "custlist."+%EXT$ will result in a report name based on the value of %EXT$. Destination paths for reports that generate multiple files should be designed to evaluate to a unique path name for each file, possibly using record fields or time/date stamps in the path expression. If unique names are not generated, the individual reports will be written together in one file. Example: "Acct_"+ACCT_NUM$ When the Print button on the Report Designer tool bar is clicked, the destination path expression will be evaluated and used as the default file name when output goes to an HTML document, a PDF document or a tab-delimited file. Clicking the Tool button beside the Destination Path Expression input invokes the Report Destination Path Expression window. It allows you to build the expression using literals, system variables, parameter values and data field values. (Data fields will only be available for report definitions generating multiple reports.) Note:
| |||||||
| |||||||
|
Inherit attributes from column on left when inserting a column |
If this option is selected, when a column is inserted, the cell attributes (i.e. font, colors, alignment, word-wrap and borders) from the previous column (on the left) are inherited on a cell-by-cell basis. If column 1 is inserted or the option is not selected, then the column cells will be assigned default attributes. Note:
|
The Report Wizard presents a series of eight interactive steps to guide you through the process of creating a new report definition. An alternate user interface is also available that addresses certain security issues. See Report Writer Security.
The report can be added to a new or existing project by selecting Projects from the Report Designer menu bar. The Projects menu displays the following options:
|
Create New Project |
Launches the Create Project dialogue for entering a new project for the current working directory. Click the Query button to select a different working directory. |
|
Add to Project |
Launches the Add to Project dialogue for adding the current task to an existing project that is selected from the Project drop box. To manage all the tasks within a project, see Project Maintenance. For information on adding tasks to a project from other locations, see Adding Tasks to Projects from Other Locations. |