Drop Box Data Class: Load From File

List Box Data Class: Load From File
|
Populate from Data Source (Drop Boxes and List Boxes) |
When creating data classes for Drop Boxes and List Boxes, a Load From File check box (on Display tab) can be selected, which allows a data table/file to be defined as the source when populating a Drop Box or List Box at run time.
|
|
|
|
When working with Grids in the NOMADS Panel Designer, a data class can be added in Grid Presets Definition by selecting the Class property. If adding a Drop Box or a List Box data class that is defined with Load From File functionality, at run time, the cell will be created as a Drop Box populated from the pre-defined data source.
(The Load From File check box was added in PxPlus 2019.)
The following five examples include detailed steps on how to define the Load From File functionality for Drop Box and List Box data classes, as well as how this functionality is subsequently applied when a NOMADS panel is run.
|
|
|
|
|
|
|
|
|
|
|
|
|
|
All examples use the Sales Rep table, which consists of the data elements below.
|
|
|
This example includes the following steps for defining the Load From File functionality for a Drop Box data class and viewing run-time examples of a NOMADS panel:
To begin:
Step 1: Create a Drop Box Data Class with the Load From File Option
In Data Class Definitions maintenance, create a Drop Box data class. Name it SALESDB and select the Dynamic check box.
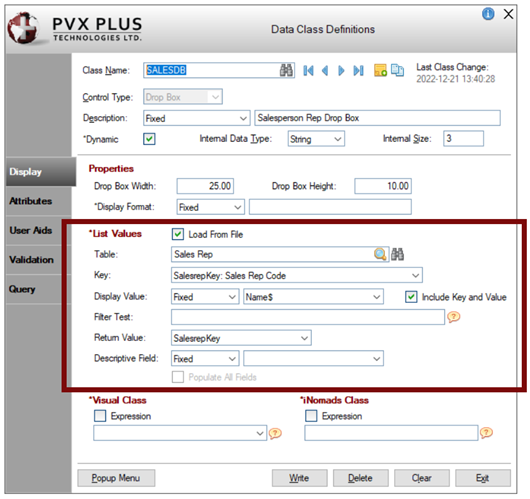
On the Display tab, select the Load From File check box. Enter the Load From File settings below.
|
|
|
Step 2: Create a Drop Box Control with the Load From File Data Class
In Step 1, SalesrepKey: Sales Rep Code was selected for the Key. This value will be used when populating the Drop Box.
On the NOMADS panel, create a Drop Box control with the Load From File data class. Name the Drop Box control SALESCODE and for the Class, enter SALESDB.
|
|
|
Step 3: Run the Panel
In Step 1, the following Load From File settings were selected:
|
|
Key |
SalesrepKey: Sales Rep Code |
|
|
Display Value |
Name$ |
|
|
Include Key and Value |
On |
At run time, the Drop Box control is populated with data from the Sales Rep table. The values displayed include Sales Rep Code and Name$, separated by a : (colon) and two spaces.
|
|
|
If the Include Key and Value check box is Off, then the values displayed will consist of Name$ only.
|
|
|
If Display Value is blank, then the values displayed will consist of Key values only.
|
|
|
These run-time examples demonstrate how changing certain settings can affect the values displayed in the Drop Box. When a record is selected, the value returned is based on the Return Value, which was specified as SalesrepKey for this example. This consists of the Sales Rep Code (e.g. AN).
This example includes the following steps for defining the Load From File functionality for a List Box data class and viewing run-time examples of a NOMADS panel:
To begin:
Step 1: Create a List Box Data Class with the Load From File Option
In Data Class Definitions maintenance, create a List Box data class and for the List Box Type, select Report View. Name it SALESLB and select the Dynamic check box.
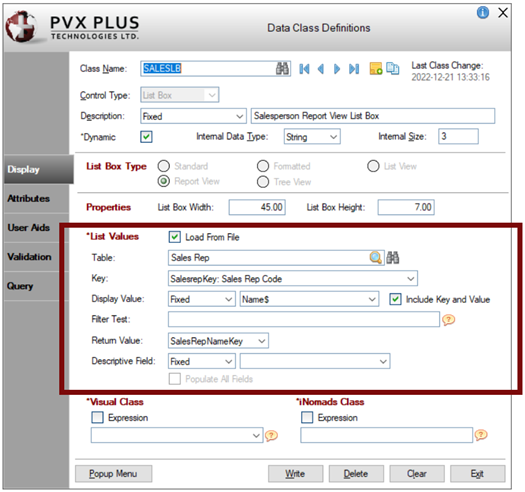
On the Display tab, select the Load From File check box. Enter the Load From File settings below.
|
|
|
Step 2: Create a List Box Control with the Load From File Data Class
In Step 1, SalesrepKey: Sales Rep Code was selected for the Key. This value will be used when populating the List Box.
On the NOMADS panel, create a List Box control with the Load From File data class. Name the List Box control SALESCODE and for the Class, enter SALESLB.
|
|
|
Step 3: Run the Panel
In Step 1, the following Load From File settings were selected:
|
|
Key |
SalesrepKey: Sales Rep Code |
|
|
Display Value |
Name$ |
|
|
Include Key and Value |
On |
At run time, the List Box (Report View) control is populated with data from the Sales Rep table. The values displayed include Sales Rep Code and Name$ in two separate columns using the column headers from the table.
|
|
If the Include Key and Value check box is Off, then the values displayed will consist of Name$ only.
|
|
|
If Display Value is blank, then the values displayed will consist of Key values only.
|
|
|
These run-time examples demonstrate how changing certain settings can affect the values displayed in the List Box. When a record is selected, the value returned is based on the Return Value, which was specified as SalesRepNameKey (this is not the primary key) for this example. This consists of the Name + Sales Rep Code and may contain Hex null characters (e.g. Andrew Newman AN). Returning a key other than the Primary key may be advantageous if it is useful to know other values that may be passed out of the key value.
The examples below show List Box results that were produced when the same Load From File selections (see Example: Load From File (List Box) were used to define new List Box data classes for other List Box Types (i.e. Standard, Formatted, List View, Tree View).
This example includes the following steps for defining the Load From File functionality for a Drop Box data class, adding this data class to a grid and viewing run-time examples of a NOMADS panel:
To begin:
Step 1 : Create a Drop Box Data Class with the Load From File Option
If desired, a new Drop Box data class can be created by using the steps in the Example: Load From File (Drop Box).
Since a Drop Box data class (SALESDB) with the Load From File option was previously created, it will be used for this example. Proceed to Step 2.
Step 2: Add this Load From File Data Class to Grid Presets Definition
On the NOMADS panel, create a new or select an existing Grid control. In the Grid Properties dialog, select the Presets tab.
In the Property column, select Class from the drop-down list. Specify the desired Column/Row that is to contain the Drop Box to be populated. In the Value/Expression column, select the SALESDB class from the query.
|
|
|
Step 3 : Run the Panel
In Step 1, the following Load From File settings were selected:
|
|
Key |
SalesrepKey: Sales Rep Code |
|
|
Display Value |
Name$ |
|
|
Include Key and Value |
On |
At run time, the Drop Box is populated with data from the Sales Rep table. The values displayed include the Sales Rep Code and Name$, separated by a : (colon) and two spaces.
|
|
|
If the Include Key and Value check box is Off, then the values displayed will consist of Name$ only.
|
|
|
If the Display Value is blank, then the values displayed will consist of Key values only.
|
|
|
These run-time examples demonstrate how changing certain settings can affect the values displayed in the Drop Box. When a record is selected, the value returned is based on the Return Value, which was specified as SalesrepKey for this example. This consists of the Sales Rep Code (e.g. AN).
This example includes the following steps for defining the Load From File functionality for a List Box data class, adding this data class to a grid and viewing run-time examples of a NOMADS panel:
To begin:
Step 1 : Create a List Box Data Class with the Load From File Option
If desired, a new List Box data class can be created by using the steps in the Example: Load From File (List Box).
Since a List Box data class (SALESLB) with the Load From File option was previously created, it will be used for this example. Proceed to Step 2.
|
|
Step 2: Add this Load From File Data Class to Grid Presets Definition
On the NOMADS panel, create a new or select an existing Grid control. In the Grid Properties dialog, select the Presets tab.
In the Property column, select Class from the drop-down list. Specify the desired Column/Row that is to contain the Drop Box to be populated (see Note above). In the Value/Expression column, select the SALESLB class from the query.
|
|
|
Step 3 : Run the Panel
In Step 1, the following Load From File settings were selected:
|
|
Key |
SalesrepKey: Sales Rep Code |
|
|
Display Value |
Name$ |
|
|
Include Key and Value |
On |
At run time, the Drop Box is populated with data from the Sales Rep table. The values displayed include the Sales Rep Code and Name$, separated by a : (colon) and two spaces.
|
|
|
If the Include Key and Value check box is Off, then the values displayed will consist of Name$ only.
|
|
|
If the Display Value is blank, then the values displayed will consist of Key values only.
|
|
|
These run-time examples demonstrate how changing certain settings can affect the values displayed in the List Box. When a record is selected, the value returned is based on the Return Value, which was specified as SalesRepNameKey (this is not the primary key) for this example. This consists of the Name + Sales Rep Code and may contain Hex null characters (e.g. Andrew Newman AN). Returning a key other than the Primary key may be advantageous if it is useful to know other values that may be passed out of the key value.