|
Query Header |
When creating a new query, first enter a name and then select Standard Query in the Query Type window. This automatically launches the Query Header Definition window for defining the characteristics of the query. You can also edit the header information of an existing query by clicking the Header toolbar button on the Query Definition window.
The Query Header Definition consists of six categories, each with its own tabbed folder: File Info, Display, Options, Font/Color, Interfaces and User Aids. The design properties displayed on each of these tabbed folders are explained below.
This window consists of the following:
|
Panel |
Name of the query. | ||||||||||||||||||||||
|
Show Query+ Options |
Check box to disable/enable options based on their Classic Query vs. Query+ availability. | ||||||||||||||||||||||
|
| |||||||||||||||||||||||
|
Data Source |
Options for defining the query's external data source:
| ||||||||||||||||||||||
|
File/Table |
Name of the primary file or database table to be displayed in the query (Fixed value or Expression). Data can have embedded or external keys or can be sort files. If your data source is a database, you must select a table name from the drop-down list. Otherwise, you can select a known data file from the Data Dictionary table lookup by clicking the Query Table View button (magnifying glass) to display a tree view of table names by Group. For information on creating a filter to locate a specific table name, see Filtering the Table Names Lookup. Type the name of a PxPlus View or the pathname of a data file, or click the Browse button to look through the directory structure to find a file. When entering a pathname, if the file has an embedded dictionary, then the embedded dictionary will be used to determine column information. Otherwise, you must manually define the data fields to be used in the query. See Field Definition. See also Manual Field Definition below. | ||||||||||||||||||||||
|
For an External Database Table: Click the Define Unique Sort Key button to display a window where you can define a table key based on fields in the table. The key definition will be added as a connection option on the OPEN statement using the KEY= clause. For a PxPlus Data File: Select the key (from drop-down selections) to sort the file in the query. (At run time, you can override this setting by loading an alternate key number into the %NOMADS'Query_Kno variable.) | |||||||||||||||||||||||
|
| |||||||||||||||||||||||
|
Title |
(Not Applicable to Drop Query) Text to appear on the title bar at run time. Click the drop-down arrow for a list of selections: Fixed, Expression, Message Library Reference. | ||||||||||||||||||||||
|
Columns/Lines |
(The Center Text Vertically option was added in PxPlus 2019.) | ||||||||||||||||||||||
|
Position |
Column and Line position of the top left corner of the panel. Not used if Panel Persistence is activated.
| ||||||||||||||||||||||
|
Size |
Width and Height of the panel. Not used if Panel Persistence is activated. For Classic Queries, minimum width is 42 columns and height is 10 lines. The minimum Query+ panel is 80 columns by 18 lines. When using Query+ Toolbar, Hybrid or Menu views (see Query View option), the panel dimensions can be modified by clicking the Test/Design toolbar button to display the query and dragging the edges of the query panel to the desired size. Click the Save + Exit button to save and incorporate these settings into the query definition when exiting the query. (The ability to save query changes when in Test/Design mode was added in PxPlus 2023 Update 1.) | ||||||||||||||||||||||
|
Adds grid lines to the display. Click the drop-down arrow for a list of selections:
(The Grid Lines option was added in PxPlus 2017.) | |||||||||||||||||||||||
|
Display |
| ||||||||||||||||||||||
|
(Query+ and Drop Query)
(The Add (Edit) row display option was added in PxPlus 2021.) | |||||||||||||||||||||||
|
| |||||||||||||||||||||||
|
Query+ Options |
The following options apply to the Query+ mode:
In iNomads, you can also choose to Set the default Query View in the Template Configuration Misc tab. All views require the same Query+ activation level. If not activated, then the query will display as a Classic Query. (The Drop Query selection was added in PxPlus 2016.)
|
Auto Column Resize
| Automatically adjusts the sizes of the columns to fit the width of the query. Click the drop-down arrow for a list of selections: Default, Always, Never. If set to Default, the setting in %NOMADS'Query_AutoColSize is used. (The Auto Column Resize option was added in PxPlus 2019.)
|
No Drop Query Header
| Suppresses the display of the column headings in Drop Queries. Click the drop-down arrow for a list of selections: Default, Always, Never. If set to Default, the setting in %NOMADS'Query_NoDropHeader is used. (The No Drop Query Header option was added in PxPlus 2019.) | ||||||||||||||||||
|
Use Classic Query |
(Classic Query Not Applicable in iNomads) Check box to force the query to display data using the Classic Query mode. This might be used when the query dataset is very large to avoid out-of-memory issues. Note: | ||||||||||||||||||||||
|
All Queries |
The following options apply to all Query modes:
| ||||||||||||||||||||||
|
Read as RECORD |
(Available Only for Manually-Defined Files) Forces NOMADS to read the file using READ RECORD, making it possible to read and display data from manually defined files that have fixed-length records that may contain binary data. | ||||||||||||||||||||||
|
Classic Query Options |
The following options apply to the Classic Query mode:
| ||||||||||||||||||||||
|
The Start At Value is the value that is passed to the query to determine which record in the query list will be selected when the query is initially loaded. This is done by matching the start value against record keys or return values as the file is read. Two drop box options are available for defining the Start At Value: one to determine the case sensitivity of the Start At Value, and one to determine how the Start At Value is matched. Case Sensitivity Click the drop-down arrow for available selections: Case Sensitive (Default), Default to Uppercase and Default to Lowercase. By default, the comparison is Case Sensitive where the case of both the start value and key value (or return value) must match. It is possible that the start value may be passed in with mixed case; however, the record keys may be all uppercase or lowercase. In these cases, you must set the case of the Start At Value to match that of the key values. In the case where the starting value uses the matching option to match the return value, using either the Default to Uppercase or Default to Lowercase option will result in a case insensitive match. Match Key Value/Return Value (Available for Query+ Only) Click the drop-down arrow for available selections: Match key value (Default) and Match return value. By default, the starting value that is passed to the query is tested against the key that is being used to load the query. This is because the starting value generally matches the key value being used to load the query. In this case, the Match key value option is applicable. However, there are instances where a query may be loaded using one key, such as a name or a description, but the return value is another key, such as a code or account number. In this case, use the Match return value option. Be aware that if there are duplicate return values, the match will occur with the first one encountered. Note:
| |||||||||||||||||||||||
|
Indicates the value to be returned when a record is selected. If omitted, the default is the value in the first column of the query. This value can also be used to determine if lines are to be suppressed when duplicate return values are encountered. Use a PxPlus expression. (The ability to suppress query lines based on duplicate return values was added in PxPlus 2021.)
Values can be returned for a single field or multiple fields concatenated in a format you can parse after the value is returned: PROD_ID$ CST_SMN$+","+CST_NAME$(1,1) You can also gain access to external keys using the special NOMADS query variable PRIME_KEY$ and return an entire record using the special NOMADS query variable ENTIRE_RECORD$: PRIME_KEY$+ENTIRE_RECORD$ | |||||||||||||||||||||||
|
| |||||||||||||||||||||||
|
Font Specification |
(Font support for Query+ was added in PxPlus 2021.) | ||||||||||||||||||||||
|
Color |
(The Color Selections Query button and dialog were added in PxPlus 2020.) | ||||||||||||||||||||||
|
Attributes |
Check boxes to apply font attributes. Overrides Library and Panel defaults. Available selections are Bold, Italics, and ANSI Characters. When the ANSI Characters check box is set to Off, you can use other character sets such as Wing Dings. (Font attributes support for Query+ was added in PxPlus 2021.) | ||||||||||||||||||||||
|
Assign a Theme to be applied to the query. The Theme can be defined as a Fixed value or string Expression. Click the Theme Maintenance button to launch the Themes Maintenance utility for creating and editing themes. Note:
| |||||||||||||||||||||||
|
| |||||||||||||||||||||||
|
Initialization Procedure |
Optional program to be called prior to opening the query panel. You may pass a comma-separated list of up to 20 optional parameters using the format: "program;label",arg$, arg$, arg$... | ||||||||||||||||||||||
|
Closing Procedure |
Optional program to be called upon exiting the query panel. You may pass a comma-separated list of up to 20 optional parameters using the format: "program;label",arg$, arg$, arg$... | ||||||||||||||||||||||
|
Maintenance |
Maintenance program for updating the file:
| ||||||||||||||||||||||
|
| |||||||||||||||||||||||
|
Help Reference |
(Classic Query Only) Help text. Select from External or Internal Help types. At run time, Help is invoked by pressing Shift - F1.
| ||||||||||||||||||||||
|
Message Bar |
(Classic Query Only) Message text to be displayed at the bottom of the panel. Available selections are:
|
The Row Display Option window is used to assign visual attributes, such as bold text, text color or highlight color, to a row in the query data list. The various visual attributes can be assigned based on specified conditions being met.
To assign visual attributes to a column, see Query Column Display.
Invoking Row Display Option
In Query Header Definition, on the Display tab, click the link Add (Edit) row display option (under the Row Highlight heading).
(The Row Display Option window was added in PxPlus 2021.)
This window consists of the following:
|
Display Method |
The following methods are available to assign various visual attributes to a row:
| ||||||||||||
|
Parameter Values |
Specify the query fields that are to be used as part of a condition. To Add a Parameter: Click the Add button (next to Parameter Values) and then click the drop-down arrow at the right of the newly-allotted parameter to select a field from the list, or define field characteristics (i.e. field number, offset, length) for manual fields. Formulas must be named to be included as additional parameters. See Query Formula Definition. Each parameter is assigned an ID (such as %1, %2, etc.) that is to be used in a condition rather than the actual name of the field. To Remove a Parameter: Select the parameter entry to be deleted and then click the Remove button (next to Parameter Values). To select multiple entries, use Shift-Click (consecutive selections) or Ctrl-Click (random selections). Prior to deleting, a message will display. | ||||||||||||
|
Condition |
Set conditions for the assigned visual attribute(s). Conditions consist of PxPlus expressions that can be evaluated to zero/non-zero, but using the ID placeholder in the place of a field name; e.g. %1="Y". To Add a Condition: Click the Add button (below Condition grid) and then enter the condition. Multiple conditions can be defined, each with its own assigned display setting (i.e. color, image, etc.). Conditions are evaluated in the order in which they appear until a condition evaluates as true (i.e. non-zero). This means that if two conditions are set, %1<10 and %1<100, then values less than 10 will be assigned the first display setting, and values from 10 to less than 100 will be assigned the second display setting. Values that fall outside of the range of the specified conditions may or may not have an assigned display setting. To assign a setting to these values, simply add a blank condition at the end and assign a display setting. Otherwise, no display setting will be assigned, and default text and color will be used for these values. Use the Move Up/Move Down buttons (below Condition grid) to change the order of the conditions. To Remove a Condition: Select the condition entry to be deleted and then click the Remove button (below Condition grid). To select multiple entries, use Shift-Click (consecutive selections) or Ctrl-Click (random selections). Prior to deleting, a message will display. | ||||||||||||
|
Color |
(Display Method is Colors, HiLiteColor or TextColor) To assign a color to a condition, click the dotted button at the right of the Color cell to launch the Color Selections window. Note: | ||||||||||||
|
Display String |
(Display Method is User) Display strings allow greater flexibility when assigning display attributes for particular conditions; e.g. you can mix bold text and background color. Display strings are PxPlus expressions; therefore, select the Exp check box and enter the expression to use. Example: '_COLOR'("Light Yellow")+'BB' Note: |
You can also create your own display methods by creating your own display class. The existing methods are in the *obj/qrycoldsp class. Create your own class and inherit the *obj/qrycoldsp class in yours by using LIKE "*obj/qrycoldsp" in its definition. Then incorporate your new methods. Set %NOMADS'Query_ColumnDisplay$ to the name of your class, and your new methods will become available.
Below are examples of setting up row display scenarios:
|
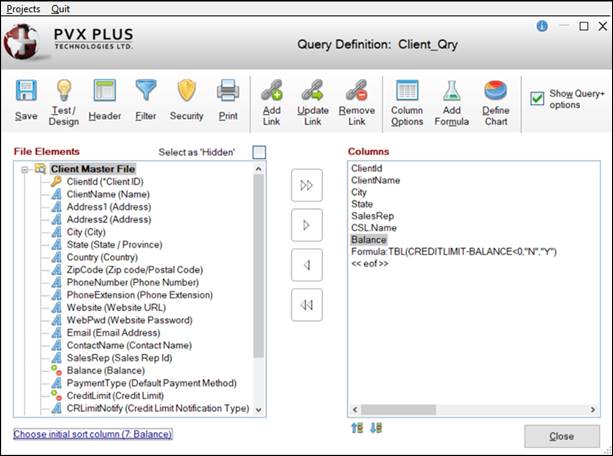
Example 1: Your query has a BALANCE column. Based on its value, you want the row to display using Red text if the value of BALANCE is negative and Green text if the value is 10000 or greater. The remaining rows are to display using the default text color. |
To do this: Assign TextColor as the Display Method. The conditions are based on the BALANCE column; therefore, select BALANCE from the drop-down list of Parameter Values. It is assigned an ID of %1. Then create two Conditions: %1<0 %1>=10000 For the first Condition, assign Light Red as the Color, and Dark Green for the second Condition. |
|
Example 2: Your query has a CUSTOMER_CLASS$ column. You want to display a record in bold text if CUSTOMER_CLASS$ contains the value "VAR". |
To do this: Assign BoldText as the Display Method. The condition is based on the CUSTOMER_CLASS$ column; therefore, select CUSTOMER_CLASS$ from the drop-down list of Parameter Values. It is assigned an ID of %1. Then create the Condition: %1="VAR" |
The Build Return Value window is invoked by clicking the Build Return Value link on the Query Header Definition Options tab (under the Return Value heading). It is used for defining the Return Value (value to be returned when a record is selected).
This window consists of the following:
|
Field Definition |
| ||||||||||
|