|
Visual Class Assignment |
|
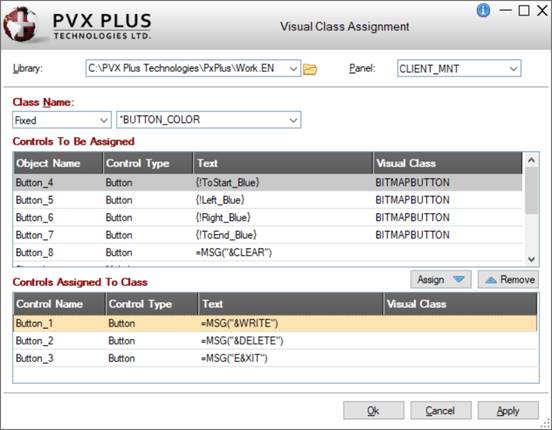
You can assign Visual Classes to controls at the library level by using the Visual Class Assignment utility. When a library is opened, invoking this utility displays a window that lists the panel controls that may be assigned to a Visual Class once a panel is selected. You can assign one Visual Class at a time to one or multiple controls, providing that the selected controls are the same control type defined for that Visual Class.
To invoke this utility, first open an existing library. Then, in Library Object Selection, select Utilities > Visual Class Assignment from the menu bar.
This window consists of the following:
|
Library |
Pathname of the current library. To specify a different library, select from the drop-down list of the most recently accessed libraries (up to nine) or use the Query button. | ||||||||
|
Panel |
Select from the drop-down list of panels in the selected library. | ||||||||
|
Class Name |
Name of the Visual Class to be assigned (either Fixed value or string Expression). A Class Name must be entered. Select from the drop-down list of all Visual Class Names or enter an existing Class Name. If the Class Name entered has not been previously defined, you are given an option to use it and apply it to the selected controls; however, you will need to define its properties using the Visual Classes Maintenance utility. | ||||||||
|
Controls To Be Assigned |
(Available when a Class Name is entered/selected) Displays a list of the controls on the selected panel to which a Visual Class can be applied or has already been applied. If the specified Class Name was previously applied to any of the panel controls, those controls are displayed separately in the Controls Assigned To Class list (see below) to distinguish them from the other controls. Panel controls that cannot be assigned to a Visual Class (i.e. Images, Shapes, External Controls) are not listed. Note:
|
|
Object Name |
Name of the control |
|
Control Type |
Type of control (i.e. Button, Dropbox, Grid, Multi-Line) |
|
Text |
Text entered for the control, if applicable (i.e. button text, drop box list values) |
|
Visual Class |
Name of the Visual Class previously assigned to the control, if applicable |
Controls Assigned To Class
(Available when a Class Name is entered/selected)
Displays a list of the controls on the selected panel to which the specified Class Name was previously assigned.
In addition, any controls that you select in the Controls To Be Assigned list to be assigned to the specified Class Name are added to this list box.
For the steps on applying a Visual Class to one or multiple controls, see Applying a Visual Class below.
The Controls Assigned To Class list displays the following information:
|
Object Name |
Name of the control |
|
Control Type |
Type of control (i.e. Button, Dropbox, Grid, Multi-Line) |
|
Text |
Text entered for the control, if applicable (i.e. button text, drop box list values) |
|
Visual Class |
Name of the Visual Class previously assigned to the control, if applicable |
Assign
Moves a selected control from the Controls To Be Assigned list to the Controls Assigned To Class list in preparation for the Apply process. See Applying a Visual Class below.
Remove
Removes a selected control from the Controls Assigned To Class list and returns it to the Controls To Be Assigned list, at the same time removing any previously assigned Visual Class for this control.
Ok
Applies the selected Visual Class Name to controls in the Controls Assigned To Class list and closes the Visual Class Assignment window.
Cancel
Cancels any changes and closes the Visual Class Assignment window.
Apply
Applies the selected Visual Class Name to controls in the Controls Assigned To Class list and keeps the Visual Class Assignment window open for any additional selections.
The steps below guide you through the process of applying a Visual Class using this utility:
|
Step |
Description |
|
1. |
Select the Library and Panel with the controls that you will be assigning to a Visual Class. |
|
2. |
Select the Visual Class Name. |
|
3. |
Select the control(s) in the Controls To Be Assigned list that you want to assign to this Visual Class. Note:
|
|
4. |
(Optional) If you want to remove a control (and its previous Visual Class) from the Controls Assigned To Class list (i.e. due to an error), select the control and click the Remove button. This returns the control to the Controls To Be Assigned list. You can also double click on the control, or use the drag and drop method. |
|
5. |
When you have made your selections, click Apply or Ok. The Visual Class is then applied to the selected controls, the Controls Assigned To Class list is blank, and the Controls To Be Assigned list is updated with these changes. Note: |
The Visual Class Assignment utility can also be used to assign Visual Classes to controls at the panel level but for the current panel only. See Visual Class Assignment (Panel Level).
To learn about creating and assigning Themes, see Themes.
Library Bulk Edit and Search Utility
Panel Bulk Edit Utility