|
Auto Complete |
|
PxPlus Auto Complete enables Multi-Line or Grid controls to show suggested text based on partially typed entries. This is useful for handling repetitive data entry. You can populate the data in advance so that the user will receive suggestions from a preset list of matches as he/she types in the field. The preset data can be retrieved from application data files accessed in Read Only mode. See Assigning Auto Complete Entries below.
For multi-lines, this functionality is also handled by the 'AutoComplete$ control object property.
The Auto Complete feature will be disabled when a multi-line is used for a password field. This functionality (for both multi-lines and grids) can be suppressed at the application level by setting the NOMADS variable %NOMADS_Suppress_Auc=1. See NOMADS Variables.
See NOMADS Auto Complete Definition to set up how the Auto Complete is to be applied in your application.
The list of entries for Auto Complete is stored in a PxPlus keyed file that is accessible to the application for this purpose. Generally, a keyed file should be created by you for each set of multi-line entries required for your application:
0010 LET F$="AutoComplete1.dat"; ERASE F$,ERR=*NEXT
0020 KEYED F$,[1:1:30:"C"],0,-40
Auto Complete will be based on the internal key of the key file, and the key has to be case insensitive for this functionality to work correctly. If the key is case sensitive, all lowercase keys will be ignored.
See KEYED directive for information on creating keyed files in PxPlus.
Quotes or apostrophes can be used to surround any of the Auto Complete parameter values so that trailing or leading spaces remain intact, as in the two examples below.
Example Using Quotes:
MULTI_LINE 100,@(10,10,30,1),HLP="[AutoComplete]DATAFILE=test.dat;FIELD=2;PREFIX=""CLIENTCO """
Example Using Apostrophes:
MULTI_LINE 100,@(10,10,30,1),HLP="[AutoComplete]DATAFILE=test.dat;FIELD=2;PREFIX='CLIENTCO '"
With Auto Complete turned on, a multi-line field can be set up to record what a user has already entered so that the next time he/she begins typing, it displays a list of suggestions to complete the word or phrase. The associated keyed file starts empty. Once the user enters new text, each word/phrase will be saved so that when the user tries to type the same information again, he/she will be presented with a match from the associated keyed file. This type of entry does not work for grids.
When defining this type of Auto Complete scenario, the keyed file must be set up with Read Only set to No. This allows the user to remove any unwanted Auto Complete entries that are, for example, the result of spelling or typing errors. To remove unwanted entries, the user first uses the Up/Down arrow keys on the keyboard to highlight the Auto Complete entry in the drop down list and then immediately presses the Delete key. If the user presses another key before pressing Delete, then only a single character in the input control is deleted.
Both grids and multi-lines will accept preset Auto Complete entries, where the associated keyed file will already be populated with data. This could be an existing source data file used in your application.
For multi-lines, the keyed file must be set up as Read Only in the Auto Complete Definition window so that it cannot record new entries from the user. In a client-server environment, the default functionality requires that the keyed file be present on the client machine. However, the keyed file can exist on the server if the Process on Server option is turned On in the Auto Complete Definition window. Auto Complete entries that are based on preset data with the READONLY= parameter set to Yes cannot be removed by the user.
For grids, Auto Complete will only work with Read Only files on the server side, and the Process on Server option must be turned On in the Auto Complete Definition window.
The Auto Complete Definition window in NOMADS is used to set up how the Auto Complete is to be applied in your application. Definitions created using this window will be stored in the providex.auc file.
To invoke this window, use one of the following methods:
|
Location |
Method |
|
From the PxPlus IDE Main Launcher |
Expand the Graphical Application Builder (NOMADS) category. Then expand the Setup category and select Auto Complete. |
|
From the NOMADS Session Manager |
From the Options menu, select Auto Complete. |
|
From the NOMADS Panel Designer |
From the Utilities menu, select Auto Complete. |
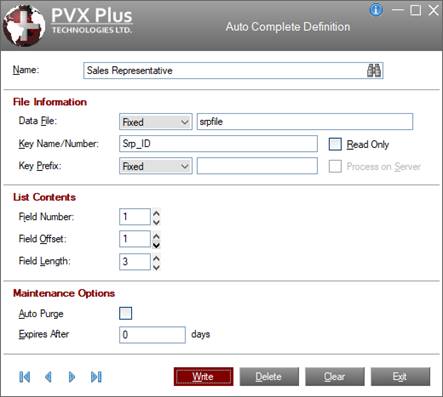
This window consists of the following:
|
Name |
Name of the Auto Complete entry. Maximum length is 64 characters. Type a new name and press Enter or click the Query button (binoculars) to select from a list of existing entries. This is the primary key for the providex.auc file. |
|
File Information | |
|
Data File |
PxPlus keyed file that contains the words and/or phrases. Maximum length is 256 characters. Click the Browse button next to this field to locate a file name. |
|
Key Name/Number |
Key name or number that will be used for Auto Complete. The primary key is 0 (zero). Maximum length is 32 characters. Default is the primary key. |
|
Key Prefix |
Prefix that will be used for searching matching words and/or phrases. Maximum length is 235 characters. When displaying/returning key values when using a prefix, the prefix will not be displayed. |
|
Read Only |
Check box to prevent writing to keyed file. Select this option if you intend to use preset entries from an existing file. Deselect this option to have Auto Update automatically update the keyed file when the user enters a new word and/or phrase. |
|
Process on Server |
Check box to indicate that the keyed file used to save/retrieve Auto Complete entries resides on the server. Applies to preset (Read Only) entries only. |
|
List Contents | |
|
Field Number |
Field number that is being displayed. Valid entries are 0 to 254. Field number 0 is used to reference the currently selected key value. |
|
Field Offset |
Starting position within the field to be displayed. Valid entries are 0 to 3839. An offset of 0 displays from the first character. |
|
Field Length |
Maximum number of characters that will be displayed. Valid entries are 0 to 127. A length of 0 will display the entire field starting from the specified offset. |
|
Maintenance Options | |
|
The following two options are available if the Auto Complete file is not Read Only: | |
|
Auto Purge |
Check box to automatically remove expired entries. If this is not set, entries do not expire. |
|
Expires After |
Number of days that a given entry will be available before expiring. Maximum length is 4 digits. |
|
| |
|
Write |
Adds/updates the current record. |
|
Delete |
Removes the current record. |
|
Clear |
Clears the current record. |
|
Exit |
Closes the Auto Complete Definition window. You will be prompted to save any changes prior to closing. |
If the Read Only and Process on Server options are selected, two new options, Display Value and Return Value, including a new Define button, are displayed in the List Contents section of this window. This allows a more complex display list and return value to be defined, consisting of a combination of literals, formatted fields and sub-fields.
The expression to specify the list contents and return value is defined on a separate Define Display Value panel that is invoked by selecting the Define button associated with each of these new options.
For a multi-line, assign a specific Auto Complete definition to the multi-line by using the Auto Complete option, which is accessed by selecting the Query tab of the Multi-Line Properties dialogue. Click the drop-down arrow for a list of existing entries (if defined using Auto Complete Definition).
For a grid, Auto Complete entries are assigned to individual cells via the Presets Definition, which is accessed by selecting the Presets tab of the Grid Properties dialogue. From the Property drop-down list, select AutoCompName. Enter a Column (Number or Name) and a Row. The Auto Complete name can be an expression or an existing Auto Complete definition. To assign an existing Auto Complete name, click the Query button (magnifying glass) in the Value/Expression cell to invoke an Auto Complete List of existing entries. The value is passed back to the Value/Expression cell once the dialogue is closed.
New entries are added to an Auto Complete file by clicking the Edit File button in the Auto Complete List window. At run time, NOMADS reads the providex.auc file using the Auto Complete key and assigns the selected Auto Complete definition to the multi-line field or grid cell.