|
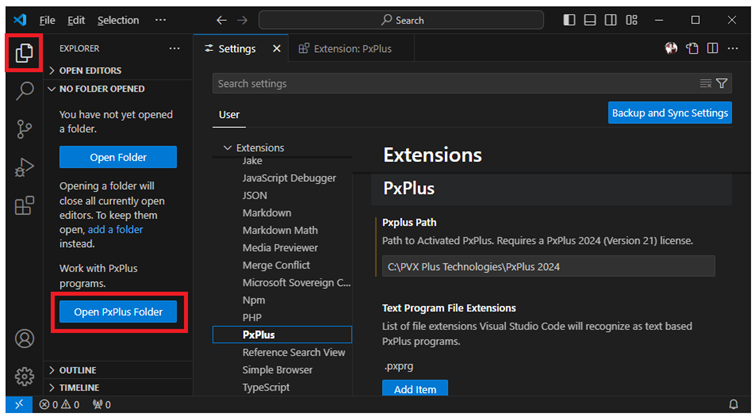
How to Use the Enhanced Layout in File Maintenance Generator |
Starting with PxPlus 2024, a new layout option - Enhanced Layout - has been added to the File Maintenance Generator. Going forward, it will be the default layout used for creating new file maintenance panels.
The Enhanced layout allows all of the section sizes - Full, Half, Third, Quarter - to be used to create both Webster+ HTML pages and NOMADS panels. In addition, this layout simplifies the use of sections by displaying the different section sizes in the panel Layout Grid.
Third and Quarter sections have been part of the File Maintenance Generator since it was expanded to also generate Webster+ HTML pages in PxPlus 2021. However, these sections were only available for Webster+ HTML pages, and the Layout Grid could only display Half or Full sections for use with generated NOMADS panels.
The layout that was used prior to PxPlus 2024 is also available and is now known as the Two-Column layout. To regenerate NOMADS panels and Webster+ HTML pages that were generated prior to PxPlus 2024, the Two-Column layout will be used.
The Webster+ section sizes functionality is identical for both the Two-Column layout and the Enhanced layout. Full, Half, Third and Quarter sections result in panels/pages where the section sizes are true full, halves, thirds and quarters of the page. These sections sizes are responsive, changing size and configuration as the Web page is made wider or narrower.
The major difference between the Two-Column layout and the Enhanced layout is the manner in which column widths (and therefore, the panel width) are determined for NOMADS:
Two-Column Layout:
Each side is made only as wide as needed for the widest element on that side; therefore, the Right Side may be much wider than the Left Side (or vice-versa) on the resulting NOMADS panel.
Enhanced Layout:
Each Half, Third or Quarter cell in the Layout Grid has the same width. If you are defining a panel using Half sections (default), both halves of the generated NOMADS panel will have the same width, which will be determined by the size of the largest element in any half. The width of the overall panel will be determined by which of the following is the widest: the widest Full section, twice the widest Half section, three times the widest Third section or four times the widest Quarter section.
This table summarizes the differences between the Two-Column layout and the Enhanced layout:
|
Consideration |
Layout Choice |
Explanation |
|
Panel layout flexibility |
Enhanced |
The Enhanced layout provides options for defining a row with Full, Half, Third or Quarter sections, which allows for more flexibility for both NOMADS panels and Webster+ HTML pages. |
|
Easy to visualize sections |
Enhanced |
While the Two-Column layout can be used to create Quarter and Third sections for Webster+ HTML pages (by right clicking on the Layout Grid column header and by inserting Section Breaks), these section sizes have no impact on the NOMADS panel being generated. The Enhanced layout makes it easier to use and visualize these sections for both NOMADS panels and Webster+ HTML pages. |
|
More than two columns (in NOMADS) |
Enhanced |
To generate a NOMADS panel with more than two columns, the Enhanced layout must be used. |
|
Narrow column widths (with two-column maximum in NOMADS) |
Two-Column |
Because the Left and Right sides of the Two-Column layout can have differing widths, the resulting NOMADS panel may be narrower if narrow elements are all placed on one side of the layout. |
|
Minimum panel width (with two-column maximum in NOMADS) |
Two-Column |
When using the Enhanced layout, care must be taken to avoid a wide panel with excess white space. In the Layout Grid, placing a wide element in a cell defined as a Quarter section will result in a NOMADS panel that is four times wider than the wide element (including the prompt for data file fields). Very wide elements should be placed in cells defined with larger section sizes, such as Full or Half sections. |
To generate a file maintenance panel, the File Maintenance Generator requires a data file defined with a Data Dictionary entry. The following screenshot shows the Data Dictionary definition for the Salesreps data file. This file will be used to create a NOMADS panel and Webster+ HTML page in the step-by-step instructions below. The Data Classes that are used in the Data Dictionary definition are supported by the File Maintenance Generator.
|
|
| ||||
|
|
1. |
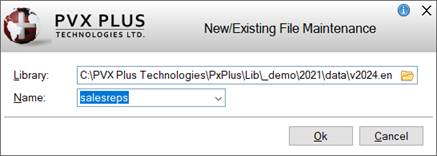
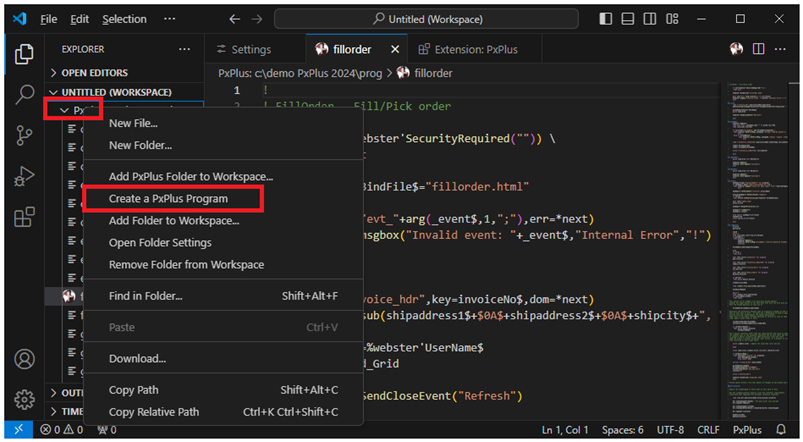
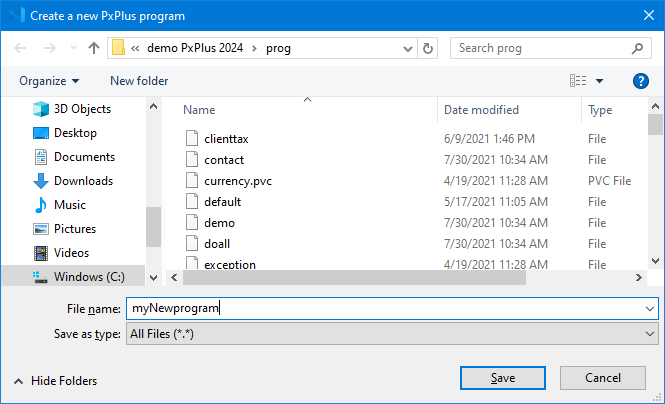
Invoke the File Maintenance Generator. This can be done by using one of the following methods: Method 1: From the IDE Main Launcher, expand the Graphical Application Builder (NOMADS) category. Select Open Application Library. This displays the Development Library window. Select or enter the File name of an existing NOMADS library file and then click the Open button. This launches the Library Object Selection window. Click the File Maint tool bar button. You are prompted to enter the Name for the new panel. Enter salesreps and then click OK. OR Note:
| |||
|
|
2. |
The Welcome panel of the File Maintenance Generator is displayed. It shows the panel name salesreps. Click the Next button. | |||
|
|
3. |
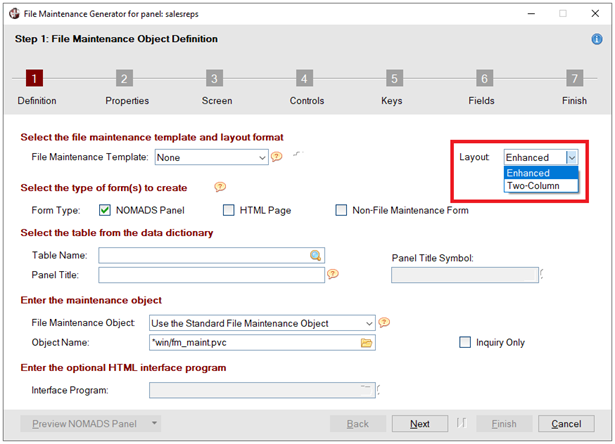
The Step 1: File Maintenance Object Definition panel is displayed. The Layout drop box defaults to Enhanced. Leave this setting as is. | |||
|
|
4. |
Select the type of form(s) to create. The NOMADS Panel check box is selected by default. Leave this setting as is. Select the HTML Page check box to also create a Webster+ HTML page. | |||
|
|
5. |
Select or enter the data table from the Data Dictionary. The Table Name and Panel Title inputs are required before proceeding to the next step. For Table Name, enter salesreps or click the Lookup button (magnifying glass) and select Salesreps. The Panel Title defaults to Sales Representatives Maintenance (but can be changed). Leave this setting as is. | |||
|
|
6. |
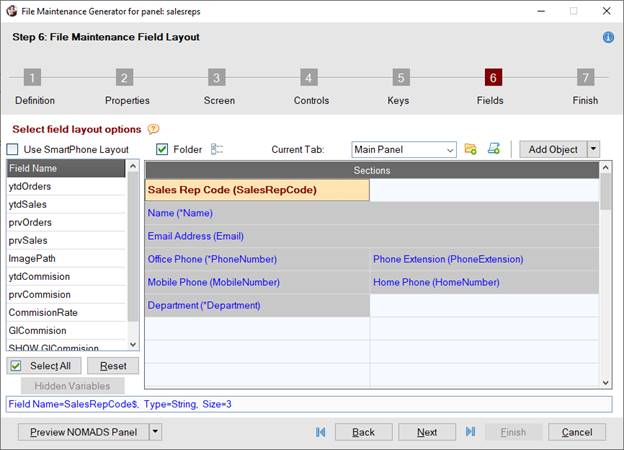
To define the field layout for the panel, proceed to Step 6: File Maintenance Field Layout by clicking the Next button five times or by clicking the number 6 button at the top. | |||
|
|
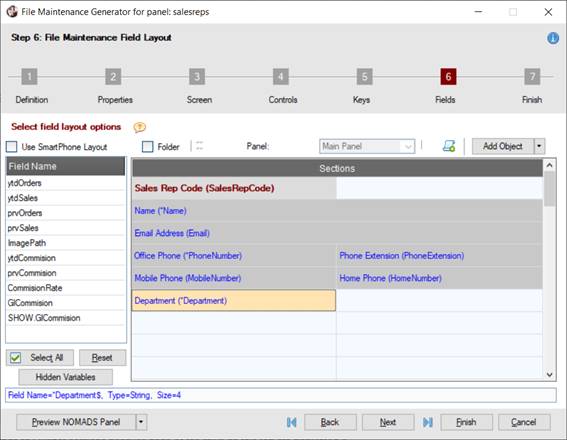
7. |
The Layout Grid for the Main Panel is displayed and defaults to Half sections. The cell at the top is prepopulated with the SalesRepCode field, which is the Key segment for the Salesreps file. When using the Enhanced layout, the title of the Layout Grid is Sections, and all the cells are initially the same Light Blue color. When using the Two-Column layout, the Layout Grid title and cell colors will be slightly different. | |||
|
|
8. |
The Field Name list box on the left lists all the fields in the Salesreps file. Field names that begin with * (asterisk) are fields flagged as Required in the Data Dictionary. Select *Name in the list box. The Info line below the Layout Grid shows information about this field from the Data Dictionary, including the Description, Type and Size. Drag and drop this field into the Layout Grid in the first column of row 2 (below SalesRepCode). The Info line displays information when a cell in the Layout Grid is selected. | |||
|
|
9. |
The Name field has a Size of 40 characters. To avoid a wide panel, this row should be changed from Half section to Full section. Right click on the Name cell and select Full Section from the popup menu. The cells on row 2 and all rows below it have changed to Full sections because none of the rows were populated. | |||
|
|
10. |
Select Email in the Field Name list box. Drag and drop this field into the row 3 (below Name). This field has a Size of 50 characters and therefore should also be in a Full section. | |||
|
|
11. |
Change row 4 from Full section to Half section. Right click on this row and select Half Section from the popup menu. The cells on row 4 and all rows below it have changed from Full sections to Half sections. | |||
|
|
12. |
Select *PhoneNumber in the Field Name list box. Drag and drop this field into the first column of row 4. | |||
|
|
13. |
Select PhoneExtension. Drag and drop this field into the second column of row 4. | |||
|
|
14. |
Select MobileNumber. Drag and drop this field into the first column of row 5. | |||
|
|
15. |
Select HomeNumber. Drag and drop this field into the second column of row 5. | |||
|
|
16. |
Select *Department. Drag and drop this field into the first column of row 6. In the Salesreps data file definition, the Department field is defined with a Drop Box type Data Class named Department. This will result in the input for the Department field being a Drop Box rather than a Multi-Line.
| |||
|
|
17. |
Add a Folder control to the Main Panel. Select the Folder check box above the Layout Grid. If desired, a Folder location can be specified by right clicking on any row on the Main Panel (except on a row containing a Key field) and selecting the Folder Location option from the popup menu. If no Folder Location is specified, the Folder control will be added to the bottom of the Main Panel automatically. See Adding a Folder. For this panel, the Folder control will be located at the bottom of the Main Panel; therefore, no Folder location will be specified. | |||
|
|
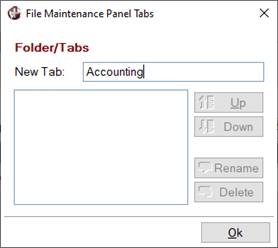
18. |
Define the first Folder tab. Click the Maintain Folder Tabs button (folder icon beside Current Tab drop box). The File Maintenance Panel Tabs dialog is displayed. | |||
|
|
19. |
Enter a name for the new tab. For New Tab, enter Accounting. | |||
|
|
20. |
Click OK to exit the File Maintenance Panel Tabs dialog. | |||
|
|
21. |
Above the Layout Grid, the Current Tab field displays the new tab name, Accounting. The Layout Grid for the new tab is empty and defaults to Half sections. | |||
|
|
22. |
Right click on the first column of row 1. Select Quarter Section from the popup menu. All cells change to Quarter sections because none of the rows on this tab were populated. | |||
|
|
23. |
Add the following fields to the Accounting tab: Select ytdOrders in the Field Name list box. Drag and drop this field into the first column of row 1.
In the Data Dictionary, all four fields are defined as Numeric with the Data Class named SalesAmt. The Data Class defines the format used to display these amounts. These fields are also defined as Read-Only fields. As a result, they should remain disabled when the file maintenance panel is processed. | |||
|
|
24. |
Add a second Folder tab by using a different method. Click inside the Current Tab drop box. The current value, Accounting, is highlighted. Enter Commissions as the name of the second tab. | |||
|
|
25. |
Above the Layout Grid, the Current Tab field displays the new tab name, Commissions. The Layout Grid for the new tab is empty and defaults to Half sections. | |||
|
|
26. |
Right click on the first column of row 1. On the popup menu, notice that the Third Section option is disabled. The reason is that a Half Section cannot be made directly into a Third Section. The Half Section must be changed to a Full Section first. Select the Full Section option from the popup menu. All cells are now changed to Full Sections. | |||
|
|
27. |
Right click to display the popup menu again and select Third Section. All cells are now changed to Third Sections. | |||
|
|
28. |
Add the following fields to the Commissions tab: | |||
|
|
29. |
The SHOW.GlCommission field in the Field Name list box is not an actual element defined in the Data Dictionary. It is shown in the list box with all of the other elements because the GLCommission field has a Data Class of glAcct, which has Extended Validation defined to show the GL Account Description from the Accounts data file. Select SHOW.GlCommission from the Field Name list box. Drag and drop this field into the second column of row 2.
As with the Two-Column layout, a variable, such as SHOW.GlCommission, can be dropped into the same cell as the Data Dictionary element it refers to. See Adding Extended Validation Descriptive Fields (SHOW.xxxxxx). When using the Enhanced layout with smaller cell sizes, this is usually not recommended since the width of the panel calculation will be affected by the very wide combined cell. Placing the SHOW.xxxxxx variable in the cell beside the related element will result in the controls being generated right beside each other (rather than in the next column). | |||
|
|
30. |
The remaining field, ImagePath, will not be moved into the Layout Grid. It is not a required field and does not need to be included. | |||
|
|
31. |
The layout for the salesreps panel is now completed.
| |||
|
|
32. |
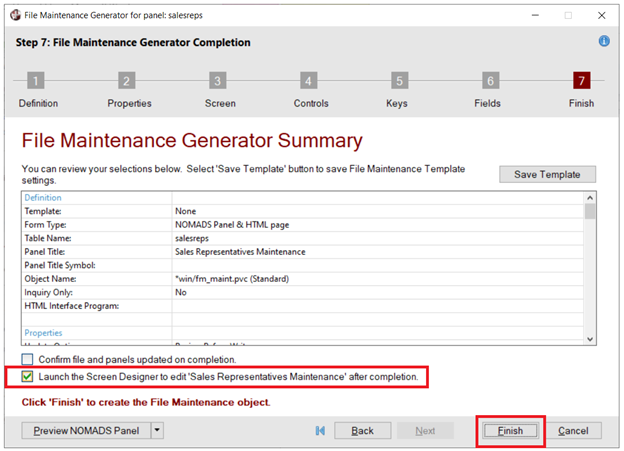
Click the Next button to proceed to Step 7: File Maintenance Generator Completion screen. Review your selections for previous steps and make any necessary changes. | |||
|
|
33. |
Select the Launch the Screen Designer to edit 'Sales Representatives Maintenance' after completion check box. | |||
|
|
34. |
Click the Finish button. | |||
|
|
35. |
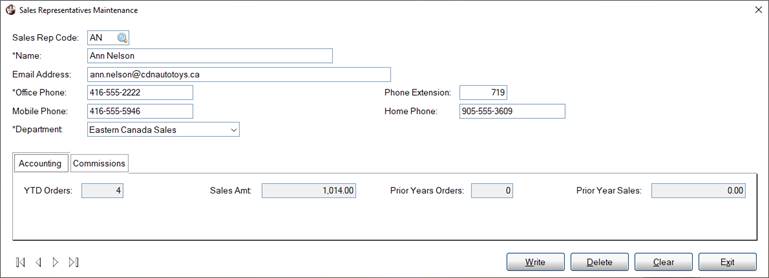
The NOMADS Designer is launched with the Main Panel displayed. Test the panel. | |||
|
|
36. |
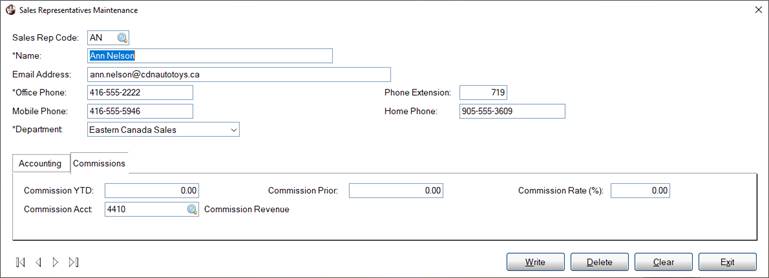
When tested, the generated NOMADS panel and Folder tabs look like this: Note:
| |||
|
|
|
|
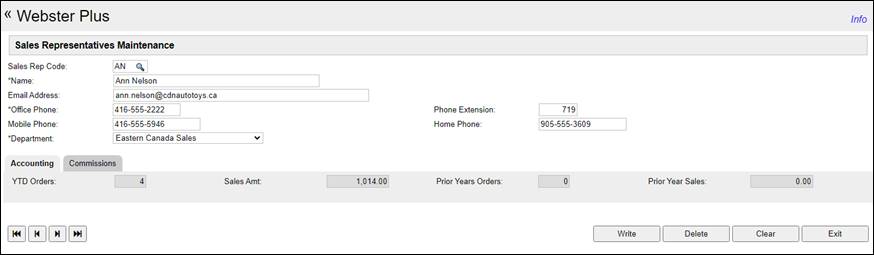
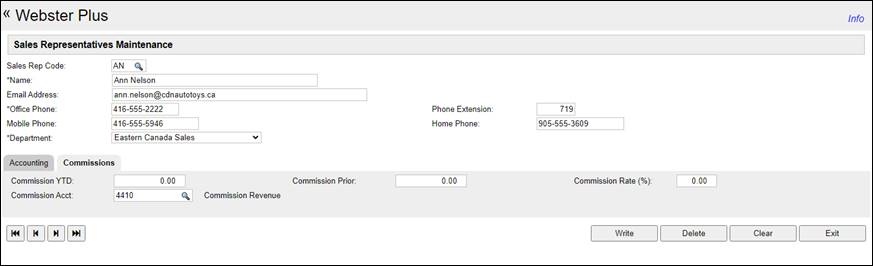
37.
The generated HTML page rendered in Webster+ looks like this:
|
|
|
|
File Maintenance Generator
Enhanced Layout
Data Dictionary Maintenance
Data Classes
Extended Class Validation and Display
Webster+