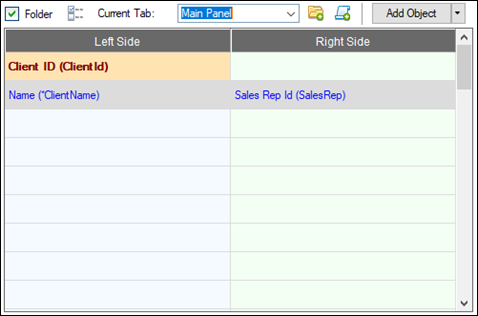
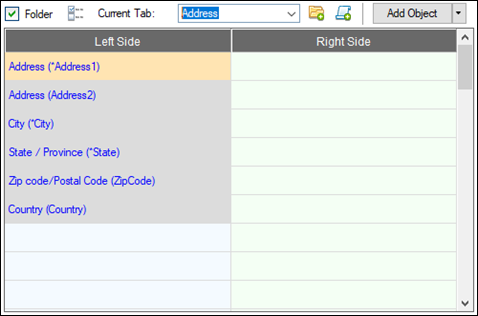
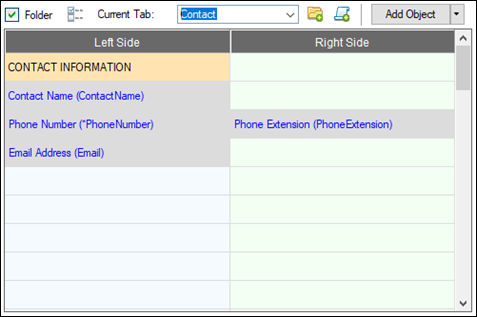
Two-Column Layout
|
Two-Column Layout Sample Panels | |
The sample panels below were generated using the
Two-Column Layout in the File Maintenance Generator; however, most settings will also apply to the
Enhanced Layout.
Beside each sample panel are the settings that generated these results. By adjusting these settings, the appearance of a generated panel can be easily modified.
Use these links to jump to a sample panel on this page:
|
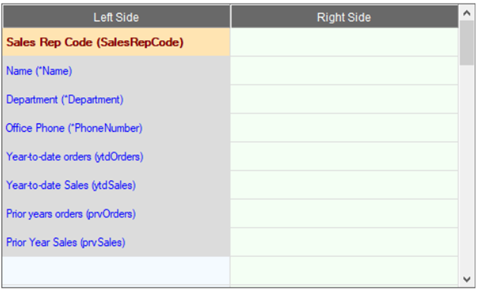
Panel |
Description |
|
Sample Panel 1 |
Standard Browse buttons (Bottom Left)
Standard Action buttons (Bottom Right) |
|
Sample Panel 2 |
Browse buttons - Embedded Panel (Right of Key)
Action buttons - Embedded Panel (Bottom Right) |
|
Sample Panel 3 |
Browse buttons - Embedded Toolbar
Action buttons - Embedded Toolbar
Required Fields with preceding * and explanation text |
|
Sample Panel 4 |
Two-Column Layout
Horizontal Lines added
Fonted Text added |
|
Sample Panel 5 |
Inquiry Only Panel |
|
Sample Panel 6 |
Multi-Tabbed Panels - Top Folder Tabs |
|
Sample Panel 7 |
Multi-Tabbed Panels - Left Sidebar Tabs |
|
Sample Panel 8 |
Combination of settings:
Title Bar added
Multi-Tabbed Panels (Left Sidebar Tabs)
Browse buttons - Embedded Panel (Right of Key)
Action buttons - Embedded Panel (Bottom Right)
Status Bar added
Right Prompt Alignment (no colon)
Required Fields with preceding * and explanation text
Vertical Spacing adjusted
Fonted Text added
Horizontal Lines added
Smart List Box added |
Standard Browse buttons (Bottom Left)
Standard Action buttons (Bottom Right)
Browse buttons - Embedded Panel (Right of Key)
Action buttons - Embedded Panel (Bottom Right)
Note:
Any embedded panels that are selected in the File Maintenance Generator to replace the standard browse and action buttons must name these controls as follows:
Browse Buttons: BUTTON_FIRST, BUTTON_PRIOR, BUTTON_NEXT, BUTTON_LAST
Action Buttons: BUTTON_WRITE, BUTTON_DEL, BUTTON_CLEAR, BUTTON_CANCEL
The Text property for these buttons can be set as desired.
See
File Maintenance and Object Inheritance.
|
 |
|
Step |
Settings |
|
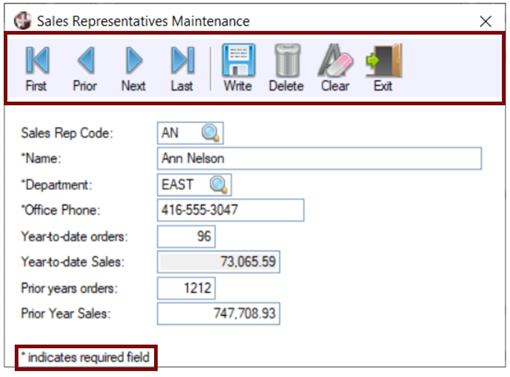
Step 1: Definition |
Table Name: Sales Rep
Panel Title: Sales Representatives Maintenance |
|
Step 3: Screen |
Location of browse buttons: Embedded Panel
Specify Library/Panel and set Position: to Right of Key
Location of action buttons: Embedded Panel
Specify Library/Panel and set Position: Bottom Right |
|
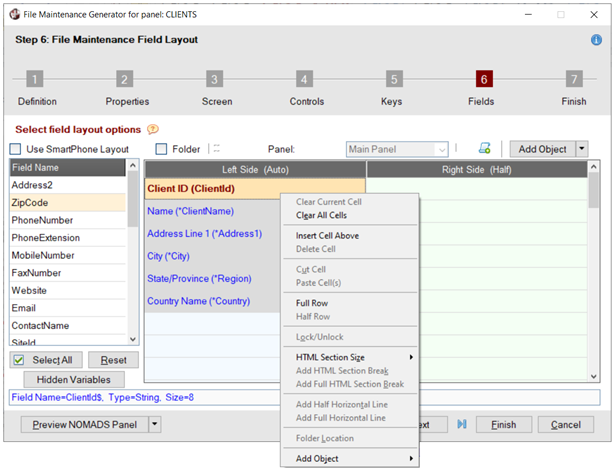
Step 6: Fields |
 | |
Browse buttons - Embedded Toolbar
Action buttons - Embedded Toolbar
Required Fields with preceding * and explanation text
|
 |
|
Step |
Settings |
|
Step 1: Definition |
Table Name: Sales Rep
Panel Title: Sales Representatives Maintenance |
|
Step 3: Screen |
Location of browse buttons: Embedded Toolbar
Location of action buttons: Embedded Toolbar |
|
Step 4: Controls |
Required Fields: Indicate with preceding * and include explanation text |
|
Step 6: Fields |
 | |
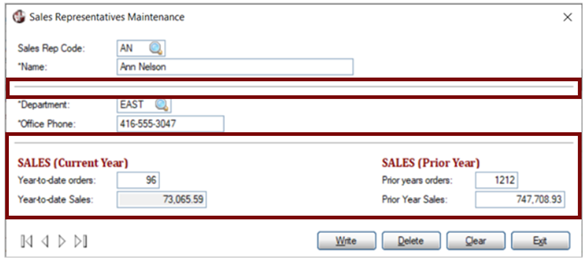
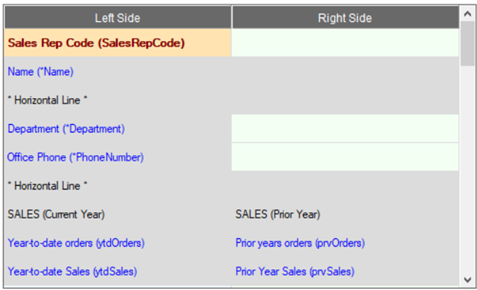
Two-Column Layout
Horizontal Lines added
Fonted Text added
|
 |
|
Step |
Settings |
|
Step 1: Definition |
Table Name: Sales Rep
Panel Title: Sales Representatives Maintenance |
|
Step 3: Screen |
Location of browse buttons: Bottom Left
Location of action buttons: Bottom Right |
|
Step 4: Controls |
Visual Class: Select Visual Class from drop box
Visual Class definition for
Fonted Text:
- Foreground Color = Dark Red
- Font = Cambria, Bold = On, Size = 14 points |
|
Step 6: Fields |
 | |
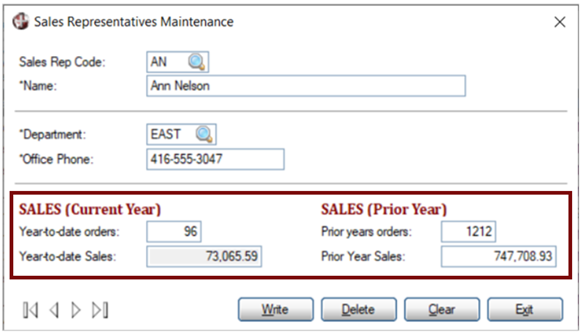
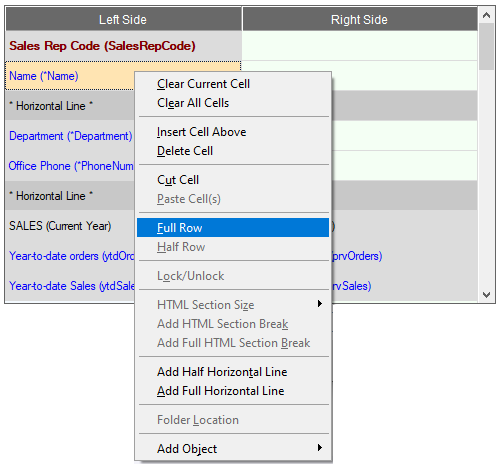
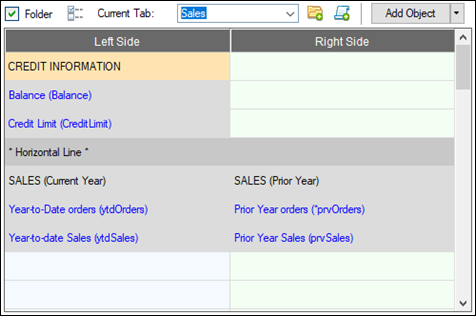
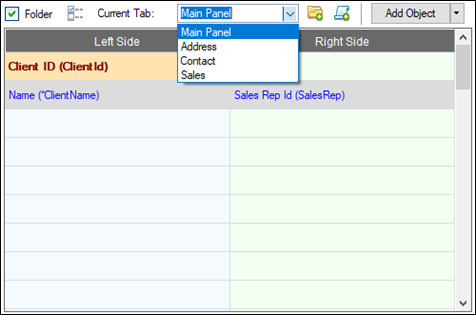
To reduce the gap between the two SALES columns, change the Name row from "Half Row" to "Full Row". This allows the Name field to extend across both columns rather than widen only the left side column.
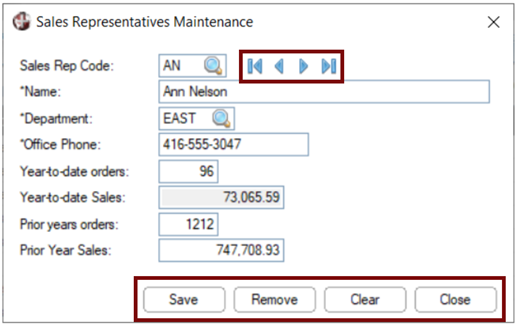
Inquiry Only Panel
|
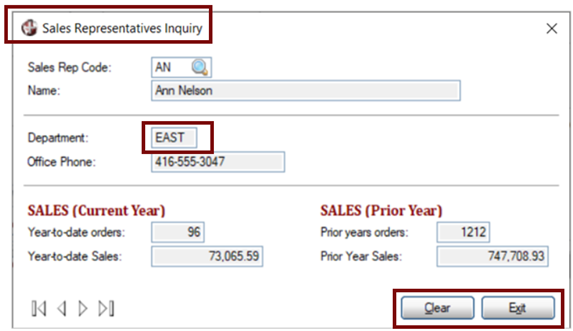
"Department" query button hidden
Clear/Exit buttons displayed |
|
Step |
Settings |
|
Step 1: Definition |
Table Name: Sales Rep
Panel Title: Sales Representatives Inquiry
Set Inquiry Only check box to On |
|
Step 3: Screen |
Location of browse buttons: Bottom Left
Location of action buttons: Bottom Right |
|
Step 4: Controls |
Required Fields: Automatically set to Do not indicate required fields and disabled
Visual Class: Select Visual Class from drop box
Visual Class definition for
Fonted Text:
- Foreground Color = Dark Red
- Font = Cambria, Bold = On, Size = 14 points |
|
Step 6: Fields |
 | |
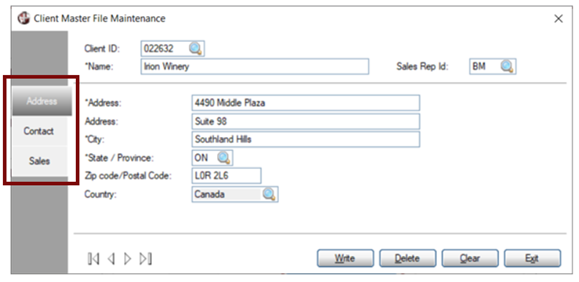
Multi-Tabbed Panels - Top Folder Tabs
|

Main Panel / Address Tab (Top Folder Tabs)
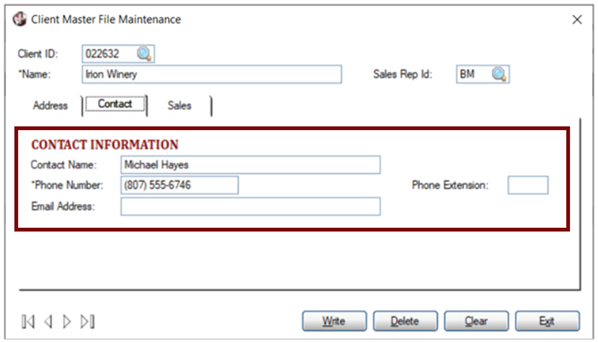
Contact Tab
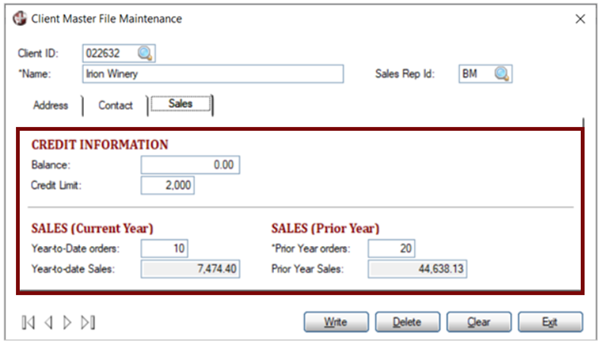
Sales Tab |
|
Step |
Settings |
|
Step 1: Definition |
Table Name: Client Master File
Panel Title: Client Master File Maintenance |
|
Step 3: Screen |
Location of browse buttons: Bottom Left
Location of action buttons: Bottom Right |
|
Step 4: Controls |
Visual Class: Select Visual Class from drop box
Visual Class definition for
Fonted Text:
- Foreground Color = Dark Red
- Font = Cambria, Bold = On, Size = 14 points |
|
Step 6: Fields |
Set
Folder check box to On
Select Folder Options button: In Folder Options window, set Tab Position to Top
Folder/Tabs (in addition to Main Panel): Define new tabs for Address, Contact, Sales


 | |
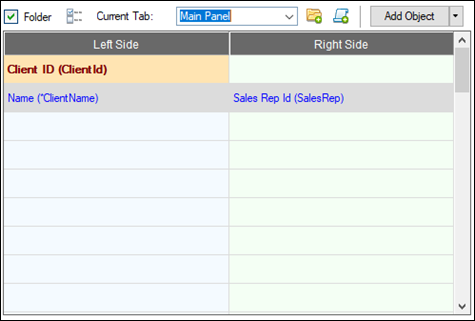
Multi-Tabbed Panels - Left Sidebar Tabs
|
Main Panel / Address Panel (Left Sidebar Tabs) |
|
Step |
Settings |
|
Step 1: Definition |
Table Name: Client Master File
Panel Title: Client Master File Maintenance |
|
Step 3: Screen |
Location of browse buttons: Bottom Left
Location of action buttons: Bottom Right |
|
Step 6: Fields |
Set
Folder check box to On
Select Folder Options button: In Folder Options window, set Tab Position to Left Sidebar
Folder/Tabs (in addition to Main Panel): Define new tabs for Address, Contact, Sales
 | |
Combination of settings:
Title Bar added
Multi-Tabbed Panels (Left Sidebar Tabs)
Browse buttons - Embedded Panel (Right of Key)
Action buttons - Embedded Panel (Bottom Right)
Status Bar added
Right Prompt Alignment (no colon)
Required Fields with preceding * and explanation text
Vertical Spacing adjusted
Fonted Text added
Horizontal Line added
Smart List Box added
Note:
Any embedded panels that are selected in the File Maintenance Generator to replace the standard browse and action buttons must name these controls as follows:
Browse Buttons: BUTTON_FIRST, BUTTON_PRIOR, BUTTON_NEXT, BUTTON_LAST
Action Buttons: BUTTON_WRITE, BUTTON_DEL, BUTTON_CLEAR, BUTTON_CANCEL
The Text property for these buttons can be set as desired.
See
File Maintenance and Object Inheritance.
|
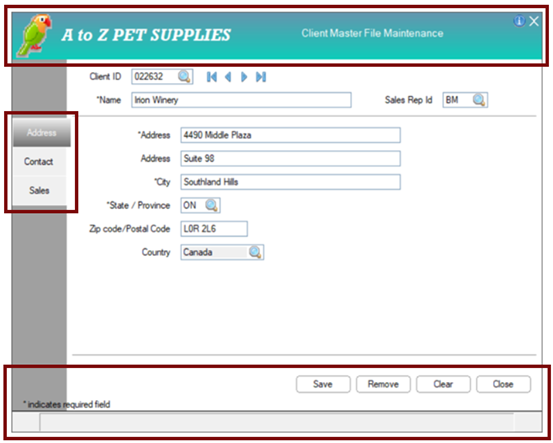
Main Panel / Address Tab (Left Sidebar Tabs)

Contact Tab
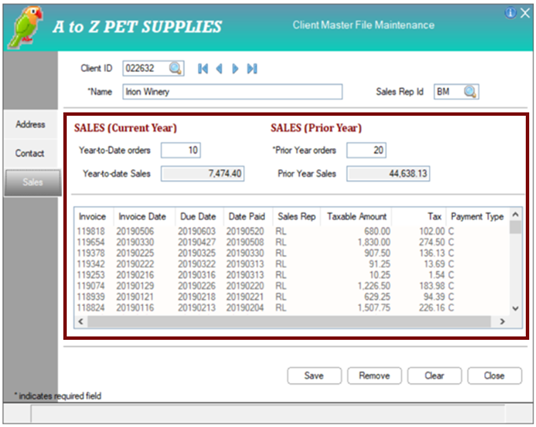
Sales Tab |
|
Step |
Settings |
|
Step 1: Definition |
Table Name: Client Master File
Panel Title: Client Master File Maintenance |
|
Step 3: Screen |
Select Screen Options button: In Screen Options window, set TitleBar Option to TitleBar.
Specify Library/Panel to use. Set Status Bar check box to On.
Location of browse buttons: Embedded Panel
Specify Library/Panel and set Position: to Right of Key
Location of action buttons: Embedded Panel
Specify Library/Panel and set Position: Bottom Right |
|
Step 4: Controls |
Prompt Alignment: Right
Set Append Colon on Prompt check box to Off
Required Fields: Indicate with preceding * and include explanation text
Vertical Spacing: 1.00
Visual Class: Select Visual Class from drop box
Visual Class definition for
Fonted Text:
- Foreground Color = Dark Red
- Font = Cambria, Bold = On, Size = 14 points
Vertical Spacing (horizontal line option): 0.75 |
|
Step 6: Fields |
Set
Folder check box to On
Select Folder Options button: In Folder Options window, set Tab Position to Left Sidebar
Folder/Tabs (in addition to Main Panel): Define new tabs for Address, Contact, Sales
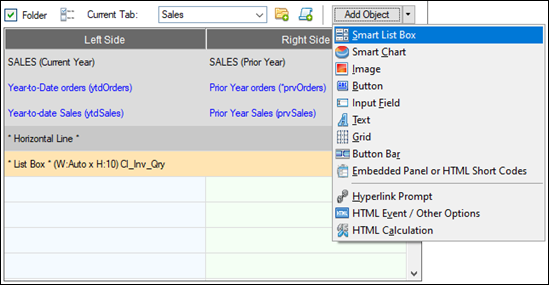
Sales tab:
Select Add Object button: Select
Smart List Box
 | |
See Also
Enhanced Layout Sample Panels
Webster+