|
|
2. |
Locate the Smart Load button:
For List Boxes, Drop Boxes, Grids and Multi-Lines, the Smart Load button is located on the Attributes tab (using the Folder Style version of the NOMADS designer).
For Charts, the Smart Load button is located in the upper right corner of the main panel. |
|
|
3. |
Click the Smart Load button:
When defining Smart List Boxes, Drop Boxes, Grids and Multi-Lines, the Smart Control Definition window is displayed.
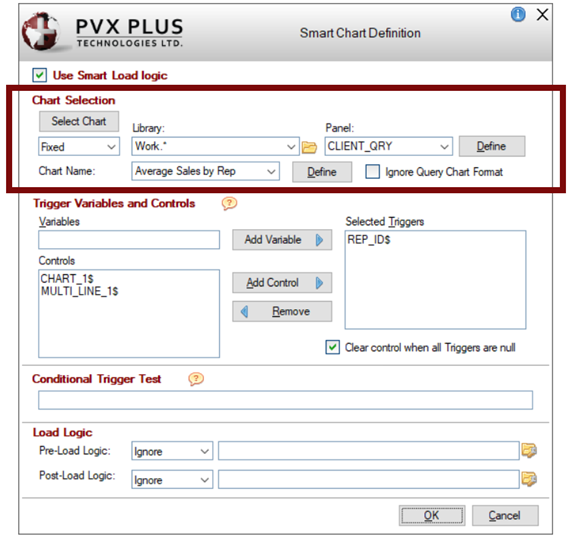
When defining Smart Charts, the Smart Chart Definition window is displayed, which includes additional
Chart Selection options.
 Note:
Smart Charts are available only if
Query+ queries are being used, as
Classic queries do not support charting. |
|
|
4. |
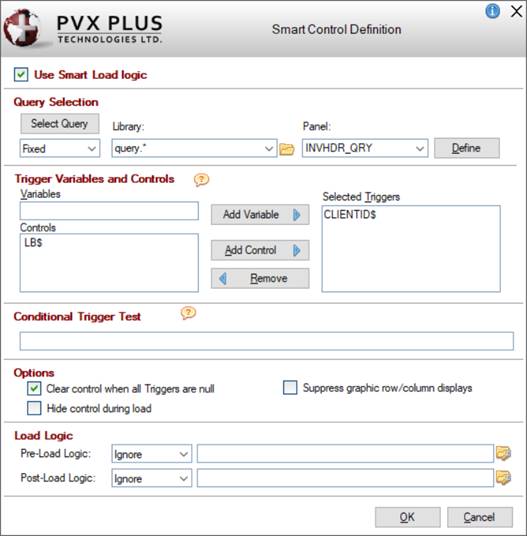
The Smart Control Definition window consists of the following options:
|
Use Smart Load logic |
Select this check box to enable Smart Load logic for the control. (By default, it is not selected.) |
|
Query Selection |
(For List Boxes, Drop Boxes, Grids and Multi-Lines - Available when Use Smart Load logic check box is selected)
The query assigned to a Smart Control must be a Query List or a Standard Query definition.
If a query has already been assigned on the Query tab of the Properties dialogue, it will be loaded as the Query Selection in the Smart Control Definition. (See Important Note.) Alternately, when a query is selected in the Smart Control Definition, it is reflected on the Query tab of the Properties dialogue. The query can be assigned in either location. Important Note:
If a query has been assigned on the Query tab of the Properties dialogue, it must be a Panel Query Type. If it is an alternate Query Type (Query Program, Non-Query Logic, Spinner Controls, Calendar), clicking the Smart Load button will display a message, prompting you to clear the current query associated with the Smart Load before continuing.
|
Select Query |
Button that invokes the Select a Query Definition window.
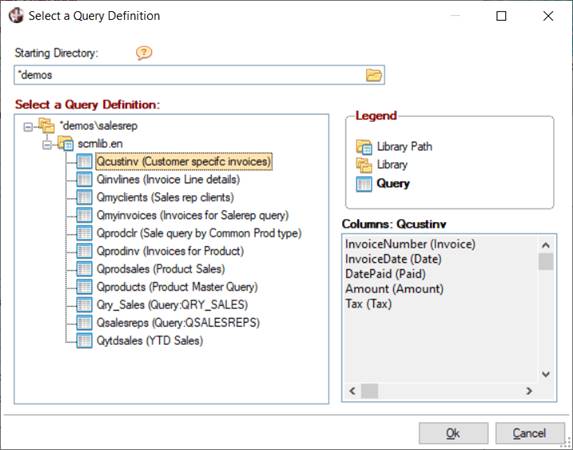
This window presents a tree-view structure that lists Query Lists and Queries that exist at the current display level and lower, arranged by directory, screen library and query.
Select a Query by clicking on the Query item or one of its columns. When a Query List or Query is selected, the Library and Query Definition input fields (described below) are automatically populated.
A Query definition can also be selected by entering the Library and Query Definition input fields manually, as described below.
(The Select Query button was added in PxPlus 2020.) |
|
Library |
Enter the path to the library containing the query definition. Click the drop-down arrow to invoke a list of recently used libraries. The Browse button allows you to browse the directory to locate the library. Be sure to use the simplest form of the path for your application. Note:
The Library name may be a specific or generic reference. See Cascading Language Suffixes. |
|
Panel |
Name of the query definition to invoke. Click the drop-down arrow for a list of all query panels in the selected library. If the query has not yet been defined, enter a new name and then click the Define button to create it. Note:
When entering a new name, valid characters are: letters (A-Z, a-z); numbers (0-9); ~ (tilde); @ (at symbol); . (period); $ (dollar sign); _ (underscore); - (dash); + (plus sign). If an invalid character is used, a message will display. |
|
Define |
Button that launches a query definition window using the Panel name to either create a new or edit an existing query definition. If creating a new query definition, it will default to a Query List type of definition. | |
|
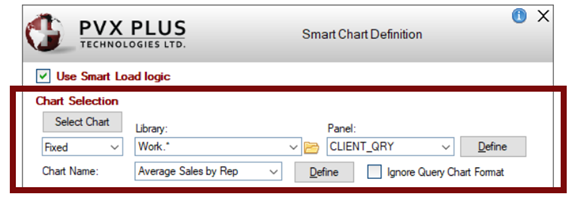
Chart Selection |
(For Charts Only - Available when Use Smart Load logic check box is selected)
|
Select Chart |
Button that invokes the Select a Chart Definition window.
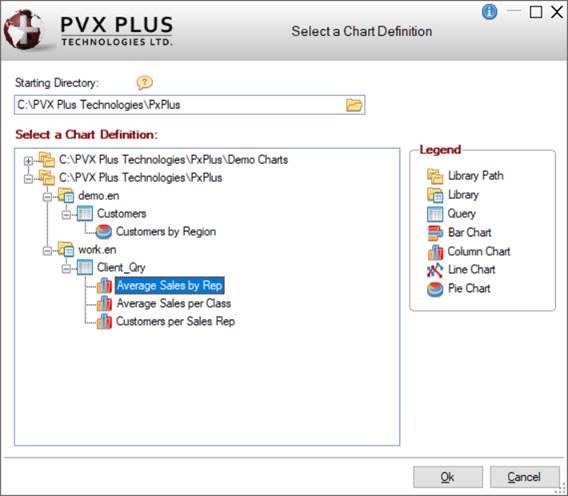
This window presents a tree-view structure that lists all the public query AutoChart definitions that exist at the current display level and lower, arranged by directory, screen library, query and chart definition.
When a chart definition is selected, the Library, Panel and Chart Name input fields in the Smart Chart Definition window are automatically populated.
A chart can also be selected by entering the Library, Panel and Chart Name input fields manually. |
|
Library |
Enter the path to the library containing the chart definition. Click the drop-down arrow to invoke a list of recently used libraries. The Browse button allows you to browse the directory to locate the library. Be sure to use the simplest form of the path for your application. Note:
The Library name may be a specific or generic reference. See Cascading Language Suffixes. |
|
Panel |
Name of the query definition to invoke. Click the drop-down arrow for a list of all query panels in the selected library. If the query has not yet been defined, enter a new name and then click the Define button to create it. Note:
When entering a new name, valid characters are: letters (A-Z, a-z); numbers (0-9); ~ (tilde); @ (at symbol); . (period); $ (dollar sign); _ (underscore); - (dash); + (plus sign). If an invalid character is used, a message will display. |
|
Define |
Button (next to Panel input field) that launches a query definition window using the Panel name to either create a new or edit an existing query definition. If creating a new query definition, it will default to a Query List type of definition. |
|
Chart Name |
Name of the Query+ AutoChart definition to be used to load the chart. Click the drop-down arrow for a list of all public chart definitions that belong to the selected query. The name of a chart definition can also be entered manually. |
|
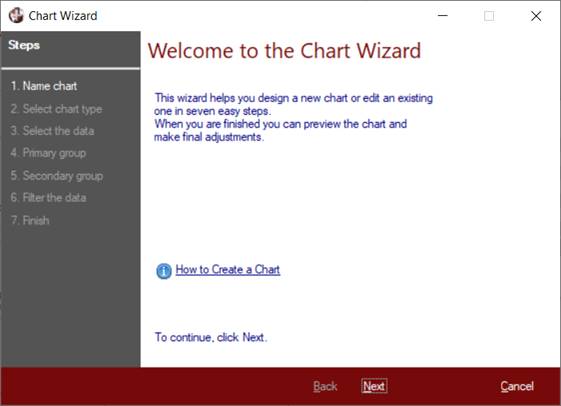
Define |
Button (next to Chart Name input field) that launches the
Chart Wizard based on the selected query panel to either create a new or edit an existing chart definition. See Run-Time Query
Charts. |
|
Ignore Query chart format |
By default, the chart format and titles are derived from the Query+ AutoChart definition.
Select the Ignore Query chart format check box to use the format and titles from the chart control definition. |
(Chart Selection was added in PxPlus 2019.) |
|
Trigger Variables and Controls |
Trigger variables serve two purposes:
|
1. |
They initiate the Load logic. If trigger variables are used, any change in the value of a trigger variable will cause the Smart Control to be reloaded after the trigger control's On Change logic has been executed (provided that the conditional trigger test is satisfied as well). If no trigger variables are defined, the Smart-enabled control will be loaded whenever a panel is drawn. When there is more than one folder on a main panel, the control is reloaded each time you switch to a folder with a Smart Control. |
|
2. |
The trigger variables are made available to the special Smart Control Load logic. This means that you can use these variables in the Query Selection Definition of the associated query object to filter the records to be displayed.
The trigger variables are also available in an identical set of variables with a _VAR. prefix, which allows you to build selection tests that compare external variables with the _VAR. prefix to variables in the Query definition with the same name, e.g. _VAR.GLAcct$=GLAcct$.
(The use of _VAR. aliases for variables passed to the *winlist logic was added in PxPlus 2021.) |
The following options are available when a query is assigned for the
Query Selection:
|
Variables |
Enter the name of a variable from your PxPlus application. Click the Add Variable button to add the variable to the Selected Triggers list. |
|
Controls |
Lists all available controls in the current panel. Click the Add Control button to move a selected control to the Selected Triggers list. |
|
Selected Triggers |
Lists variables and controls currently selected to be used in the trigger criteria. To remove a selected item from this list, click the Remove button. | |
|
Conditional Trigger Test |
(Not Applicable for Smart Multi-Lines)
Additional test to be imposed on load-triggering criteria. If defined, the Conditional Trigger Test must be satisfied for the Load logic to be triggered. |
|
Text to Display if Read Fails |
(For Smart Multi-Lines Only - Available when Query Selection is entered)
Text to load into the Multi-Line when the query fails to retrieve data. Can be a Fixed value, string Expression or Message Library entry (see
Message Library Maintenance). If left blank, spaces will be loaded. |
|
Options |
|
Clear control when all Triggers are null |
If this check box is selected, the Smart control being defined will be cleared whenever all the variables/controls in the Selected Triggers list are null.
(The Clear control when all Triggers are null check box was added in PxPlus 2021.) |
|
Hide control during load |
(Not Applicable for Smart Multi-Lines)
If this check box is selected, the control is hidden while it is being loaded. Loading is faster and cleaner in appearance, especially when displaying grids with graphical row/column displays.
(The Hide control during load check box was added in PxPlus 2021 Update 1.) |
|
Suppress graphic row/column displays |
(For Report View List Boxes and Grids Only)
If the query assigned to the Smart control uses Row Highlight or Column Display options such as bold text, foreground and background colors, images or percent bars, the graphic displays can be suppressed by selecting this check box.
Default is On for Grids and Off for Report View List Boxes.
(The Suppress graphic row/column displays check box was added in PxPlus 2021 Update 1.) | |
|
Load Logic |
|
Pre-Load Logic |
Optional logic to be processed prior to loading. Available processes are Ignore, Perform, Call, Execute. See
Events Logic. |
|
Post-Load Logic |
Optional logic to be processed after loading. Available processes are Ignore, Perform, Call, Execute. See
Events Logic. | | |